Page 38 of 434

37 Getting started
Adjusting
Steering wheel Steering wheel adjustment
The stalk for steering wheel adjustment is
located on the lower left of the steering
column.
1Adjusting steering column, in or out
2Adjusting steering column, up or down
�
Switch on ignition
or
�
Open the driver’s door.Adjusting steering column in or out
�
Move stalk forward or back in the direc-
tion of arrow1 until a comfortable
steering wheel position is reached with
your arms slightly bent at the elbow.
Adjusting steering column up or down
�
Move stalk up or down in the direction
of arrow2.
Make sure your legs can move freely
and that you have a good view on all
the displays (including malfunction and
indicator lamps) on the instrument
cluster.
For more information, see “Heated steer-
ing wheel* (SL 500, SL 600)”
(
�page 220).
Warning!
G
Do not adjust the steering wheel while driv-
ing. Adjusting the steering wheel while driv-
ing could cause the driver to lose control of
the vehicle.
When leaving the vehicle, always remove the
SmartKey from the starter switch, take the
SmartKey with KEYLESS-GO
* with you and
lock your vehicle.
Even with the SmartKey removed from the
starter switch or the SmartKey with
KEYLESS-GO* removed from the vehicle,
the steering wheel adjustment feature can
be operated when the driver’s door is open.
Therefore, do not leave children unattended
in the vehicle, or with access to an unlocked
vehicle. Unsupervised use of vehicle equip-
ment may cause an accident and/or serious
personal injury.
iThe memory function (
�page 114) lets
you store the setting for the steering
wheel together with the settings for the
seat position and the rear view mirrors.
Page 54 of 434
53 Getting started
Parking and locking
Turning off the engine�
Place the gear selector lever in
positionP.
Turning off with the SmartKey
�
Turn the SmartKey in the starter switch
(�page 31) to position0 and remove
it.
�
Press the seat belt release button
(�page 40).
Allow the retractor to completely re-
wind the seat belt by guiding the latch
plate.
�
After exiting the vehicle, press the lock
button ‹ on the SmartKey
(�page 30).
All turn signal lamps flash three times.
The locking knobs on the doors move
down.
iAlways set the parking brake in addi-
tion to shifting to positionP.
On steep slopes, turn the front wheels
towards the road curb. iThe immobilizer is activated.iThe SmartKey can only be removed
from the starter switch with the gear
selector lever in positionP.
iWith the SmartKey removed and the
driver’s door open, a warning sounds if
the vehicle’s exterior lamps are not
switched off.iOpening a door causes the windows on
that side of the car to open slightly.
They will return to the up position when
the door is closed.
Warning!
G
To prevent possible personal injury, always
keep hands and fingers away from the door
openings when closing the doors. Be espe-
cially careful when small children are
around.
Before closing doors, make sure that there
is no possibility of someone getting caught
in a door during closing.
Page 55 of 434
54 Getting startedParking and lockingFor more information, see “Locking and
unlocking” (
�page 90).Turning off with KEYLESS-GO*
�
Place the gear selector lever inP.
�
Press the KEYLESS-GO start/stop but-
ton to shut off the engine.
With the driver's door closed, the start-
er switch is now in position1. With the
driver's door opened, the starter switch
is set to position0, same as SmartKey
removed from starter switch
(�page 31).
�
Press the seat belt release button
(�page 40).
Allow the retractor to completely re-
wind the seat belt by guiding the latch
plate.
Warning!
G
When leaving the vehicle, always remove the
SmartKey from the starter switch, take the
SmartKey with KEYLESS-GO* with you and
lock the vehicle. Do not leave children unat-
tended in the vehicle, or with access to an
unlocked vehicle. Unsupervised use of vehi-
cle equipment may cause an accident
and/or serious personal injury.
iIf you hear a warning signal you have
either�
forgotten to turn off the lights be-
fore opening the driver’s door
or
�
tried to turn off the engine while the
gear selector lever is not inP
Turn off the lights or place the gear se-
lector lever inP.
iOpening a door causes the windows on
that side of the car to open slightly.
They will return to the up position when
the door is closed.
Page 70 of 434

69 Safety and Security
Occupant safety
Roll barThe roll bar raises automatically in an acci-
dent or in a critical driving situation. You
can also raise and lower the roll bar manu-
ally using the buttons provided.
The buttons for the roll bar are on the cen-
ter console under the roof switch.
1Lower roll bar
2Raise roll bar
The roll bar can be moved manually when
the ignition is switched on.Raising the roll bar
�
Lift the switch for the retractable hard-
top.
�
Press and hold button2 until the roll
bar is raised.
Warning!
G
This vehicle is a two occupant vehicle. The
rear storage area is not intended for use by
occupants and is not equipped for properly
seating or restraining occupants. Thus this
area should never be used by any persons.
Before operating the roll bar switch make
sure that the roll bar’s path is clear and no
persons are injured by the moving roll bar
due to inattention. Raising or lowering of the
roll bar could injure someone inadvertently
occupying the rear storage area.
For your own safety, we recommend to drive
with the roll bar raised if the outside temper-
ature is below +5°F (-15°C).!If the outside temperature falls below
+5°F (-15°C), the roll bar must be
raised manually using the buttons pro-
vided to avoid damaging the hydraulics.
iWhen the roll bar is raised automatical-
ly, you will hear a ratcheting sound.
Warning!
G
If the roll bar warning light
in the ta-
chometer remains lit after starting the en-
gine, there is a malfunction. In the display
you see the message
Raise the
roll-over bar
.
For safety reasons, drive only with the roll
bar upright until the malfunction is repaired.
Have your vehicle checked at an authorized
Mercedes-Benz Center.
Page 74 of 434
73 Safety and Security
Occupant safety
Warning!
G
The BabySmart
TM airbag deactivation sys-
tem will ONLY work with a special child seat
designed to operate with it. It will not work
with child seats which are not BabySmart
TM
compatible.
Never place anything between seat cushion
and child seat (e.g. pillow), since it reduces
the effectiveness of the deactivation sys-
tem. The bottom of the child seat must
make full contact with the passenger seat
cushion. An incorrectly mounted child seat
could cause injuries to the child in case of an
accident, instead of protecting the child.
Follow the manufacturer’s instructions for
installation of special child seats.
Warning!
G
When using a BabySmart
TM compatible
child seat on the front passenger seat, the
passenger front airbag will not deploy only if
the
7
indicator lamp remains illuminat-
ed.
Please be sure to check the indicator every
time you use the special system child seat.
Should the light go out while the restraint is
installed, please check installation. If the
light remains out, do not use the
BabySmartTM restraint to transport children
on the passenger seat until the system has
been repaired.
Warning!
G
Do not place powered-on laptops, cell
phones and like electronic devices on the
passenger seat. Signals from such devices
may interfere with the BabySmart
TM system.
Such signal interference may cause the
7
indicator lamp not to come on during
self-test or be continuously lit, indicating
that the system is not functioning.
Page 77 of 434
76 Safety and SecurityDriving safety systemsABS
The Antilock Brake System (ABS) regulates
the brake pressure so that the wheels do
not lock during braking. This allows you to
maintain the ability to steer your vehicle.
The ABS is functional above a speed of ap-
proximately 5 mph (8 km/h) independent
of road surface conditions.
On slippery road surfaces, the ABS will re-
spond even to light brake pressure. The - indicator lamp in the instrument
cluster comes on when you turn the
SmartKey in the starter switch to
position2 or press the KEYLESS-GO*
start/stop button twice. It goes out when
the engine is running.
Braking
If the ABS activates during braking, the
ABS/ESP warning lamp v in the instru-
ment cluster dial flashes. Because of the
SBC brake system, you will not feel any
pulsation in the brake pedal.
�
Keep firm and steady pressure on the
brake pedal.
Continuous, steady brake pedal pressure
yields the advantages provided by the ABS,
namely braking power and the ability to
steer the vehicle.The ABS/ESP warning lamp v flashes
whenever the ABS is activated which can
be an indication of hazardous road condi-
tions and functions as a reminder to take
extra care while driving.
Emergency brake maneuver
�
Keep continuous, full pressure on the
brake pedal.
Warning!
G
Do not pump the brake pedal. Use firm,
steady brake pedal pressure instead. Pump-
ing the brake pedal defeats the purpose of
the ABS and significantly reduces braking
effectiveness.
Page 90 of 434
89 Controls in detail
Locking and unlocking
Seats
Memory function
Lighting
Instrument cluster
Control system
Automatic transmission
Good visibility
Automatic climate control
Power windows
Retractable hardtop
Driving systems
Useful features
Page 100 of 434
99 Controls in detail
Locking and unlocking
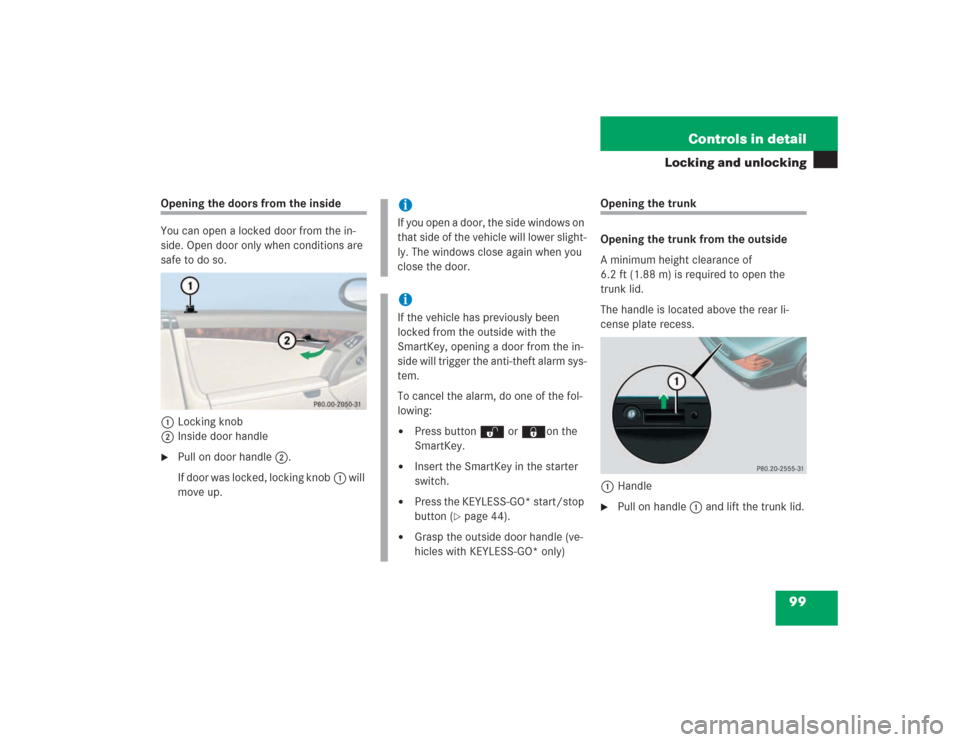
Opening the doors from the inside
You can open a locked door from the in-
side. Open door only when conditions are
safe to do so.
1Locking knob
2Inside door handle�
Pull on door handle2.
If door was locked, locking knob1 will
move up.
Opening the trunk
Opening the trunk from the outside
A minimum height clearance of
6.2 ft (1.88 m) is required to open the
trunk lid.
The handle is located above the rear li-
cense plate recess.
1Handle �
Pull on handle 1 and lift the trunk lid.
iIf you open a door, the side windows on
that side of the vehicle will lower slight-
ly. The windows close again when you
close the door.iIf the vehicle has previously been
locked from the outside with the
SmartKey, opening a door from the in-
side will trigger the anti-theft alarm sys-
tem.
To cancel the alarm, do one of the fol-
lowing:�
Press button Œ or ‹on the
SmartKey.
�
Insert the SmartKey in the starter
switch.
�
Press the KEYLESS-GO* start/stop
button (
�page 44).
�
Grasp the outside door handle (ve-
hicles with KEYLESS-GO* only)