Page 4 of 434

Contents
Introduction.......................................... 9
Product information ................................ 9
Operator’s Manual ............................... 10
Service and warranty information .. 10
Important notice for California
retail buyers and lessees of
Mercedes-Benz automobiles .......... 11
Maintenance .................................. 12
Roadside Assistance ...................... 12
Change of address or ownership.... 12
Operating your vehicle outside
the USA or Canada......................... 13
Where to find it .................................... 14
Symbols ............................................... 15
Operating safety .................................. 16
Proper use of the vehicle ............... 16
Problems with your vehicle.................. 17
Reporting safety defects...................... 18
Reporting safety defects ................ 18
At a glance.......................................... 19
Cockpit ................................................. 20
Instrument cluster ................................ 22
Multifunction steering wheel ................ 24
Center console ..................................... 25
Upper part ...................................... 25
Lower part ...................................... 26
Overhead control panel ........................ 27
Door control panel................................ 28
Getting started................................... 29
Unlocking ............................................. 30
Unlocking with the SmartKey......... 30
Unlocking with KEYLESS-GO*......... 32
Adjusting .............................................. 34
Seats .............................................. 34
Steering wheel ................................ 37
Mirrors ............................................ 38
Driving .................................................. 40
Fastening the seat belts ................. 40
Starting the engine......................... 43
Switching on headlamps ................. 46
Turn signals and high beam ............ 47
Windshield wipers........................... 47
Problems while driving .................... 49
Parking and locking .............................. 51
Parking brake ................................. 52
Switching off headlamps................. 52
Turning off the engine..................... 53
Emergency engine shut-down ......... 55
Page 20 of 434
19 At a glance
Cockpit
Instrument cluster
Multifunction steering wheel
Center console
Overhead control panel
Door control panel
Page 22 of 434
21 At a glance
Cockpit
Item
Page
1
Parking brake pedal
45
2
Hood lock release
253
3
Parking brake release
52
4
Door control panel
28
5
Exterior lamp switch
46,
117
6
Headlamp washer button
168
7
Combination switch�
Turn signals
�
Windshield wipers
�
High beam
47
47
120
Item
Page
8
Cruise control switch�
Cruise control
�
Distronic*
193
196
9
Instrument cluster
22,
124
a
Multifunction steering
wheel
24,
128
b
Lever for voice control
system*, see separate
operating instructions
c
Front Parktronic* warn-
ing indicator
210
d
Digital clock
140
e
Overhead control panel
27
Item
Page
f
Interior storage compart-
ments (locking/unlock-
ing)
216
g
7 indicator lamp
72
h
Glove box
214
j
Center console
25, 26
k
Starter switch
33
l
Horn
m
Steering wheel adjust-
ment lever
Heated steering wheel*
37
220
Page 26 of 434
25 At a glance
Center console
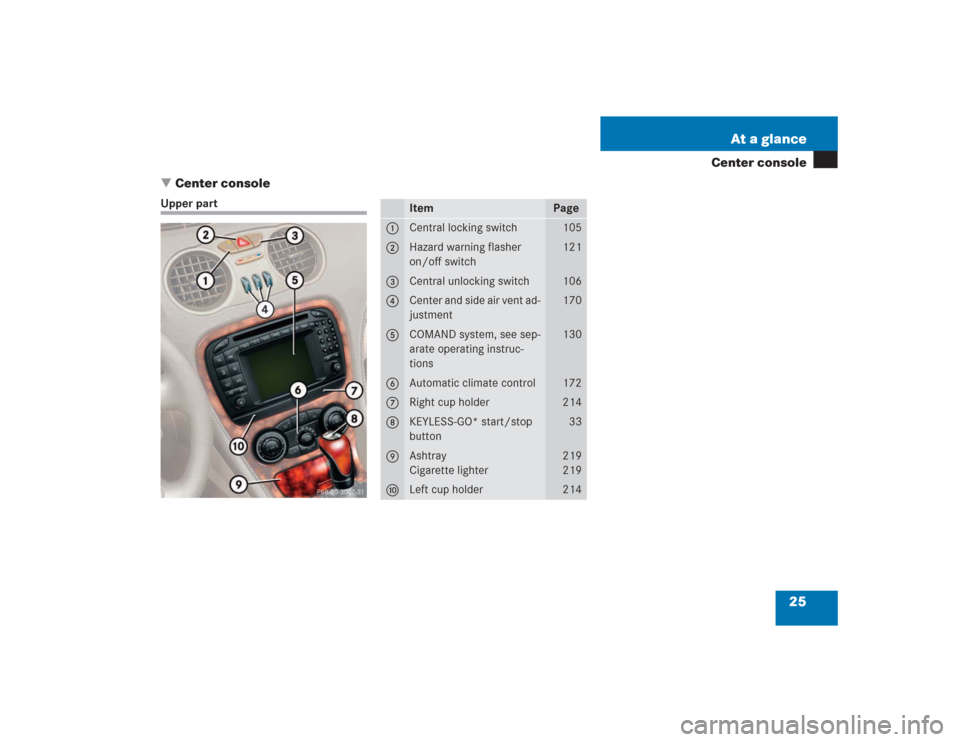
�Center console
Upper part
Item
Page
1
Central locking switch
105
2
Hazard warning flasher
on/off switch
121
3
Central unlocking switch
106
4
Center and side air vent ad-
justment
170
5
COMAND system, see sep-
arate operating instruc-
tions
130
6
Automatic climate control
172
7
Right cup holder
214
8
KEYLESS-GO* start/stop
button
33
9
Ashtray
Cigarette lighter
219
219
a
Left cup holder
214
Page 27 of 434
26 At a glanceCenter consoleLower part
Item
Page
1
Parking assist (Parktronic
system)* deactivation
switch
210
2
Active Body Control (ABC)
switch
207
3
Tow-away alarm switch
86
4
Hardtop open/close con-
trol with buttons for roll bar
184
69
5
Exterior rear view mirror
adjustment
38
Item
Page
6
Vehicle level control switch
208
7
ESP control switch
79
8
Thumbwheel for setting
distance for Distronic*
203
9
Distance warning func-
tion* on/off switch
203
a
Program mode selector for
automatic transmission
163
b
Gear selector lever for
automatic transmission
158
Page 39 of 434

38 Getting startedAdjustingMirrors
Adjust the interior and exterior rear view
mirrors before driving so that you have a
good view of the road and traffic condi-
tions.
Interior rear view mirror�
Manually adjust the interior rear view
mirror.
For more information, see “Rear view mir-
rors” (
�page 166).Exterior rear view mirrorThe buttons are located on the lower part
of the center console.
1Driver’s side exterior rear view mirror
button
2Passenger-side exterior rear view mir-
ror button
3Adjustment button
Warning!
G
In the case of an accident, liquid electrolyte
may escape the mirror housing if the mirror
glass breaks.
Electrolyte has an irritating effect. Do not al-
low the liquid to come into contact with
eyes, skin, clothing, or respiratory system.
In case it does, immediately flush affected
area with water, and seek medical help if
necessary.
Warning!
G
Exercise care when using the passenger
side exterior rear view mirror. The mirror
surface is convex (outwardly curved surface
for a wider field of view). Objects in mirror
are closer than they appear. Check your in-
terior rear view mirror or glance over your
shoulder before changing lanes.!Electrolyte drops coming into contact
with the vehicle paint finish can only be
completely removed while in their liq-
uid state and by applying plenty of wa-
ter.
Page 70 of 434

69 Safety and Security
Occupant safety
Roll barThe roll bar raises automatically in an acci-
dent or in a critical driving situation. You
can also raise and lower the roll bar manu-
ally using the buttons provided.
The buttons for the roll bar are on the cen-
ter console under the roof switch.
1Lower roll bar
2Raise roll bar
The roll bar can be moved manually when
the ignition is switched on.Raising the roll bar
�
Lift the switch for the retractable hard-
top.
�
Press and hold button2 until the roll
bar is raised.
Warning!
G
This vehicle is a two occupant vehicle. The
rear storage area is not intended for use by
occupants and is not equipped for properly
seating or restraining occupants. Thus this
area should never be used by any persons.
Before operating the roll bar switch make
sure that the roll bar’s path is clear and no
persons are injured by the moving roll bar
due to inattention. Raising or lowering of the
roll bar could injure someone inadvertently
occupying the rear storage area.
For your own safety, we recommend to drive
with the roll bar raised if the outside temper-
ature is below +5°F (-15°C).!If the outside temperature falls below
+5°F (-15°C), the roll bar must be
raised manually using the buttons pro-
vided to avoid damaging the hydraulics.
iWhen the roll bar is raised automatical-
ly, you will hear a ratcheting sound.
Warning!
G
If the roll bar warning light
in the ta-
chometer remains lit after starting the en-
gine, there is a malfunction. In the display
you see the message
Raise the
roll-over bar
.
For safety reasons, drive only with the roll
bar upright until the malfunction is repaired.
Have your vehicle checked at an authorized
Mercedes-Benz Center.
Page 80 of 434
.Switching off the ESP
To improve the vehicles traction, turn off
the ESP in dr")
79 Safety and Security
Driving safety systems
For more information, see the
“Practical hints” section (
�page 282).Switching off the ESP
To improve the vehicle's traction, turn off
the ESP in driving situations where it would
be advantageous to have the drive wheels
spin and thus cut into surfaces for better
grip such as:
�
starting out on slippery surfaces and in
deep snow in conjunction with snow
chains
�
in sand or gravelThe switch is located in the lower part of
the center console.
1ESP switch
�
Press ESP switch1 until the ABS/ESP
warning lamp v in the instrument
cluster comes on.
ESP is deactivated.
!Because of the ESP’s automatic opera-
tion, the engine must be shut off
(SmartKey in starter switch position 0
or 1 or KEYLESS-GO* start/stop but-
ton in position 0 or 1) when�
the parking brake is being tested on
a brake test dynamometer
�
the vehicle is being towed with the
front/rear axle raised
Active braking action through the ESP
may otherwise seriously damage the
brake system.
The ESP will only function properly if
you use wheels of the recommended
tire size (
�page 378).
Warning!
G
ESP should not be switched off during nor-
mal driving other than in the circumstances
described below. Disabling of the system
will reduce vehicle stability in standard driv-
ing maneuvers.!Turn on the ESP immediately if the
aforementioned circumstances do not
apply anymore.
iDistronic* cannot be activated when
the ESP has been deactivated.
��


* deactivation
switch
210
2
Active Body Control (ABC)
switch
207
3
Tow-away alarm switch
86
4
Hardtop open/close")