Page 305 of 434

304 Practical hintsWhat to do if …
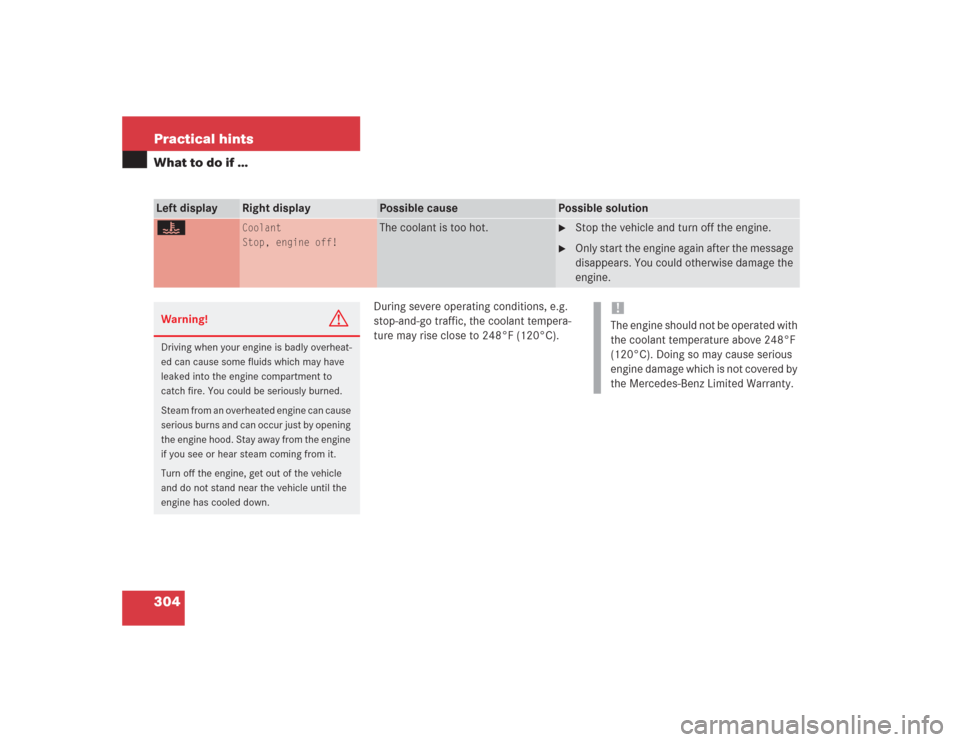
During severe operating conditions, e.g.
stop-and-go traffic, the coolant tempera-
ture may rise close to 248°F (120°C).
Left display
Right display
Possible cause
Possible solution
•
Coolant
Stop, engine off!
The coolant is too hot.
�
Stop the vehicle and turn off the engine.
�
Only start the engine again after the message
disappears. You could otherwise damage the
engine.
Warning!
G
Driving when your engine is badly overheat-
ed can cause some fluids which may have
leaked into the engine compartment to
catch fire. You could be seriously burned.
Steam from an overheated engine can cause
serious burns and can occur just by opening
the engine hood. Stay away from the engine
if you see or hear steam coming from it.
Turn off the engine, get out of the vehicle
and do not stand near the vehicle until the
engine has cooled down.
!The engine should not be operated with
the coolant temperature above 248°F
(120°C). Doing so may cause serious
engine damage which is not covered by
the Mercedes-Benz Limited Warranty.
Page 310 of 434
309 Practical hints
What to do if …
Left display
Right display
Possible cause
Possible solution
A
Reserve fuel
The fuel level has dropped below
the reserve mark.
�
Refuel at the next gas station (
�page 250).
Check
gas cap!
See Oper’s Man.
The fuel cap is not closed tightly.
�
Check the fuel cap (
�page 250).
K
Visit
workshop!
The retractable hardtop is malfunc-
tioning.
�
Have the retractable hardtop checked by an
authorized Mercedes-Benz Center.
K
Lock
Vario-Roof
The retractable hardtop is not
locked properly.
�
Push or pull on the retractable hardtop switch
until the indicator lamp in the switch goes out
and the retractable hardtop is completely
open or closed (
�page 184).
O
Close hood!
You are driving with the hood open.
�
Close the hood (
�page 254).
I
Remove
key!
You have forgotten to remove the
SmartKey.
�
Remove the SmartKey from the starter
switch.
Replace
key!
The batteries in the SmartKey are
discharged.
�
Change the batteries (
�page 328).
Page 335 of 434

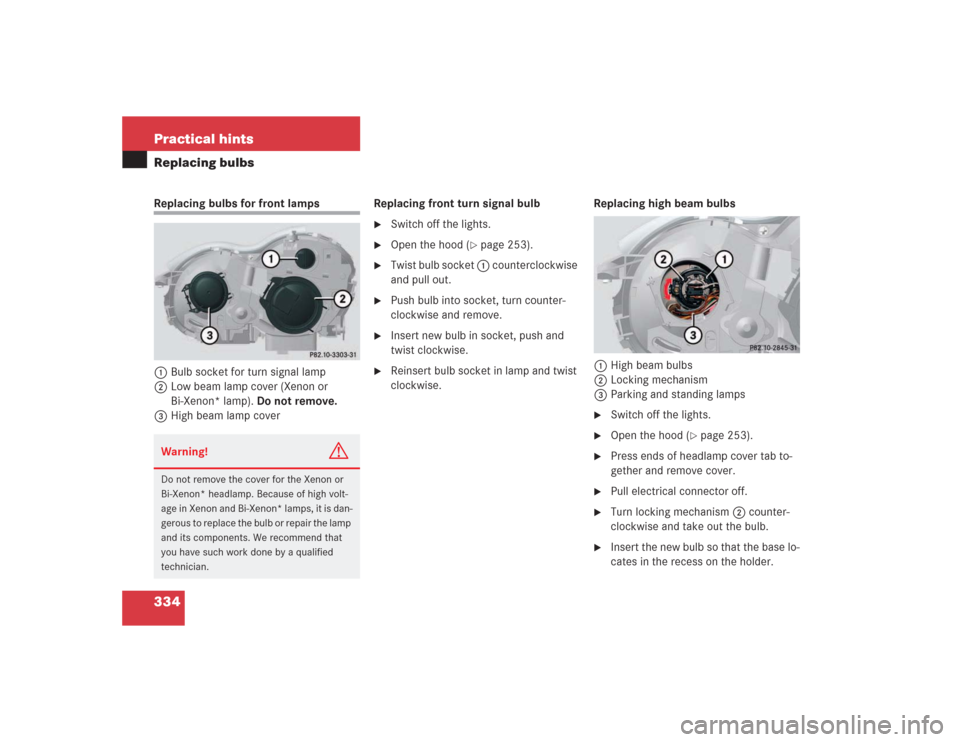
334 Practical hintsReplacing bulbsReplacing bulbs for front lamps
1Bulb socket for turn signal lamp
2Low beam lamp cover (Xenon or
Bi-Xenon* lamp). Do not remove.
3High beam lamp coverReplacing front turn signal bulb
�
Switch off the lights.
�
Open the hood (
�page 253).
�
Twist bulb socket 1 counterclockwise
and pull out.
�
Push bulb into socket, turn counter-
clockwise and remove.
�
Insert new bulb in socket, push and
twist clockwise.
�
Reinsert bulb socket in lamp and twist
clockwise.Replacing high beam bulbs
1High beam bulbs
2Locking mechanism
3Parking and standing lamps
�
Switch off the lights.
�
Open the hood (
�page 253).
�
Press ends of headlamp cover tab to-
gether and remove cover.
�
Pull electrical connector off.
�
Turn locking mechanism 2 counter-
clockwise and take out the bulb.
�
Insert the new bulb so that the base lo-
cates in the recess on the holder.
Warning!
G
Do not remove the cover for the Xenon or
Bi-Xenon* headlamp. Because of high volt-
age in Xenon and Bi-Xenon* lamps, it is dan-
gerous to replace the bulb or repair the lamp
and its components. We recommend that
you have such work done by a qualified
technician.
Page 336 of 434

335 Practical hints
Replacing bulbs
�
Turn locking mechanism 2 clockwise.
�
Plug the connector onto the bulb.
�
Align headlamp cover and click into
place.
Replacing parking and standing lamp
bulbs
�
Switch off the lights.
�
Open the hood (
�page 253).
�
Press ends of headlamp cover tab to-
gether and remove cover.
�
Pull out the bulb socket with the bulb.
�
Pull the bulb out of the bulb socket.
�
Insert a new bulb in the socket.
�
Reinstall the bulb socket.
�
Align headlamp cover and click into
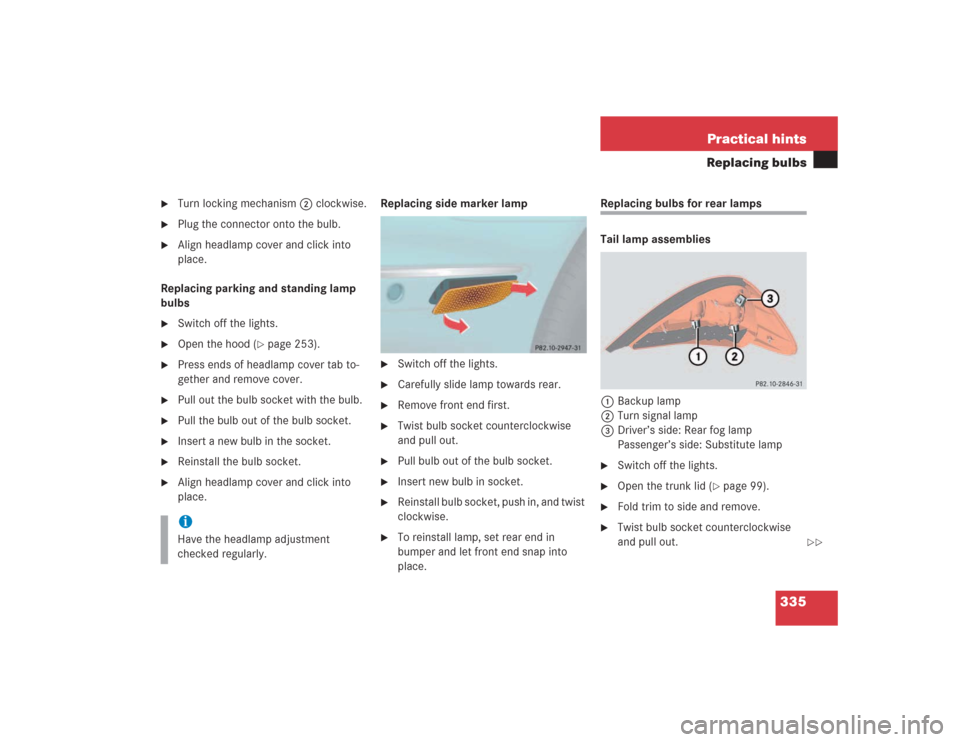
place.Replacing side marker lamp
�
Switch off the lights.
�
Carefully slide lamp towards rear.
�
Remove front end first.
�
Twist bulb socket counterclockwise
and pull out.
�
Pull bulb out of the bulb socket.
�
Insert new bulb in socket.
�
Reinstall bulb socket, push in, and twist
clockwise.
�
To reinstall lamp, set rear end in
bumper and let front end snap into
place.
Replacing bulbs for rear lamps
Tail lamp assemblies
1Backup lamp
2Turn signal lamp
3Driver’s side: Rear fog lamp
Passenger’s side: Substitute lamp�
Switch off the lights.
�
Open the trunk lid (
�page 99).
�
Fold trim to side and remove.
�
Twist bulb socket counterclockwise
and pull out.
iHave the headlamp adjustment
checked regularly.
��
Page 339 of 434
338 Practical hintsReplacing wiper bladesInstalling wiper blades�
Slide the wiper blade onto the wiper
arm until it locks in place.
�
Rotate the wiper blade into a position
parallel to the wiper arm.
�
Fold the wiper arm backward to rest on
the windshield. Make sure you hold on
to the wiper when folding the wiper arm
back.
!Never open the hood when the wiper
arms are folded forward.
Hold on to the wiper when folding the
wiper arm back. If released, the force
of the impact from the tensioning
spring could crack the windshield.
Do not allow the wiper arms to contact
the windshield glass without a wiper
blade inserted.
Make sure the wiper blades are proper-
ly installed. Improperly installed wiper
blades may cause windshield damage.
For your convenience, we recommend
that you have this work carried out by
an authorized Mercedes-Benz Center.
Page 412 of 434

411 Index
Fuse chart 369
Fuse chart see Vehicle tool kit
Fuses 369
Fuse chart 369
Fuse extractor 369
Main fuse box 369
Spare fuses 369
G
Garage door opener 27, 231
Gasoline see Fuel
Gear range
Automatic transmission 157
Indicator 23
Limiting 157
Shifting into optimal 156
Gear range limit
Canceling 156
Gear selector lever 26
Cleaning 279
Lock 43, 401
Position 158
Position (automatic
transmission) 155Glove box 21, 214
GPS 399
H
Hands-free microphone 27
Hard plastic trim items
Cleaning 279
Hardtop open/close control 26
Hardtop see Retractable hardtop
Hardtop switch 185
Hazard warning flasher 121
Hazard warning flasher switch 25
Headlamp switch-off delay see Delayed
switch-off, exterior lamps
Headlamps
Automatic mode 118
Headlamp cleaning system 168, 261
Manual mode 118
Refilling washer fluid 261Headliner
Cleaning 279
Head-thorax airbag 72, 399
Heated steering wheel* 220
Height adjustment
Head restraints 36
Height adjustments
Vehicle level 208
High beam flasher 121
High beam headlamp indicator 23
High beam headlamps 47, 117, 332
Replacing bulbs 334
Switching on 121
Hood 253
Messages in display 309
Horn 21
Hydroplaning 243
Page 416 of 434

415 Index
N
Navigation system
Operating 134
Night security illumination 143
O
Octane number 401
Odometer, main 23
Oil
Adding 257
Consumption 255
Filler neck 257
Oil level
Checking 252
One-touch gearshifting 156
Canceling gear range limit 156
Downshifting 156
Upshifting 156Opening
Doors from the inside 99
Fuel filler flap 250
Hood 253
Luggage cover 185
Retractable hardtop (SmartKey) 188
Retractable hardtop (switch) 185
Side windows 182
Storage compartment in the
armrest 216
Storage compartment in the center
console 216
Sunshade 192
Trunk from inside vehicle 100
Trunk lid 99
Windows 181
Operating
CD player 134
Navigation system 134
Radio 133
Telephone* 152
Overhead control panel 27
Overspeed range 125, 400P
Panic alarm 74
Panic button on SmartKey 74
Panorama roof*
Sunshade 191
Sunshade closing 192
Sunshade opening 192
Parcel net in passenger footwell 217
Parcel net in trunk 217
Parctronic* deactivation switch 26
Parking 242
Parking assistance (Parktronic*) 210
Parking brake
Engaging 52
Releasing 45
Parking brake pedal 21
Parking lamps 332
Replacing the bulbs 335
Switching on 117
Parking position
Exterior rear view mirrors 115, 149,
167