Page 285 of 435
284 OperationTires and wheelsTire pressure changes by approximately
1.5 psi (0.1 bar) per 18°F (10°C) of air
temperature change. Keep this in mind
when checking tire pressure where the
temperature is different from the outside
temperature.
Tire temperature and tire pressure also in-
crease while driving, depending on the
driving speed and the tire load.Check the spare tire periodically for condi-
tion and inflation pressure. Spare tires will
age and become worn over time even if
never used, and thus should be inspected
and replaced when necessary or after a
maximum of six years.
iThe pressures listed for light loads are
minimum values offering high driving
comfort.
Increased inflation pressures listed for
heavier loads may also be used for light
loads. These higher pressures produce
favorable handling characteristics. The
ride of the vehicle, however, will be
somewhat harder. Never exceed the
max. values or inflate tires below the
min. values listed on the fuel filler flap.
Warning!
G
Follow recommended tire inflation pres-
sures.
Do not overinflate tires. Overinflating tires
can result in sudden deflation (blowout) be-
cause they are more likely to become punc-
tured or damaged by road debris, potholes,
etc.
Do not underinflate tires. Underinflated tires
wear unevenly, adversely affect handling
and fuel economy, and are more likely to fail
from being overheated.
Do not overload the tires by exceeding the
specified vehicle capacity weight (as indicat-
ed by the label on the pillar in the driver’s
door opening). Overloading the tires can
overheat them, possibly causing a blowout.
Page 299 of 435
298 OperationVehicle careEngine cleaning
Prior to cleaning the engine compartment
make sure to protect electrical compo-
nents and connectors from the intrusion of
water and cleaning agents.
Corrosion protection, such as MB Anticor-
rosion Wax should be applied to the engine
compartment after every engine cleaning.
Before applying, all control linkage bush-
ings and joints should be lubricated. The
poly-V-belt and all pulleys should be pro-
tected from any wax.
Vehicle washing
Do not use hot water or wash your vehicle
in direct sunlight. Only use a mild car wash
detergent, such as Mercedes-Benz ap-
proved Car Shampoo.
Thoroughly spray the vehicle with a dif-
fused jet of water. Direct only a very weak
spray towards the ventilation intake. Use
plenty of water and rinse the sponge and
chamois frequently. Rinse with clear water and thoroughly dry
with a chamois. Do not allow cleaning
agents to dry on the finish.
Due to the width of the vehicle, fold in ex-
terior rear view mirrors prior to running the
vehicle through an automatic car wash to
prevent damage to the mirrors.
In the winter, thoroughly remove all traces
of road salt as soon as possible.
When washing the underbody, do not for-
get to clean the inner sides of the wheels.Ornamental moldings
For regular cleaning and care of very dirty
chrome-plated parts, use a chrome clean-
er.
Headlamps, tail lamps, side markers,
turn signal lenses
�
Use a mild car wash detergent, such as
Mercedes-Benz approved Car Sham-
poo, with plenty of water.
To prevent scratches, never apply strong
force and use only a soft, non-scratchy
cloth when cleaning the lenses. Do not at-
tempt to wipe dirty lenses with a dry cloth
or sponge.
iVehicles with KEYLESS-GO*:
If a door handle is hit by a strong jet of
water, and a SmartKey with
KEYLESS-GO* is in close proximity, i.e.
within approx. 3 ft. (approx. 1 m), the
vehicle could be inadvertently locked
or unlocked.
Page 302 of 435
301 Operation
Vehicle care
Light alloy wheels
Mercedes-Benz approved Wheel Care
should be used for regular cleaning of the
light alloy wheels.
If possible, clean wheels once a week with
Mercedes-Benz approved Wheel Care, us-
ing a soft bristle brush and a strong spray
of water.
Follow the instructions on container.
Instrument cluster
Use a gentle dishwashing detergent or
mild detergent for delicate fabrics as a
washing solution. Wipe with a cloth moist-
ened in lukewarm solution. Do not use
scouring agents.Steering wheel and gear selector lever
Wipe with a damp cloth and dry thoroughly
or clean with Mercedes-Benz approved
Leather Care.
Cup holder
Use a gentle dishwashing detergent or
mild detergent for delicate fabrics as a
washing solution. Wipe with a cloth moist-
ened in lukewarm solution. Do not use
scouring agents.
Hard plastic trim items
Pour Mercedes-Benz approved Interior
Care onto soft lint-free cloth and apply
with light pressure.
Headliner and shelf below rear window
Clean with soft bristle brush, or use a
dry-shampoo cleaner in case of excessive
dirt.Seat belts
The webbing must not be treated with
chemical cleaning agents. Only use clear,
lukewarm water and soap. Do not dry the
webbing at temperatures above 176°F
(80°C) or in direct sunlight.
iOnly use acid-free cleaning materials.
Acid may cause corrosion or damage
the clear coat.
Warning!
G
Do not bleach or dye seat belts as this may
severely weaken them. In a crash they may
not be able to provide adequate protection.
Page 303 of 435
302 OperationVehicle careUpholstery
Using aftermarket seat covers or wearing
clothing that have the tendency to give off
coloring (e.g. when wet, etc.) may cause
the upholstery to become permanently dis-
colored. By lining the seats with a proper
intermediate cover, contact-discoloration
will be prevented.
Leather upholstery
Wipe leather upholstery with a damp cloth
and dry thoroughly or clean with
Mercedes-Benz approved Leather Care.
Exercise particular care when cleaning per-
forated leather as its underside should not
become wet.Nubuck leather upholstery (S 55 AMG)
The nubuck leather upholstery is treated
with a protective coating. Wipe nubuck
leather upholstery with damp microfiber
cloth to remove dust and other light stains.
Carefully dab nubuck leather upholstery
with a microfiber cloth to remove oil stains.Plastic and rubber parts
Do not use oil or wax on these parts.
Wood trims
Dampen cloth using water and use damp
cloth to clean wood trims in your vehicle.
Do not use solvents like tar remover or
wheel cleaner nor polishes or waxes as
these may be abrasive.
!Do not use Mercedes-Benz approved
Leather Care or any solvents to clean
nubuck leather upholstery.
Avoid hard scrubbing on nubuck leath-
er upholstery.
Page 312 of 435
311 Practical hints
What to do if …?
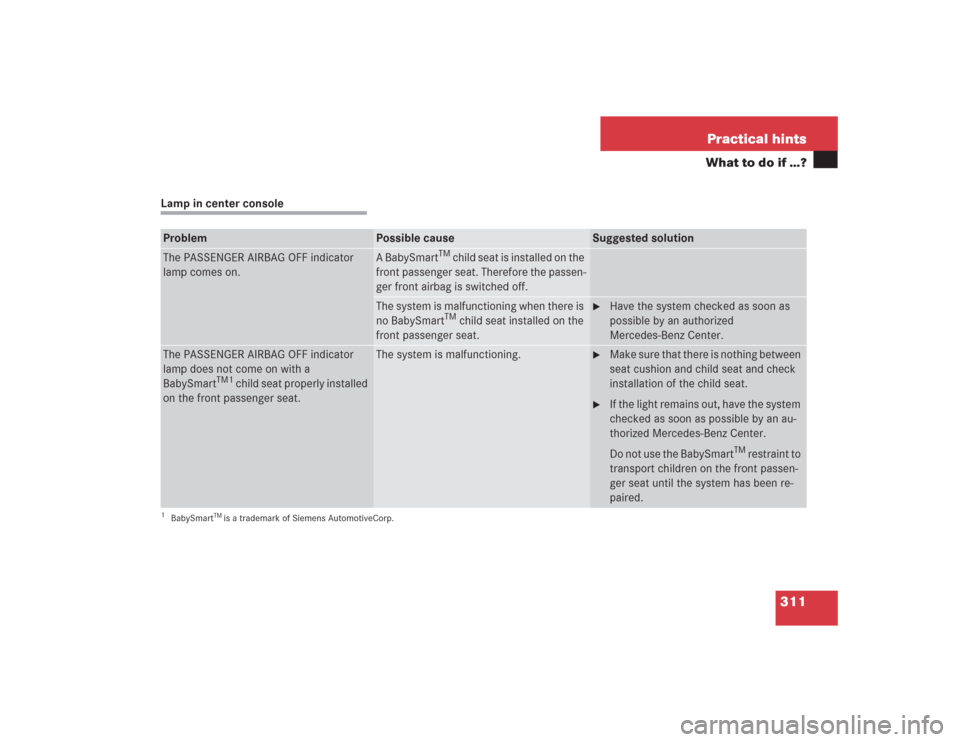
Lamp in center consoleProblem
Possible cause
Suggested solution
The PASSENGER AIRBAG OFF indicator
lamp comes on.
A BabySmart
TM child seat is installed on the
front passenger seat. Therefore the passen-
ger front airbag is switched off.
The system is malfunctioning when there is
no BabySmart
TM child seat installed on the
front passenger seat.
�
Have the system checked as soon as
possible by an authorized
Mercedes-Benz Center.
The PASSENGER AIRBAG OFF indicator
lamp does not come on with a
BabySmart
TM1
child seat properly installed
on the front passenger seat.
1BabySmart
TMis a trademark of Siemens AutomotiveCorp.
The system is malfunctioning.
�
Make sure that there is nothing between
seat cushion and child seat and check
installation of the child seat.
�
If the light remains out, have the system
checked as soon as possible by an au-
thorized Mercedes-Benz Center.
Do not use the BabySmart
TM restraint to
transport children on the front passen-
ger seat until the system has been re-
paired.
Page 329 of 435
328 Practical hintsWhat to do if …?Display symbol
Display message
Possible cause
Possible solution
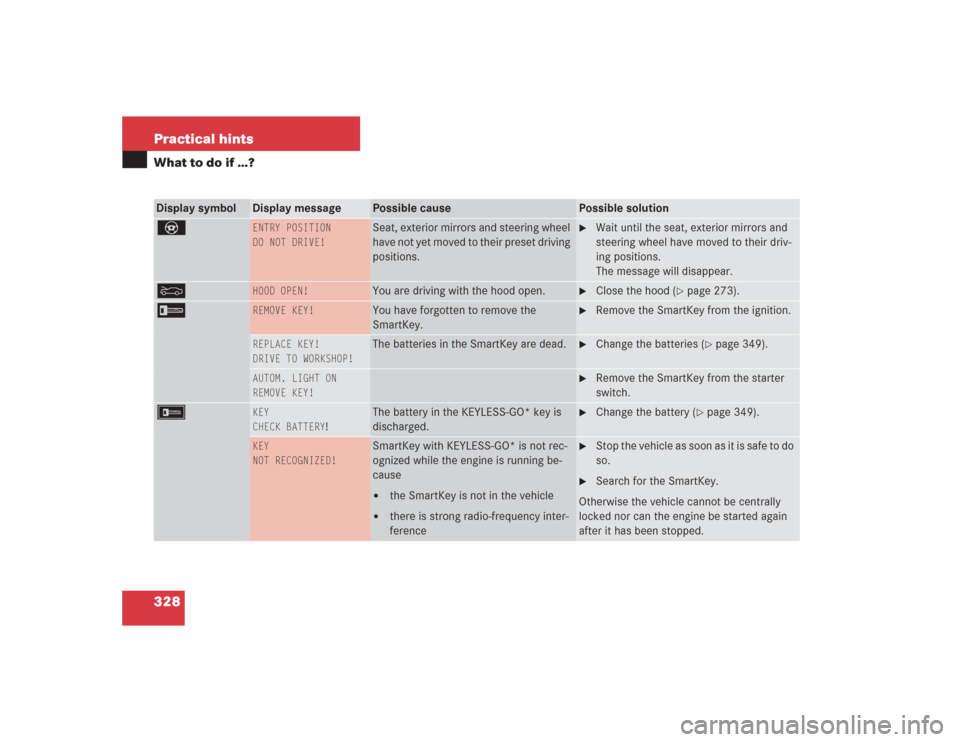
_
ENTRY POSITION
DO NOT DRIVE!
Seat, exterior mirrors and steering wheel
have not yet moved to their preset driving
positions.
�
Wait until the seat, exterior mirrors and
steering wheel have moved to their driv-
ing positions.
The message will disappear.
Y
HOOD OPEN!
You are driving with the hood open.
�
Close the hood (
�page 273).
I
REMOVE KEY!
You have forgotten to remove the
SmartKey.
�
Remove the SmartKey from the ignition.
REPLACE KEY!
DRIVE TO WORKSHOP!
The batteries in the SmartKey are dead.
�
Change the batteries (
�page 349).
AUTOM. LIGHT ON
REMOVE KEY!
�
Remove the SmartKey from the starter
switch.
F
KEY
CHECK BATTERY
!
The battery in the KEYLESS-GO* key is
discharged.
�
Change the battery (
�page 349).
KEY
NOT RECOGNIZED!
SmartKey with KEYLESS-GO* is not rec-
ognized while the engine is running be-
cause�
the SmartKey is not in the vehicle
�
there is strong radio-frequency inter-
ference
�
Stop the vehicle as soon as it is safe to do
so.
�
Search for the SmartKey.
Otherwise the vehicle cannot be centrally
locked nor can the engine be started again
after it has been stopped.
Page 330 of 435
329 Practical hints
What to do if …?
Display symbol
Display message
Possible cause
Possible solution
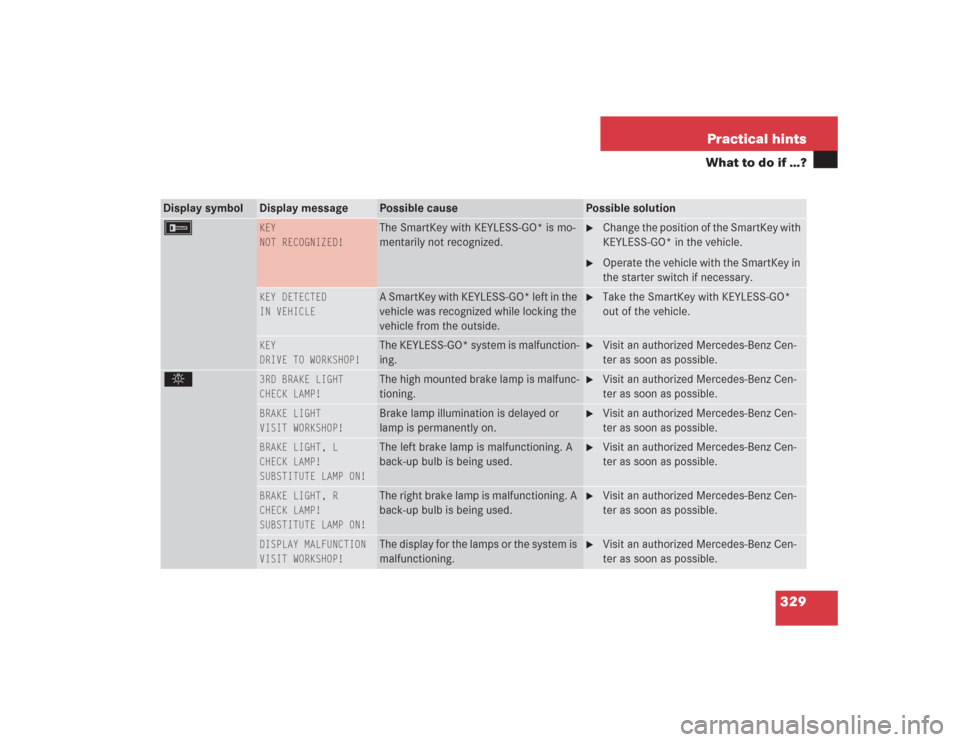
F
KEY
NOT RECOGNIZED!
The SmartKey with KEYLESS-GO* is mo-
mentarily not recognized.
�
Change the position of the SmartKey with
KEYLESS-GO* in the vehicle.
�
Operate the vehicle with the SmartKey in
the starter switch if necessary.
KEY DETECTED
IN VEHICLE
A SmartKey with KEYLESS-GO* left in the
vehicle was recognized while locking the
vehicle from the outside.
�
Take the SmartKey with KEYLESS-GO*
out of the vehicle.
KEY
DRIVE TO WORKSHOP!
The KEYLESS-GO* system is malfunction-
ing.
�
Visit an authorized Mercedes-Benz Cen-
ter as soon as possible.
.
3RD BRAKE LIGHT
CHECK LAMP!
The high mounted brake lamp is malfunc-
tioning.
�
Visit an authorized Mercedes-Benz Cen-
ter as soon as possible.
BRAKE LIGHT
VISIT WORKSHOP!
Brake lamp illumination is delayed or
lamp is permanently on.
�
Visit an authorized Mercedes-Benz Cen-
ter as soon as possible.
BRAKE LIGHT, L
CHECK LAMP!
SUBSTITUTE LAMP ON!
The left brake lamp is malfunctioning. A
back-up bulb is being used.
�
Visit an authorized Mercedes-Benz Cen-
ter as soon as possible.
BRAKE LIGHT, R
CHECK LAMP!
SUBSTITUTE LAMP ON!
The right brake lamp is malfunctioning. A
back-up bulb is being used.
�
Visit an authorized Mercedes-Benz Cen-
ter as soon as possible.
DISPLAY MALFUNCTION
VISIT WORKSHOP!
The display for the lamps or the system is
malfunctioning.
�
Visit an authorized Mercedes-Benz Cen-
ter as soon as possible.
Page 332 of 435

331 Practical hints
What to do if …?
Display symbol
Display message
Possible cause
Possible solution
.
LIGHT SENSOR
DRIVE TO WORKSHOP!
The lamp sensor is malfunctioning. The
headlamps switch on automatically.
�
In the control system, set lamp operation
to manual (
�page 154).
�
Switch on headlamps using the exterior
lamp switch.
�
Visit an authorized Mercedes-Benz Cen-
ter as soon as possible.
LOW BEAM, L
CHECK LAMP!
The left low beam lamp is malfunctioning.
�
Visit an authorized Mercedes-Benz Cen-
ter as soon as possible.
LOW BEAM, R
CHECK LAMP!
The right low beam lamp is malfunction-
ing.
�
Visit an authorized Mercedes-Benz Cen-
ter as soon as possible.
MARKER LIGHT, FL
CHECK LAMP!
The front left side marker lamp is mal-
functioning.
�
Replace the bulb as soon as possible.
MARKER LIGHT, FR
CHECK LAMP!
The front right side marker lamp is mal-
functioning.
�
Replace the bulb as soon as possible.
REAR FOGLAMP
CHECK LAMP!
The rear fog lamp is malfunctioning.
�
Replace the bulb as soon as possible.
REVERSE LIGHT, L
CHECK LAMP!
The left reverse lamp is malfunctioning.
�
Replace the bulb as soon as possible.
REVERSE LIGHT, R
CHECK LAMP!
The right reverse lamp is malfunctioning.
�
Replace the bulb as soon as possible.