Page 117 of 435
116 Controls in detailSeatsSwitching on seat heating�
Press switch1 twice.
A red indicator lamp above the switch
comes on.
Switching off seat heating
�
Press switch1 again. Switching on rapid seat heating
�
Press switch1 once.
Both indicator lamps above the switch
come on. Switching off rapid seat heating mode
�
Press switch1 twice.
iThe seat heating will be automatically
switched off after approximately
30 minutes.
iThe system switches over to normal
heating mode after approximately
five minutes. Only the right-hand indi-
cator lamp remains lit.
!If one or both of the lamps on the seat
heating switch are flashing, there is in-
sufficient voltage available since too
many electrical consumers are turned
on. The seat heating switches off auto-
matically.
The seat heating will switch back on
again automatically as soon as suffi-
cient voltage is available.
Page 118 of 435
. The driver")
117 Controls in detailSeats
Seat ventilation*
The switch is located on the door. Seat
ventilation can be activated manually with
the SmartKey in starter switch position1
or2 (
�page 31). The driver’s seat ventila-
tion can be activated automatically by the
summer opening feature (
�page 197).
The blue indicator lamps on the switch
show the ventilation level selected:
1Seat ventilation switch
�
Switch on ignition.
Switching on seat ventilation
�
Press switch1.
Three blue indicator lamps above the
switch come on.
Continue pressing switch1 until the
desired seat ventilation level is
reached.Switching off seat ventilation
�
Press switch1 repeatedly until all in-
dicator lamps go out.
Level3
Three indicator lamps on
2
Two indicator lamps on
1
One indicator lamp on
off
No indicator lamp on
iThe seat ventilation for the driver’s seat
is automatically set to the highest level
if activated via summer opening fea-
ture (
�page 197).
!If one or all of the lamps on the seat
ventilation switch are flashing, there is
insufficient voltage since too many
electrical consumers are switched on.
The seat ventilation switches off auto-
matically.
The seat ventilation will switch back on
again automatically as soon as suffi-
cient voltage is available.
Page 119 of 435
118 Controls in detailSeatsRear seats
Power seat bench*
The switches for adjusting the seat bench
are located at the respective rear doors.
1Seat bench fore and aft adjustment
2Head restraint fold/place uprightSeat bench fore and aft adjustment
�
Press switch forward or backward in di-
rection of arrow1.
Head restraint folding
�
Press switch up or down in direction of
arrow2.
The head restraint is folded or placed
upright.
For information on switching on seat heat-
ing* and seat ventilation*, see
(
�page 117) and (
�page 114).Individual power seats*
The switches for adjusting the seats are lo-
cated at the respective rear doors.
1Seat fore and aft adjustment
2Seat height
3Head restraint fold/place upright
Page 120 of 435

119 Controls in detailSeats
Seat fore and aft adjustment�
Press switch forward or backward in di-
rection of arrow1.
Seat height
�
Press switch up or down in the direc-
tion of arrow2.
Head restraint folding
�
Press switch up or down in direction of
arrow3.
The head restraint is folded or placed
upright.
For information on switching on seat heat-
ing* and seat ventilation*, see
(
�page 117) and (
�page 114).Power seat, setting front passenger
seat position from rear*
This function lets you adjust the position of
the front passenger seat from the rear.The switch is located on the right rear pas-
senger door.
1Front passenger seat adjustment
2Rear seat adjustment
3Seat height
4Head restraint height
5Backrest tilt
6Seat fore and aft adjustment
Warning!
G
When adjusting the front passenger seat,
make sure the seat, if occupied, is as far
from the passenger front airbag as possible.
Otherwise, the passenger could be seriously
or even fatally injured in the event of an ac-
cident or braking maneuver.
Make sure that no one is caught or injured
while the seat is being adjusted.
The power seats can also be operated with
the driver's or passenger door open. Do not
leave children unattended in the vehicle, or
with access to an unlocked vehicle. Unsu-
pervised use of vehicle equipment may
cause an accident and/or serious personal
injury
Page 121 of 435
120 Controls in detailSeats�
Switch on ignition.
or
�
Open the right rear passenger door.
�
Press button1 to adjust the front
passenger seat.Passenger seat fore and aft adjustment
�
Press the switch forward or backward
in direction of arrow6.
Passenger seat backrest tilt
�
Press the switch forward or backward
in direction of arrow5.
Passenger seat height
�
Press the switch up or down in the
direction of arrow3.
Passenger seat head restraint height
�
Press the switch up or down in
direction of arrow4.
Press button2 to adjust the rear seat
(
�page 119).
iAdjusting the passenger seat position
from the rear is not possible if you de-
activate the operation of the rear door
windows (
�page 74).
!Do not move the front passenger seat
completely forward if objects are
stored in the parcel net in the front pas-
senger-side footwell. Items in the net
may be damaged
Page 123 of 435
.
�
Press memory button2.
�
Re")
122 Controls in detailMemory functionStoring positions into memory�
Adjust the seats, steering wheel and
exterior rear view mirrors to the de-
sired position (
�page 34).
�
Press memory button2.
�
Release memory button2 and push
one of the position buttons1 within
three seconds.
All the settings are stored with the se-
lected position.
Recalling positions from memory�
Press and hold one of the position
buttons1 until the seat, steering
wheel and exterior rear view mirrors
have fully moved to the stored posi-
tions.Storing exterior rear view mirror park-
ing position
For easier parking, you can adjust the pas-
senger-side exterior rear view mirror so
that you can see the right rear wheel as
soon as you engage reverse gearR.
For information on activating the parking
position, see “Setting parking position for
exterior rear view mirror” (
�page 162).
iReleasing the button immediately
stops movement to the stored posi-
tions.Warning!
G
Do not operate the power seats using the
memory button if the seat backrest is in an
excessively reclined position. Doing so
could cause damage to front or rear seats.
First move seat backrest to an upright posi-
tion.
iYou can store a parking position for the
passenger-side exterior rear view mir-
ror for each SmartKey or SmartKey
with KEYLESS-GO*.
Page 161 of 435

160 Controls in detailControl systemConvenience submenu
Access the
CONVENIENCE
submenu via the
SETTINGS
menu. Use the
CONVENIENCE
sub-
menu to change the settings for a number
of convenience features. The following
functions are available:Setting key-dependency
Use this function to set whether the mem-
ory settings for the seats, the steering
wheel, the mirrors, and the automatic cli-
mate control should be stored separately
for each SmartKey (
�page 121).
�
Move the selection marker with
theæ orç button to
the
CONVENIENCE
submenu.
�
Press buttonj ork repeatedly
until you see this message in the dis-
play:
SETTINGS KEY-DEPENDENT
.
The selection marker is on the current
setting.
�
Pressæ orç to set key-depen-
dency to
ON or
OFF
. Activating easy-entry/exit feature
Use this function to activate and deacti-
vate the easy-entry/exit feature. When the
feature is activated, the steering wheel and
driver’s seat will move back to facilitate ex-
iting when you:
�
remove the SmartKey from the starter
switch or the KEYLESS-GO start/stop
button*
�
open the driver’s door
However, the engine must be turned off.
Function
Page
Setting key-dependency
160
Activating easy-entry/exit fea-
ture
160
Setting parking position for exte-
rior rear view mirror
162
Setting fold-in function for exteri-
or rear view mirrors
162
Adjusting the drive-dynamic seat
(driver’s side)
163
Warning!
G
You must make sure that no one can be-
come trapped or injured by the moving
steering wheel and the driver’s seat when
the easy-entry / exit feature is in operation
and the driver’s door is being opened or the
SmartKey is removed from the starter
switch.
Page 164 of 435
163 Controls in detail
Control system
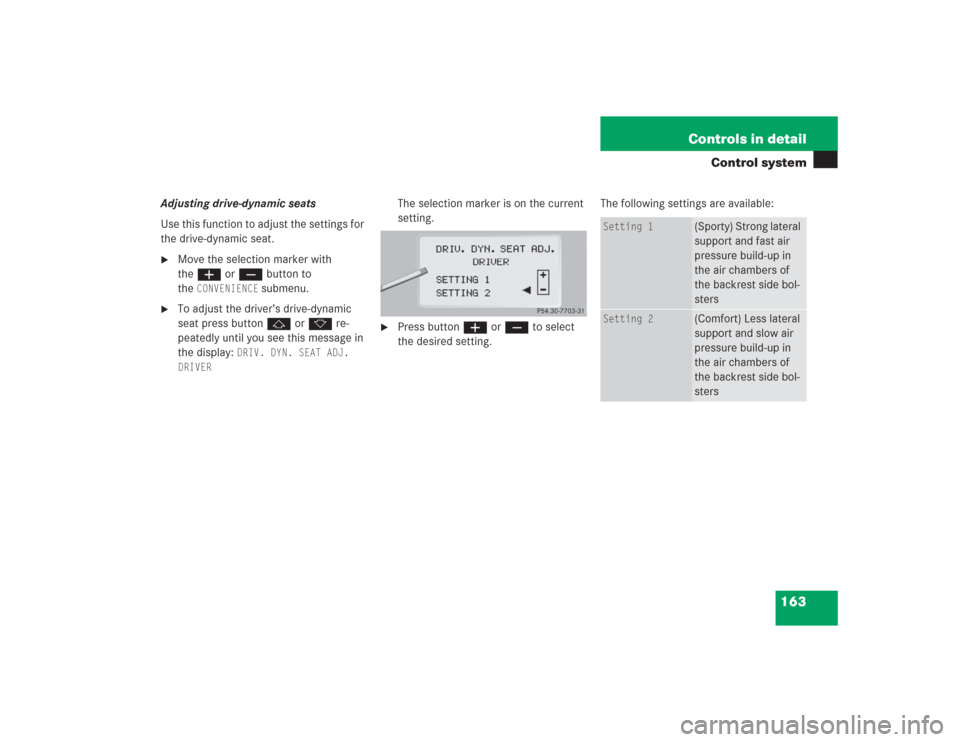
Adjusting drive-dynamic seats
Use this function to adjust the settings for
the drive-dynamic seat.�
Move the selection marker with
theæ orç button to
the
CONVENIENCE
submenu.
�
To adjust the driver’s drive-dynamic
seat press buttonj ork re-
peatedly until you see this message in
the display:
DRIV. DYN. SEAT ADJ.
DRIVER
The selection marker is on the current
setting.
�
Press buttonæ orç to select
the desired setting. The following settings are available:
Setting 1
(Sporty) Strong lateral
support and fast air
pressure build-up in
the air chambers of
the backrest side bol-
sters
Setting 2
(Comfort) Less lateral
support and slow air
pressure build-up in
the air chambers of
the backrest side bol-
sters