Page 109 of 435
.
Easy-entry/exit feature
With the easy-entry/exit feature activated,
the steering wh")
108 Controls in detailSeats
�SeatsFor more information on seat adjustment,
see “Seat adjustment” (
�page 35).
Easy-entry/exit feature
With the easy-entry/exit feature activated,
the steering wheel tilts upwards and the
driver’s seat moves to the rear.
This allows easier entry into and exit from
the vehicle when the driver’s door is
opened. However, the engine must be
turned off.
When the SmartKey is inserted in the start-
er switch or you have pressed the
KEYLESS-GO* start/stop button once and
the driver’s door is closed, the steering
wheel and the driver’s seat return to their
last set positions.You can activate the following functions:
�
Steering column
Only the steering column is adjusted.
�
Steering column and seat
The steering column and the seat are
adjusted.
The easy-entry/exit feature can be
switched on or off in the convenience sub-
menu of the control system (
�page 160).
Warning!
G
You must ensure that no one can become
trapped or injured by the moving steering
wheel and driver’s seat when the
easy-entry / exit feature is activated, the
driver’s door is being opened, and the en-
gine is turned off or the SmartKey is re-
moved from the starter switch.
Do not leave children unattended in the ve-
hicle, or with access to an unlocked vehicle.
Children could open the driver’s door and
unintentionally activate the easy-entry/exit
feature*, which could result in an accident
and/or serious personal injury.
iTo cancel seat/steering wheel move-
ment, do one of the following:�
Press the seat adjustment switch
(�page 35)
�
Move the steering column stalk
(�page 37)
�
Press the memory button
(�page 121)
Page 110 of 435

Front seat head restrai")
109 Controls in detailSeats
Removing and installing front seat head restraints
For information on head restraint adjust-
ment, see the “Getting started” section
(�page 36)
Front seat head restraints
1Head restraint height switchRemoving front head restraints
�
Press switch1 upwards and hold until
the head restraint is fully extended.
�
Pull out head restraint.
Installing front head restraints:
�
Press switch1 upwards and hold for
about five seconds.
�
Push the head restraint down until it
engages.
�
Adjust head restraint to desired posi-
tion (
�page 35).
Warning!
G
For your protection, drive only with properly
positioned head restraints.
Adjust head restraint so that the center of
the head restraint supports the back of the
head at eye level. This will reduce the poten-
tial for injury to the head and neck in the
event of an accident or similar situation.
Do not drive the vehicle without the seat
head restraints. Head restraints are intend-
ed to help reduce injuries during an acci-
dent.
iTilt the seat backrest to the rear for
easier removal and installation of the
head restraints.
Page 111 of 435
110 Controls in detailSeatsRear seat head restraints
Folding head restraints back
The rear seat head restraints and the rear
seat power head restraints* can be folded
backward for increased visibility.
1Switch in the front center console
�
Make sure the ignition is switched on.
All the lamps in the instrument cluster
come on.
�
Press switch1 in the front center con-
sole briefly.
The rear head restraints will fold back-
ward.Placing head restraints upright
�
Pull the rear head restraint upright until
it locks into position.
!The rear head restraints cannot be re-
moved.
Warning!
G
For safety reasons, always drive with the
rear head restraints in the upright position
when the rear seats are occupied.
Keep the area around head restraints clear
of articles (e.g. clothing) to not obstruct the
folding operation of the head restraints.
!Make sure the head restraints engage
when placing them upright manually.
Otherwise their protective function
cannot be ensured.
Page 112 of 435

111 Controls in detailSeats
Placing power head restraints* upright�
Make sure the ignition is switched on.
All the lamps in the instrument cluster
come on.
�
Press switch1 in the front center con-
sole and hold.
The rear head restraints will fold up-
right.Folding back and placing upright power
head restraints* with the switches in
the rear doors
You can fold the rear power head restraints
backward or upright using the head re-
straint folding switches in the respective
rear doors.
1Head restraint switch, rear
�
Make sure the ignition is switched on.
All the lamps in the instrument cluster
come on.
�
Press switch up in direction of
arrow1.
The rear power head restraint will fold
upright.
�
Press switch down in direction of
arrow1.
The rear power head restraint will fold
backward.
Head restraint tilt
You can adjust the angle manually by pull-
ing or pushing the head restraints by hand.Warning!
G
For safety reasons, always drive with the
rear head restraints in the upright position
when the rear seats are occupied.
Keep the area around head restraints clear
of articles (e.g. clothing) to not obstruct the
folding operation of the head restraints.
Page 113 of 435

112 Controls in detailSeatsLumbar support
You can adjust the contour of the seat’s
lumbar support to best support your spine.
The thumbwheel for the driver’s and front
passenger’s seat are located on the inner
side of the seat.
1Thumbwheel�
Make sure the ignition is switched on.
All the lamps in the instrument cluster
come on.
�
Set the lumbar support between 0
and 5.
Multicontour backrest*
The multicontour backrest has inflatable
air cushions built into the seat backrest to
provide additional lumbar and side sup-
port.
The seat backrest cushion height and cur-
vature can be continuously varied with
switches on the right side of the seat after
turning the SmartKey in the starter switch
to position2 or pressing the KEYLESS-GO*
start/stop button twice.1Shoulder region support
2Side bolster adjustment
3Massage function (PULSE)
4Lumbar region support
�
Make sure the ignition is switched on.
All lamps in the instrument cluster
come on.
Shoulder region support
�
Press æ or ç on switch1.
The air cushion inflates or deflates.
Page 114 of 435

113 Controls in detailSeats
Lumbar region support�
Press k or j on rocker
switch4.
This selects the air cushion you wish to
adjust.
�
Press æ or ç on rocker
switch4.
The air cushion inflates or deflates.
Side bolsters adjustment
�
Adjust the side bolsters so that they
provide good lateral support using
switch 2.Massage function (PULSE)
You can reduce muscle tension during long
trips by periodically using the massage
function.
�
Press button3.
The indicator lamp on button3 comes
on. The air cushions in the lumbar re-
gion inflate and deflate rhythmically.
Drive-dynamic seat*
The drive-dynamic seat automatically ad-
justs the lateral support provided by the
seat backrest to your driving style.
1Activate drive-dynamic function
The drive-dynamic seat electronically con-
trols the air pressure in the air chambers of
the seat backrest side bolsters. This func-
tion improves driving comfort and plea-
sure.
iWhen the engine is turned off, the last
cushion setting is retained in memory,
and the cushion is automatically ad-
justed to this setting when the engine
is restarted.
iThe massage function switches off au-
tomatically after approximately eight
minutes. The indicator lamp extinguish-
es.
Page 115 of 435
114 Controls in detailSeatsActivating�
Press button1.
The indicator lamp in the switch comes
on and the following message appears
in the multifunction display for five sec-
onds: Deactivating
�
Press button1 again.
The indicator lamp in the button goes
out.
The message:DRIV. DYN. SEAT ADJ.
DRIVER
OFF appears in the multifunction display.
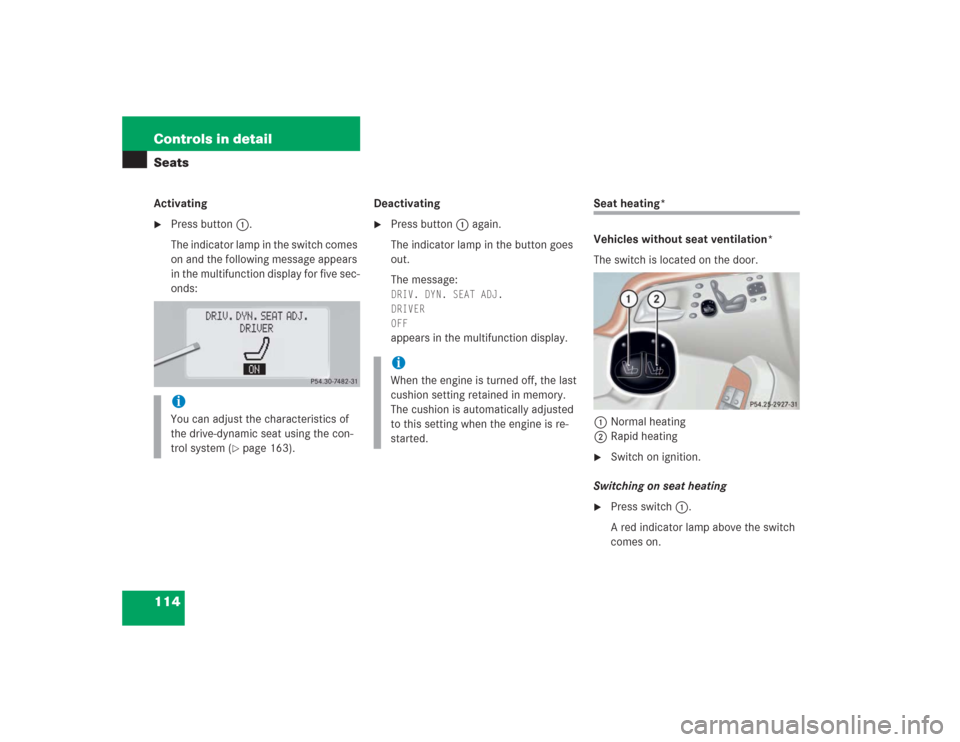
Seat heating*
Vehicles without seat ventilation*
The switch is located on the door.
1Normal heating
2Rapid heating�
Switch on ignition.
Switching on seat heating
�
Press switch1.
A red indicator lamp above the switch
comes on.
iYou can adjust the characteristics of
the drive-dynamic seat using the con-
trol system (
�page 163).
iWhen the engine is turned off, the last
cushion setting retained in memory.
The cushion is automatically adjusted
to this setting when the engine is re-
started.
Page 116 of 435

115 Controls in detailSeats
Switching off seat heating�
Press switch1 again.
Switching on rapid seat heating
�
Press switch2.
Both red indicator lamps above the
switch come on. Switching off rapid seat heating mode
�
Press switch2 again. Vehicles with seat ventilation*
The switch is located on the door. The red
indicator lamps on the switch show the
heating level selected:
1Seat heating switch
�
Switch on ignition.
iThe seat heating will be automatically
switched off after approximately
30 minutes. iThe system switches over to normal
heating mode after approximately
five minutes. Only the right-hand indi-
cator lamp remains lit.
!If one or both of the lamps on the seat
heating switch are flashing, there is in-
sufficient voltage available since too
many electrical consumers are turned
on. The seat heating switches off auto-
matically.
The seat heating will switch back on
again automatically as soon as suffi-
cient voltage is available.
Leveloff
No indicator lamp on
1
One indicator lamp on
2
Two indicator lamps on