Page 347 of 435

346 Practical hintsWhere will I find ...?
Spare wheel
Removing the spare wheel�
Take out the vehicle tool kit tray2.
�
Loosen the luggage bowl3. To do so,
turn the luggage bowl counterclock-
wise
�
Remove the spare wheel4.
Storing the spare wheel
�
Place spare wheel4in wheel well.
�
Secure the spare wheel. To do so, turn
the luggage bowl3 clockwise to its
stop.
�
Place vehicle tool kit tray2 in luggage
bowl.Spare wheel S 430, S 500 and S 600
(except Sport Package*)
The spare wheel rim is mounted with a full
sized tire of the same type as on the vehi-
cle, and it is fully functional.
However, that spare wheel rim is weight
optimized and has a limited service life of
12 000 miles (20 000 km) use before a
standard wheel rim must replace it.
In case of flat tire, you may temporarily use
the spare wheel.
Do not operate vehicle with more than one
spare wheel mounted.
Warning!
G
The jack is designed exclusively for jacking
up the vehicle at the jack take-up brackets
built into both sides of the vehicle. To help
avoid personal injury, use the jack only to lift
the vehicle during a wheel change. Never
get beneath the vehicle while it is supported
by the jack. Keep hands and feet away from
the area under the lifted vehicle. Always
firmly set parking brake and block wheels
before raising vehicle with jack.
Do not disengage parking brake while the
vehicle is raised. Be certain that the jack is
always vertical (plumb line) when in use, es-
pecially on hills. Always try to use the jack
on level surface. Make sure the jack arm is
fully seated in the jack take-up bracket. Al-
ways lower the vehicle onto sufficient ca-
pacity jackstands before working under the
vehicle.
��
Page 348 of 435
347 Practical hints
Where will I find ...?
For more information, see “Rims and tires”
(�page 384).Spare wheel S 55 AMG and Sport
Package*
In case of a flat tire, you may temporarily
use the spare wheel when observing the
following restrictions:
�
Do not exceed a vehicle speed of
50 mph (80 km/h).
�
Drive to the nearest tire repair facility
to have the flat tire repaired or re-
placed as appropriate.
�
Do not operate vehicle with more than
one spare wheel mounted.
For more information, see “Rims and tires”
(
�page 384).
Warning!
G
Never operate the vehicle with more than
one spare wheel mounted.
The spare wheel rim is for temporary use
only. Use for over a total of 12 000 miles
(20 000 km) (aggregate of all uses) may
cause wheel rim failure leading to an acci-
dent and possible injuries.
The spare wheel should only be used tempo-
rarily and replaced with a regular road wheel
as quickly as possible.
Warning!
G
The dimensions of the spare wheel are dif-
ferent from those of the road wheels. As a
result, the vehicle handling characteristics
change when driving with a mounted spare
wheel. Adapt your driving style accordingly.
Never operate the vehicle with more than
one spare wheel mounted.
The spare wheel is for temporary use only.
When driving with spare wheel mounted, en-
sure proper tire pressure and do not exceed
vehicle speed of 50 mph (80 km).
The spare wheel rim is for temporary use
only. Use for over a total of 12 000 miles
(20 000 km) (aggregate of all uses) may
cause wheel rim failure leading to an acci-
dent and possible injuries.
The spare wheel should only be used tempo-
rarily and replaced with a regular road wheel
as quickly as possible.
Page 349 of 435
348 Practical hintsUnlocking/locking in an emergency
�Unlocking/locking in an emergencyUnlocking the vehicle
If you are unable to unlock the vehicle with
the SmartKey, open the driver’s door and
the trunk using the mechanical key.
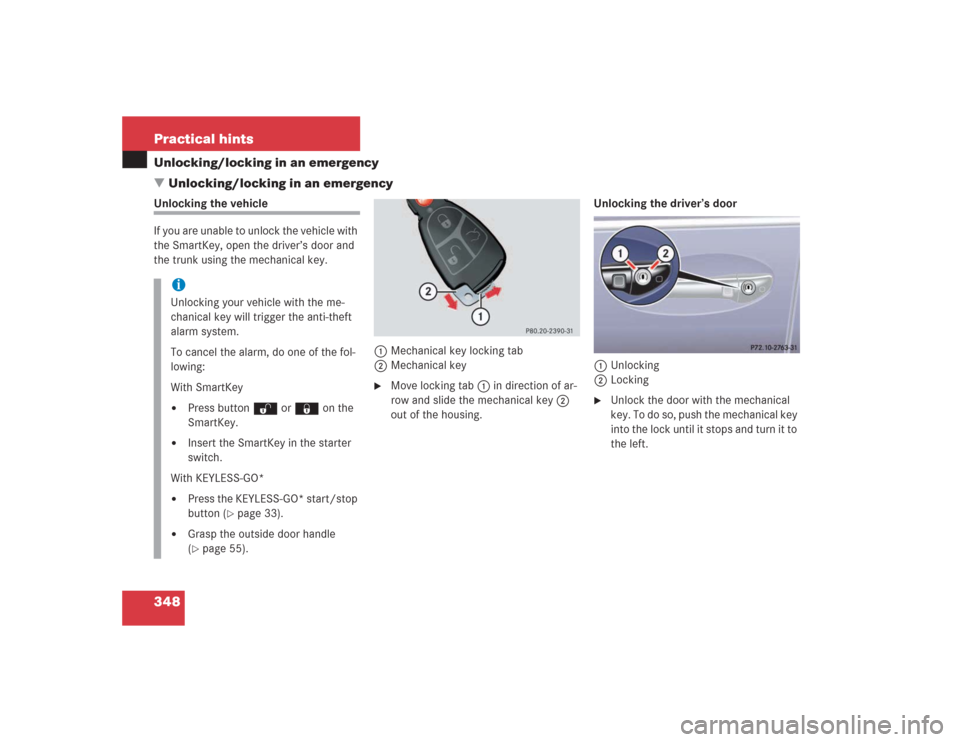
1Mechanical key locking tab
2Mechanical key
�
Move locking tab1 in direction of ar-
row and slide the mechanical key2
out of the housing.Unlocking the driver’s door
1Unlocking
2Locking
�
Unlock the door with the mechanical
key. To do so, push the mechanical key
into the lock until it stops and turn it to
the left.
iUnlocking your vehicle with the me-
chanical key will trigger the anti-theft
alarm system.
To cancel the alarm, do one of the fol-
lowing:
With SmartKey�
Press button Œ or ‹ on the
SmartKey.
�
Insert the SmartKey in the starter
switch.
With KEYLESS-GO*
�
Press the KEYLESS-GO* start/stop
button (
�page 33).
�
Grasp the outside door handle
(�page 55).
Page 350 of 435
349 Practical hints
Unlocking/locking in an emergency
Unlocking the trunk
A minimum height clearance of 6 ft.
(1.85 m) is required to open the trunk lid.
If you are unable to unlock the trunk with
the SmartKey or KEYLESS-GO*, open the
trunk with the mechanical key.
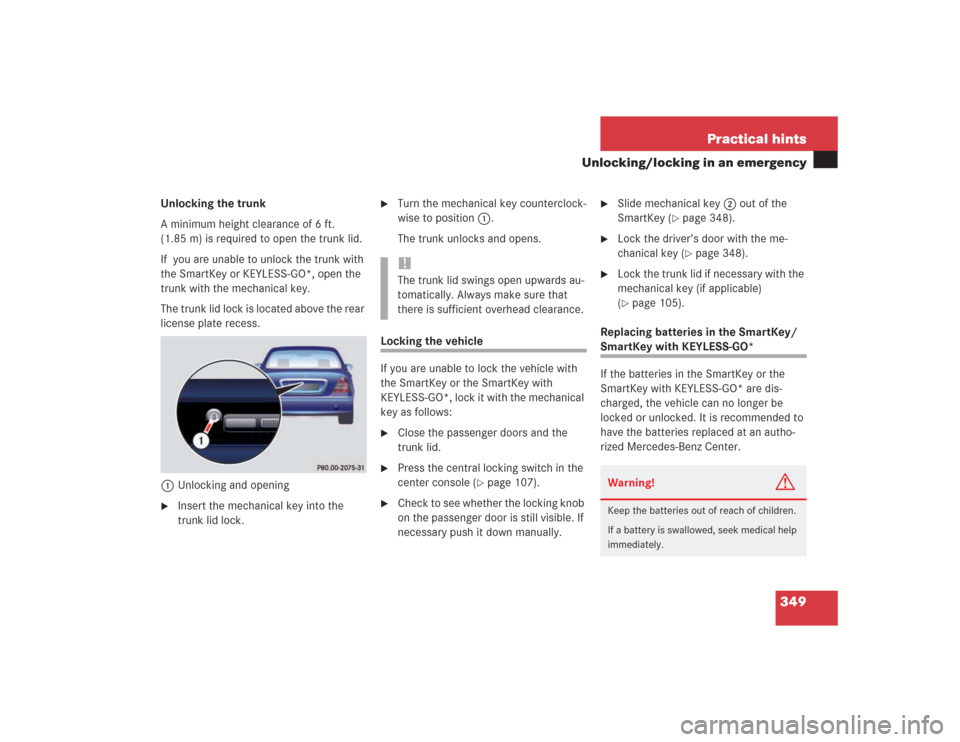
The trunk lid lock is located above the rear
license plate recess.
1Unlocking and opening�
Insert the mechanical key into the
trunk lid lock.
�
Turn the mechanical key counterclock-
wise to position1.
The trunk unlocks and opens.
Locking the vehicle
If you are unable to lock the vehicle with
the SmartKey or the SmartKey with
KEYLESS-GO*, lock it with the mechanical
key as follows:�
Close the passenger doors and the
trunk lid.
�
Press the central locking switch in the
center console (
�page 107).
�
Check to see whether the locking knob
on the passenger door is still visible. If
necessary push it down manually.
�
Slide mechanical key2 out of the
SmartKey (
�page 348).
�
Lock the driver’s door with the me-
chanical key (
�page 348).
�
Lock the trunk lid if necessary with the
mechanical key (if applicable)
(�page 105).
Replacing batteries in the SmartKey/
SmartKey with KEYLESS-GO*
If the batteries in the SmartKey or the
SmartKey with KEYLESS-GO* are dis-
charged, the vehicle can no longer be
locked or unlocked. It is recommended to
have the batteries replaced at an autho-
rized Mercedes-Benz Center.
!The trunk lid swings open upwards au-
tomatically. Always make sure that
there is sufficient overhead clearance.
Warning!
G
Keep the batteries out of reach of children.
If a battery is swallowed, seek medical help
immediately.
Page 351 of 435
350 Practical hintsUnlocking/locking in an emergencyBatteries contain materials that can harm
the environment if disposed of improperly.
Recycling of batteries is the preferred
method of disposal. Many states require
sellers of batteries to accept old batteries
for recycling.
SmartKey
1Mechanical key
2Battery compartment
Replacement batteries: Lithium, type
CR 2025 or equivalent.
�
Remove mechanical key1
(�page 348).
�
Insert the mechanical key1 in side
opening and push gray slide.
The battery compartment is unlatched.
�
Pull the battery compartment2 out of
the SmartKey housing in direction of
arrow.
�
Remove the batteries.3Battery
4Contact spring
�
Using a lint-free cloth, insert new
batteries3 under the contact
spring4 with the plus (+) side facing
up.
�
Return battery compartment into hous-
ing until it locks into place.
iWhen changing batteries, always re-
place both batteries.
The required replacement batteries are
available at any authorized
Mercedes-Benz Center.
Page 352 of 435
351 Practical hints
Unlocking/locking in an emergency
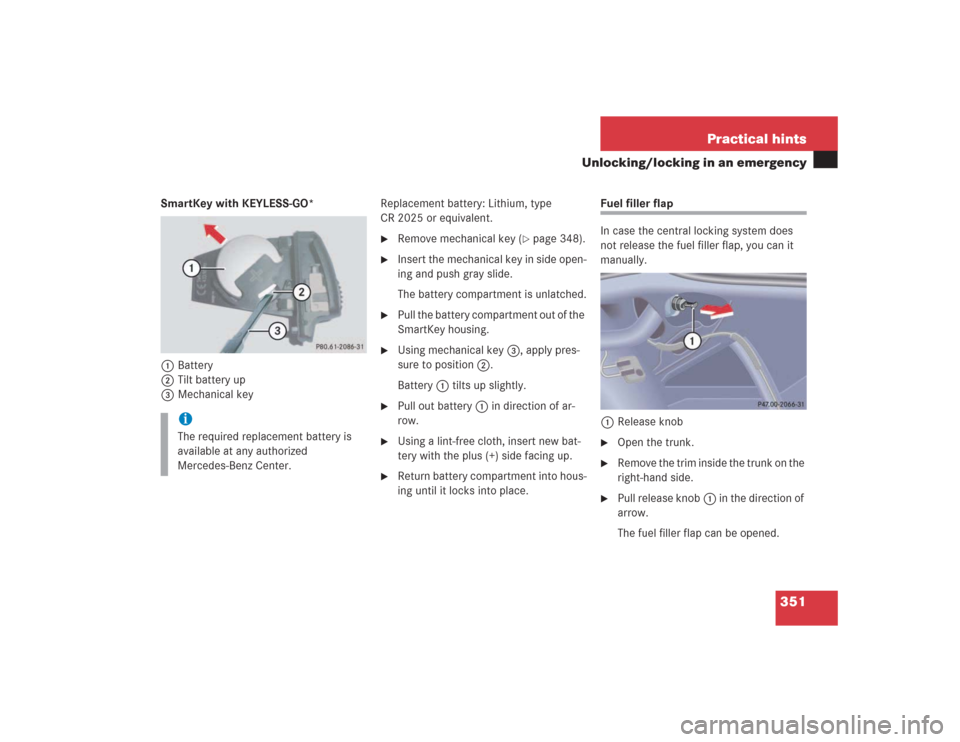
SmartKey with KEYLESS-GO*
1Battery
2Tilt battery up
3Mechanical keyReplacement battery: Lithium, type
CR 2025 or equivalent.
�
Remove mechanical key (
�page 348).
�
Insert the mechanical key in side open-
ing and push gray slide.
The battery compartment is unlatched.
�
Pull the battery compartment out of the
SmartKey housing.
�
Using mechanical key3, apply pres-
sure to position2.
Battery1 tilts up slightly.
�
Pull out battery1 in direction of ar-
row.
�
Using a lint-free cloth, insert new bat-
tery with the plus (+) side facing up.
�
Return battery compartment into hous-
ing until it locks into place.
Fuel filler flap
In case the central locking system does
not release the fuel filler flap, you can it
manually.
1Release knob�
Open the trunk.
�
Remove the trim inside the trunk on the
right-hand side.
�
Pull release knob1 in the direction of
arrow.
The fuel filler flap can be opened.
iThe required replacement battery is
available at any authorized
Mercedes-Benz Center.
Page 353 of 435
352 Practical hintsOpening/closing in an emergency
�Opening/closing in an emergencySliding/pop-up roof
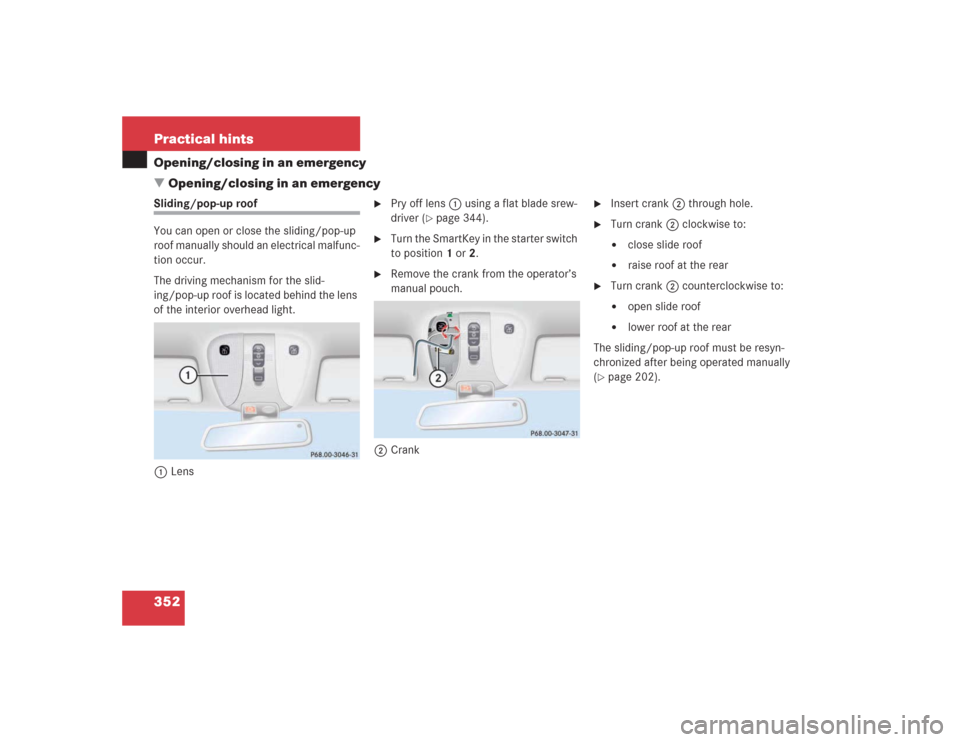
You can open or close the sliding/pop-up
roof manually should an electrical malfunc-
tion occur.
The driving mechanism for the slid-
ing/pop-up roof is located behind the lens
of the interior overhead light.
1Lens
�
Pry off lens1 using a flat blade srew-
driver (
�page 344).
�
Turn the SmartKey in the starter switch
to position1 or2.
�
Remove the crank from the operator’s
manual pouch.
2Crank
�
Insert crank2 through hole.
�
Turn crank2 clockwise to:�
close slide roof
�
raise roof at the rear
�
Turn crank2 counterclockwise to:�
open slide roof
�
lower roof at the rear
The sliding/pop-up roof must be resyn-
chronized after being operated manually
(
�page 202).
Page 354 of 435
353 Practical hints
Replacing bulbs
�Replacing bulbs
Safe vehicle operation depends on proper
exterior lighting and signaling. It is there-
fore essential that all bulbs and lamp as-
semblies are in good working order at all
times.
Correct headlamp adjustment is extremely
important. Have headlamps checked and
readjusted at regular intervals and when a
bulb has been replaced. See an authorized
Mercedes-Benz Center for headlamp ad-
justment.
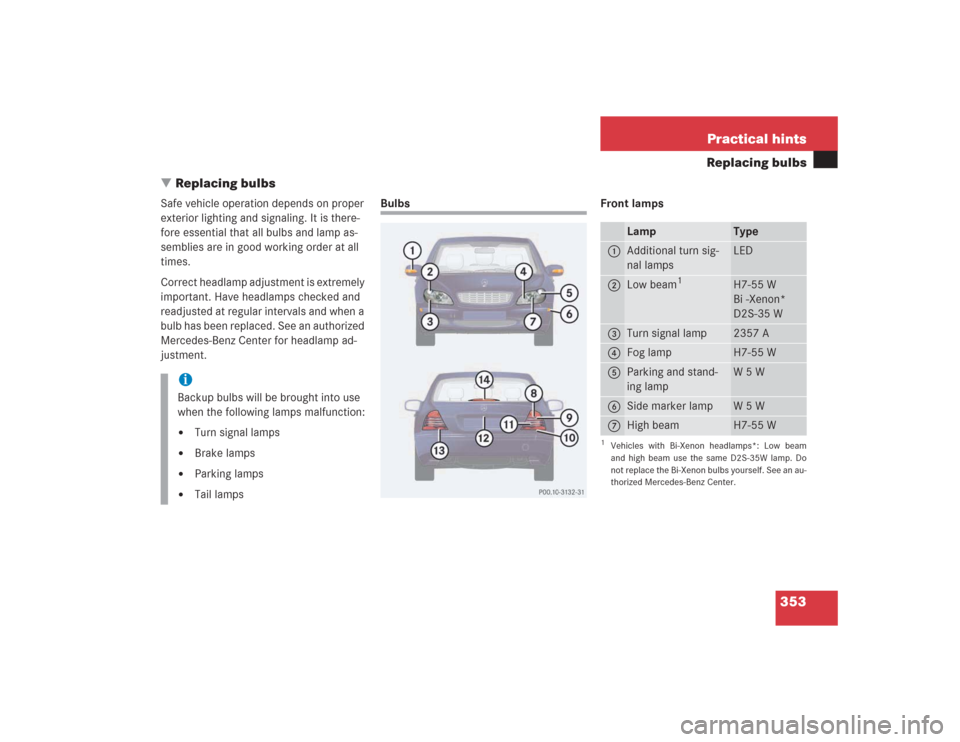
Bulbs Front lamps
iBackup bulbs will be brought into use
when the following lamps malfunction:�
Turn signal lamps
�
Brake lamps
�
Parking lamps
�
Tail lamps
Lamp
Type
1
Additional turn sig-
nal lamps
LED
2
Low beam
1
1Vehicles with Bi-Xenon headlamps*: Low beam
and high beam use the same D2S-35W lamp. Do
not replace the Bi-Xenon bulbs yourself. See an au-
thorized Mercedes-Benz Center.
H7-55 W
Bi -Xenon*
D2S-35 W
3
Turn signal lamp
2357 A
4
Fog lamp
H7-55 W
5
Parking and stand-
ing lamp
W5W
6
Side marker lamp
W5W
7
High beam
H7-55 W