Page 107 of 344
107 Controls in detail
Lighting
�Lighting
For notes on how to switch on the head-
lamps (
�page 48) and use the turn signals
(
�page 49), see the “Getting started” sec-
tion.
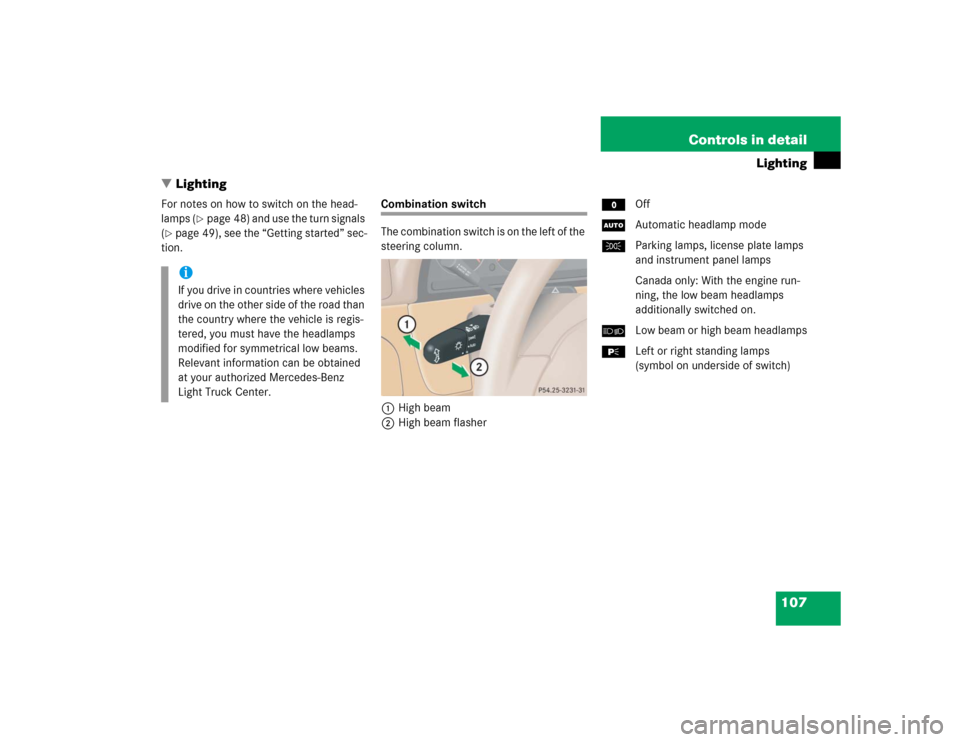
Combination switch
The combination switch is on the left of the
steering column.
1High beam
2High beam flasherMOff
UAutomatic headlamp mode
CParking lamps, license plate lamps
and instrument panel lamps
Canada only: With the engine run-
ning, the low beam headlamps
additionally switched on.
õLow beam or high beam headlamps
ƒLeft or right standing lamps
(symbol on underside of switch)
iIf you drive in countries where vehicles
drive on the other side of the road than
the country where the vehicle is regis-
tered, you must have the headlamps
modified for symmetrical low beams.
Relevant information can be obtained
at your authorized Mercedes-Benz
Light Truck Center.
Page 108 of 344
.
Automat")
108 Controls in detailLightingManual headlamp mode
The low beam headlamps and parking
lamps can be switched on and off with the
combination switch. For combination
switch, see (
�page 107).
Automatic headlamp mode
The parking lamps, low beam headlamps
and license plate lamps switch on and off
automatically depending on the brightness
of the ambient light.
�
Turn the combination switch toU.iIf you remove the key and open the
driver’s door while the parking lamps or
low beam headlamps are switched on,
then a warning sounds.
Warning!
G
If the combination switch is set toU,�
the headlamps may switch off unexpect-
edly when the system senses bright am-
bient light, for example light from
oncoming traffic.
�
the headlamps will not be automatically
switched on under foggy conditions.
To minimize risk to you and to others, acti-
vate headlamps by turning combination
switch toõ when driving or when traffic
and / or ambient lighting conditions require
you to do so.
In low ambient lighting conditions, only
switch from positionU toõ with the
vehicle at a standstill. Switching fromU
toõ will briefly switch off the head-
lamps. Doing so while driving in low ambient
lighting conditions may result in an acci-
dent.
The automatic headlamp feature is only an
aid to the driver. The driver is responsible for
the operation of the vehicle's lights at all
times.iIf the automatic headlamp mode is ac-
tivated, the fog lamps can also be
switched on (
�page 111). The low
beam headlamp and parking lamps are
activated simultaneously.
Page 109 of 344

109 Controls in detail
Lighting
Daytime running lamp mode
Canada only:�
Turn combination switch to
positionM orU.
When the engine is running, the low beam
headlamps are automatically switched on.
In low ambient light conditions, the parking
lamps will also switch on.
When you shift from a driving position to
positionN orP, the low beam switches off
(three minutes delay).
For nighttime driving you should turn the
combination switch to positionõ to
permit activation of the high beam head-
lamps.Night security illumination
When you turn off the engine and the last
door has been closed, the following lamps
will remain lit:
�
Parking lamps
�
Tail lamps
�
License plate lamps
�
Front fog lamps
The combination switch must be set to
positionU (
�page 107).Deactivating night security illumination
temporarily
�
Before leaving the vehicle, turn the key
in the steering lock to position0
(�page 33) then turn it to position2
and back to0.
The night security illumination is deac-
tivated. It will reactivate as soon as you
start the engine.
Setting illumination time
1Switch for fog lamps
iThe high beam flasher is always avail-
able.
iYou can reactivate this function within
ten minutes by opening a door or the
liftgate.
If you do not open a door or the liftgate
after turning off the engine, the lamps
will automatically switch off after
60 seconds.
Page 111 of 344

111 Controls in detail
Lighting
Fog lamps
The switch is located on the upper center
console.1Front fog lamps
2Indicator lamp
3Front fog lamps and rear fog lamp
Switching front fog lamps on and off
�
Make sure the low beam headlamps
are switched on.
�
Press upper part1 of switch.
The green indicator lamp‡ in the
instrument cluster comes on.
�
Press upper part1 of switch again.
The green indicator lamp‡ in the
instrument cluster goes out.Switching front fog lamps and rear fog
lamps on and off
�
Make sure the low beam headlamps
are switched on.
�
Press lower part3 of switch.
The green indicator lamp‡ in the
instrument cluster comes on in addi-
tion to the yellow indicator lamp2 in
the switch.
�
Press lower part3 of switch again.
The green indicator lamp‡ in the
instrument cluster and the yellow indi-
cator lamp2 in the switch go out.
Switching rear fog lamp on and off
�
Press upper part1 of switch.
The yellow indicator lamp2 in the
switch goes out.
�
Press upper part1 of switch.
The green indicator lamp‡ in the
instrument cluster goes out.
Warning!
G
In low ambient lighting or foggy conditions,
only switch from positionU toB with
the vehicle at a standstill. Switching
fromU toB will briefly switch off the
headlamps. Doing so while driving in low
ambient lighting conditions may result in an
accident.iThe fog lamps can be switched on with
combination switch in positionõ
orU. Consult your state Motor Reg-
ulations regarding allowable lamp oper-
ation.
Page 116 of 344
116 Controls in detailInstrument cluster
�Instrument clusterA full view illustration of the instrument
cluster can be found in the “At a glance”
section of this manual (
�page 24).
1Left knob
2Right knobThe instrument cluster is activated when
you:
�
open the driver’s door
�
turn the key in steering lock to
position1 or 2 (
�page 33)
�
press the left knob1
Instrument cluster illumination
To brighten illumination�
Turn knob1 clockwise.
The instrument cluster illumination will
brighten.
To dim illumination
�
Turn knob1 counterclockwise.
The instrument cluster illumination will
dim.iYou can set the instrument cluster illu-
mination with the following lamps on:�
parking lamps
�
low beam headlamps
�
high beam headlamps
Page 126 of 344
 and for setting the rear view
mirrors (
�page 40) is found in the
“Getting started” section")
126 Controls in detailGood visibility
�Good visibilityInformation on the windshield wipers
(�page 49) and for setting the rear view
mirrors (
�page 40) is found in the
“Getting started” section.
Rear view mirror
Interior rear view mirror, antiglare
position
1Lever�
Tilt the mirror to the antiglare night po-
sition by moving lever1 towards the
windshield.
The interior rear view mirror is dimmed.Automatic antiglare rear view mirror*
The reflection brightness of the exterior
rear view mirror on the driver’s side and
the interior rear view mirror will respond
automatically to glare when:
�
the automatic antiglare function is acti-
vated (
�page 127)
�
the ignition is switched on
�
incoming light from headlamps falls on
the sensor in the interior rear view
mirror
The rear view mirror will not react if
�
reverse gear is engaged
�
the interior light is turned on
Warning!
G
The automatic antiglare function does not
react if incoming light is not aimed directly
at sensors in the inside rear view mirror.
The interior rear view mirror and the exterior
rear view mirror on the driver’s side do not
react, for example, if the cargo area is fully
loaded.
Glare can endanger you and others.Warning!
G
In the case of an accident, liquid electrolyte
may escape the mirror housing if the mirror
glass breaks.
Electrolyte has an irritating effect. Do not al-
low the liquid to come into contact with
eyes, skin, clothing, or the respiratory sys-
tem. In case it does, immediately flush af-
fected area with water, and seek medical
help if necessary.
Page 131 of 344
131 Controls in detail
Good visibility
Headlamp cleaning system*
The button is located on the right side of
the dashboard.Headlamp washer button�
Switch on ignition.
�
Briefly press the upper part of button.
The headlamps will be cleaned with a
high-pressure water jet.Information on filling up the washer reser-
voir can be found in the “Operation” sec-
tion (
�page 224).
Rear window wiper
The rear window wiper will also automati-
cally engage if the windshield wiper is en-
gaged and the gear selector lever is placed
in reverse.Rear window wiper with rain sensor*
Rear window wiper intervals are controlled
automatically according to the amount of
water on the windshield and the speed of
the vehicle, if:
�
rear window wiper is switched on
�
front windshield wipers are switched to
intermittent wiping
The interval for the rear window wiper re-
mains constant when the windshield wiper
interval is ten seconds or more.
Page 215 of 344

215 Operation
At the gas station
�
Replace the fuel cap by turning it to the
right.
You will hear when the fuel cap is tight-
ened.
�
Close the fuel filler flap.
Check regularly and before a long trip�
Open the hood (
�page 217)
1Engine oil level
2Coolant level
For normal replenishing, use water (po-
table water quality). More information
on the coolant level can be found in the
“Operation” section (
�page 222).
3Brake fluid
4Windshield washer system and
headlamp cleaning system*
More information on filling the reser-
voir can be found in the “Operation”
section (
�page 224).
iUse only premium unleaded gasoline
with a minimum Posted Octane Rating
of 91 (average of 96 RON / 86 MON).
Information on gasoline quality can
normally be found on the fuel pump.
More information on gasoline can be
found in the Factory Approved Service
Products pamphlet.
iLeaving the engine running and the fuel
cap open can cause the yellow fuel
tank reserve warning lamp to flash and
the? lamp to illuminate.
See also “Practical hints” section
(�page 248).