Page 58 of 376

58 Safety and SecurityOccupant safetyWarning!
G
The service life of the passenger front airbag
extends to the date indicated on the label lo-
cated on the driver side B pillar. To provide
continued reliability after that date, they
should be inspected by an authorized
Mercedes-Benz Light Truck Center at that
time and replaced when necessary.
Warning!
G
To reduce the risk of injury when the front
airbags inflate, it is very important for the
driver and front passenger to always be in a
properly seated position and to wear your
seat belt.
For maximum protection in the event of a
collision always be in normal seated position
with your back against the backrest. Fasten
your seat belt and ensure it is properly posi-
tioned on your body (
�page 62).
Since the airbag inflates with considerable
speed and force, a proper seating and hands
on steering wheel position will help to keep
you at a safe distance from the airbag. Oc-
cupants who are unbelted, out of position or
too close to the airbag can be seriously in-
jured by an airbag as it inflates with great
force in the blink of an eye:
�
Sit properly belted in an upright position
with your back against the backrest.
�
Adjust the driver seat as far as possible
rearward, still permitting proper opera-
tion of vehicle controls. The distance
from the center of the driver’s breast-
bone to the center of the airbag cover on
the steering wheel must be at least
ten inches (25 cm) or more. You should
be able to accomplish this by a combina-
tion of adjustments to the seat and
steering wheel. If you have any prob-
lems, please see your authorized
Mercedes-Benz Light Truck Center.
�
Do not lean with your head or chest
close to the steering wheel or dash-
board.
�
Keep hands on the outside of steering
wheel rim. Placing hands and arms in-
side the rim can increase the risk and
potential severity of hand/arm injury
when driver front airbag inflates.
�
Adjust the front passenger seat as far as
possible rearward from the dashboard
when the seat is occupied.
Page 104 of 376
104 Controls in detailLighting
�LightingFor notes on how to switch on the head-
lamps and use the turn signals, see the
“Getting started” section (
�page 46).
Exterior lamp switch
The exterior lamp switch is located on the
dashboard to the left of the steering wheel.MOff
UAutomatic headlamp mode
CParking lamps (also side marker
lamps, tail lamps, license plate
lamps, instrument panel lamps)
Canada only: When engine is run-
ning, the low beam is additionally
switched on.
BParking lamps plus low beam or
high beam headlamps (combination
switch pushed forward).
ˆStanding lamps, right (turn left one
stop)
‚Standing lamps, left (turn left two
stops)
iIf you drive in countries where vehicles
drive on the other side of the road than
the country where the vehicle is regis-
tered, you must have the headlamps
modified for symmetrical low beams.
Relevant information can be obtained
at your authorized Mercedes-Benz
Light Truck Center.
Page 149 of 376

149 Controls in detail
Differential locks
A few words about differentials and differential locks
When a vehicle negotiates a turn, wheels
on the outside of the curve must travel far-
ther and rotate faster than the inside
wheels. The differential, the operation of a
set of gears that allows the powered
wheels in a vehicle to turn at different
speeds, makes this essential function pos-
sible.
The drawback is that the differential also
sends most of the engine’s power to the
wheel with the least load or strain on it. For
example, if one of a vehicle’s powered
wheels sits on a patch of snow and spins
because there is no traction, all of the en-
gine’s power will go to that wheel because
the power will take the path of least resis-
tance. Meanwhile, the opposite wheel, sit-
ting on dry pavement where it could get
enough grip to start the vehicle moving,
sits idle because it receives no power.The Electronic Traction System (ETS) ad-
dresses this problem and provides for
good control and steering ability by auto-
matically slowing the slipping wheel and
thus increasing the power to the other
non-slipping drive wheels to get the vehicle
moving. The ESP and ETS in this vehicle
feature such intelligent limited-slip differ-
ential technology, ideally suited for
on-road and light off-road driving. Transfer
case position LOW (
�page 145) also en-
hances off-road driving capabilities
(
�page 213).
More extreme off-road conditions may call
for another solution, engaging a differen-
tial lock or preventing the differential from
operating altogether. As part of its stan-
dard equipment, this vehicle comes with
three differential locks: front, transfer case
(center) and rear. Each can be engaged
simply by pushing dashboard-mounted
buttons in sequential order (center, rear,
front) (
�page 150). When the transfer
case (center) differential is locked, half of
the engine’s power is automatically distrib-
uted to the front wheels and half to the rear wheels. When the rear differential is
locked, power going to the rear wheels is
equally distributed, so that both rear
wheels turn at the same speed and torque.
When the front differential is locked, all
four wheels now turn with equal power and
torque. Please be aware that engaging the
differential locks will significantly reduce
the steering ability of the vehicle.
For your safety and the safety of others
and to prevent damage to the vehicle, the
differential locks must not be engaged
when driving on paved roads. It is impor-
tant to understand that during
on-road/paved driving, differentials are
absolutely necessary for providing the es-
sential control and steering ability of the
vehicle. The differential locks, therefore,
must not be engaged when driving on
paved roads and should only be used to
the extent necessary to negotiate off-road
conditions which cannot be handled by the
systems (automatic 4-ETS, the ESP, manu-
al switch position “LOW” of transfer case)
this vehicle comes equipped with.
Page 321 of 376
321 Practical hintsFuses
Fuse box in middle tunnel
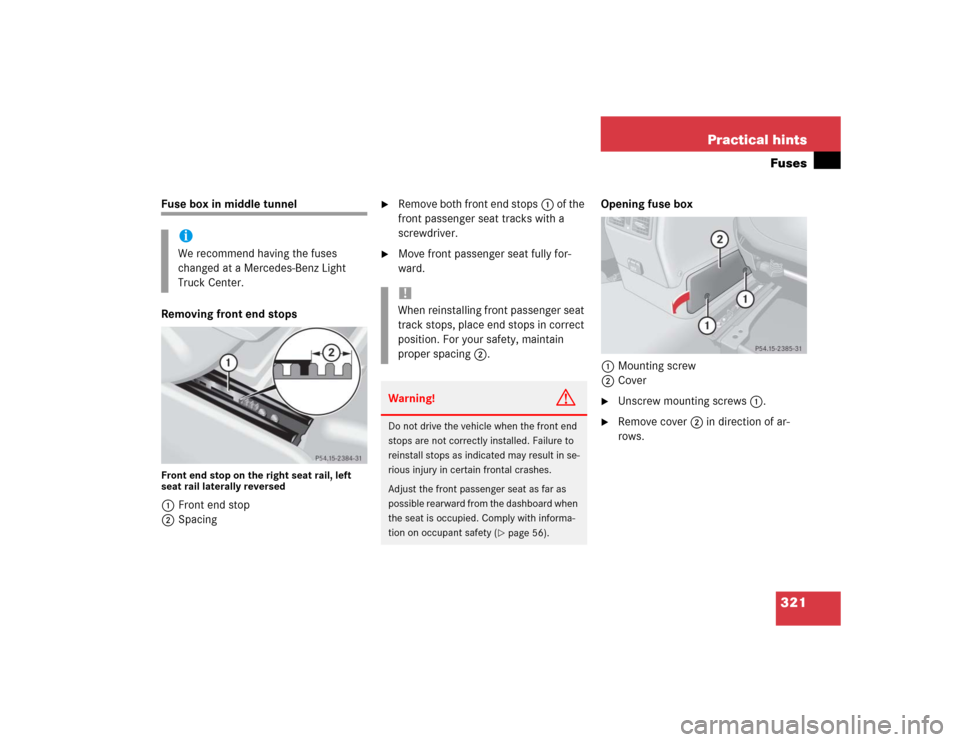
Removing front end stopsFront end stop on the right seat rail, left
seat rail laterally reversed1Front end stop
2Spacing
�
Remove both front end stops1 of the
front passenger seat tracks with a
screwdriver.
�
Move front passenger seat fully for-
ward.Opening fuse box
1Mounting screw
2Cover
�
Unscrew mounting screws1.
�
Remove cover2 in direction of ar-
rows.
iWe recommend having the fuses
changed at a Mercedes-Benz Light
Truck Center.
!When reinstalling front passenger seat
track stops, place end stops in correct
position. For your safety, maintain
proper spacing2.Warning!
G
Do not drive the vehicle when the front end
stops are not correctly installed. Failure to
reinstall stops as indicated may result in se-
rious injury in certain frontal crashes.
Adjust the front passenger seat as far as
possible rearward from the dashboard when
the seat is occupied. Comply with informa-
tion on occupant safety (
�page 56).