Page 233 of 376

233 Operation
Engine compartment
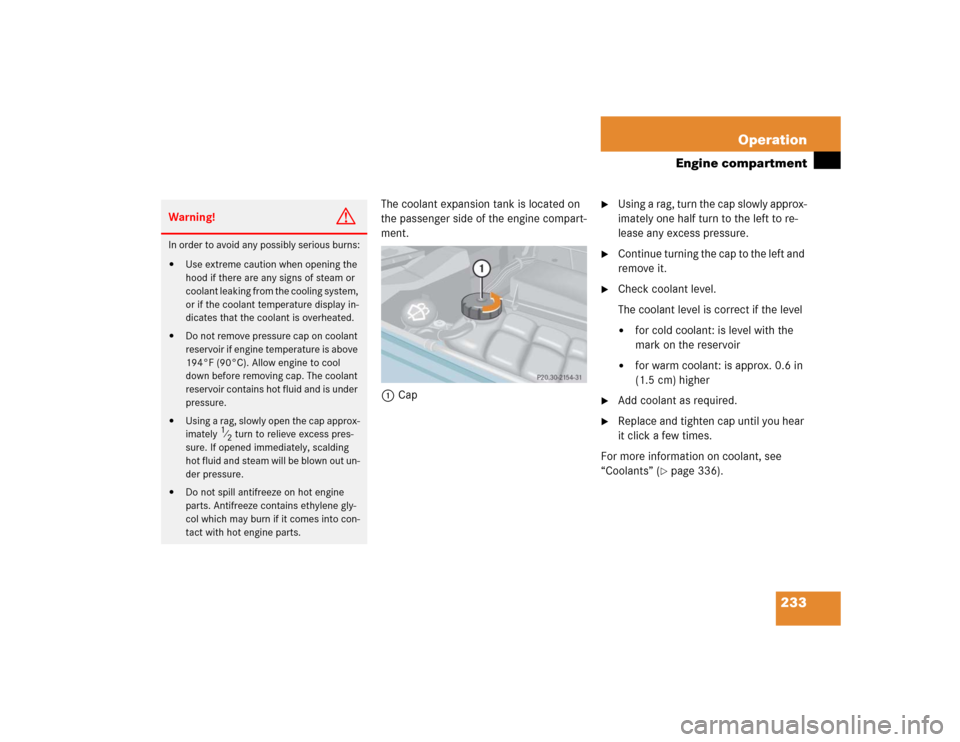
The coolant expansion tank is located on
the passenger side of the engine compart-
ment.
1Cap
�
Using a rag, turn the cap slowly approx-
imately one half turn to the left to re-
lease any excess pressure.
�
Continue turning the cap to the left and
remove it.
�
Check coolant level.
The coolant level is correct if the level �
for cold coolant: is level with the
mark on the reservoir
�
for warm coolant: is approx. 0.6 in
(1.5 cm) higher
�
Add coolant as required.
�
Replace and tighten cap until you hear
it click a few times.
For more information on coolant, see
“Coolants” (
�page 336).
Warning!
G
In order to avoid any possibly serious burns:�
Use extreme caution when opening the
hood if there are any signs of steam or
coolant leaking from the cooling system,
or if the coolant temperature display in-
dicates that the coolant is overheated.
�
Do not remove pressure cap on coolant
reservoir if engine temperature is above
194°F (90°C). Allow engine to cool
down before removing cap. The coolant
reservoir contains hot fluid and is under
pressure.
�
Using a rag, slowly open the cap approx-
imately
1⁄2turn to relieve excess pres-
sure. If opened immediately, scalding
hot fluid and steam will be blown out un-
der pressure.
�
Do not spill antifreeze on hot engine
parts. Antifreeze contains ethylene gly-
col which may burn if it comes into con-
tact with hot engine parts.
Page 269 of 376

269 Practical hints
What to do if …
During severe operating conditions and
stop-and-go city traffic, the coolant tem-
perature may rise close to 248°F (120°C).
Display symbol
Display message
Possible cause
Possible solution
Ï
COOLANT
STOP, ENGINE OFF!
The coolant is too hot.
�
Stop the vehicle and turn off the en-
gine.
�
Only start the engine again after the
message disappears. You could other-
wise damage the engine.
Warning!
G
Driving when your engine is badly overheat-
ed can cause some fluids which may have
leaked into the engine compartment to
catch fire. You could be seriously burned.
Steam from an overheated engine can cause
serious burns and can occur just by opening
the hood. Stay away from the engine if you
see or hear steam coming from it.
Turn off the engine, get out of the vehicle
and do not stand near the vehicle until the
engine has cooled down.
!The engine should not be operated with
the coolant temperature above 248°F
(120°C). Doing so may cause serious
engine damage which is not covered by
the Mercedes-Benz Limited Warranty.
Page 273 of 376
273 Practical hints
What to do if …
Display symbol
Display message
Possible cause
Possible solution
A
RESERVE FUEL
GO TO GAS STATION
The fuel level has dropped below the re-
serve mark.
�
Refuel at the next gas station
(�page 224).
CHECK GAS CAP
SEE OPERATOR’S MANUAL
The fuel cap is not closed tightly.
�
Check the fuel cap (
�page 224).
Y
HOOD OPEN!
You are driving with the hood open.
�
Close the hood (
�page 228).
I
REMOVE KEY!
You have forgotten to remove the Smart-
Key.
�
Remove the SmartKey from the starter
switch.
REPLACE KEY
DRIVE TO WORKSHOP!
No additional code available for Smart-
Key.
�
Visit an authorized Mercedes-Benz
Light Truck Center.
Page 304 of 376

304 Practical hintsReplacing wiper blades
�Replacing wiper blades
Removing wiper blades�
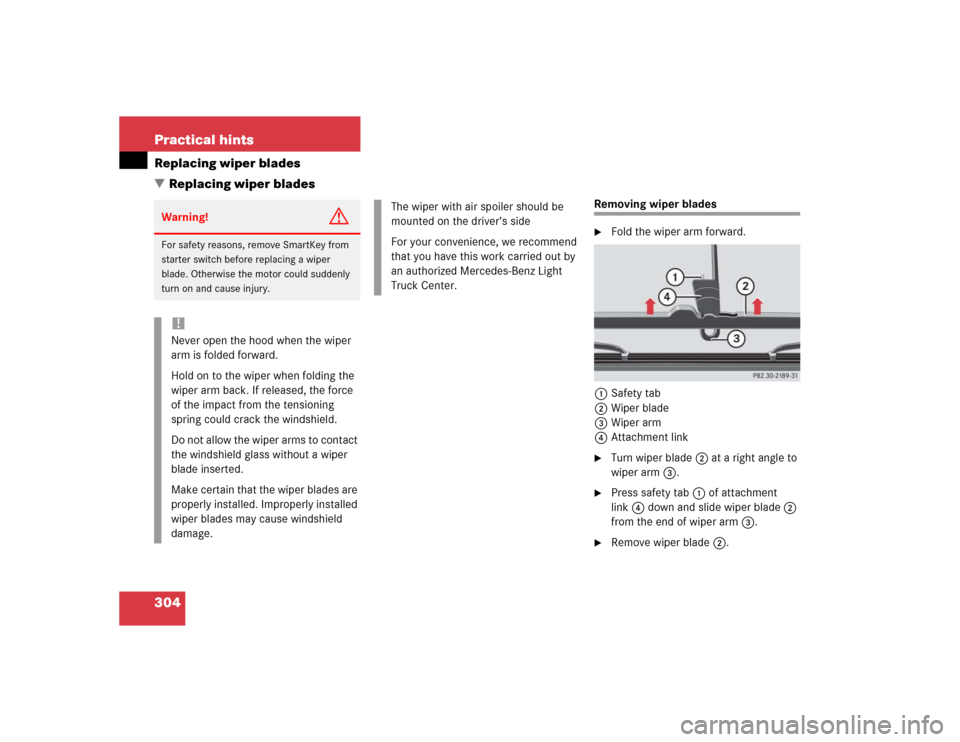
Fold the wiper arm forward.
1Safety tab
2Wiper blade
3Wiper arm
4Attachment link
�
Turn wiper blade2 at a right angle to
wiper arm3.
�
Press safety tab1 of attachment
link4 down and slide wiper blade2
from the end of wiper arm3.
�
Remove wiper blade2.
Warning!
G
For safety reasons, remove SmartKey from
starter switch before replacing a wiper
blade. Otherwise the motor could suddenly
turn on and cause injury.!Never open the hood when the wiper
arm is folded forward.
Hold on to the wiper when folding the
wiper arm back. If released, the force
of the impact from the tensioning
spring could crack the windshield.
Do not allow the wiper arms to contact
the windshield glass without a wiper
blade inserted.
Make certain that the wiper blades are
properly installed. Improperly installed
wiper blades may cause windshield
damage.
The wiper with air spoiler should be
mounted on the driver’s side
For your convenience, we recommend
that you have this work carried out by
an authorized Mercedes-Benz Light
Truck Center.
Page 356 of 376

356 IndexEmergency operation (Limp Home
Mode) 144
Emergency operations
Closing sliding/pop-up roof 292
Locking the vehicle 288
Opening sliding/pop-up roof 292
Remote door unlock 197
Unlocking the tailgate 287
Unlocking the vehicle 287
Emergency tensioning device see ETD
Emission control 222
Emission control label 326
Ending
A call (telephone) 138
Engine
Compartment 227
Message in display 256
Starting with the key 44
Technical data 328
Turning off with the key 52
Engine cleaning 246Engine compartment 227
Hood 227
Engine malfunction indicator lamp 25,
256
Engine number 344
Engine oil 228, 334
Adding 231
Additives 335, 340
Checking level 228
Consumption 228
Display messages 272
Messages in display 229, 271
Oil dipstick 232
Viscosity 344
Engine oil level see Oil level
Enlarged cargo compartment 176
ESP 25, 74, 78, 344
Messages in display 263
Switching off 79
Switching on 81
Synchronizing 263
Warning lamp 257ETD 56, 65, 344
Safety guidelines 60
Exterior lamp switch 104
Exterior lamps
Delayed switch-off 131
Exterior rear view mirrors
Adjusting 38
Parking position for 135
F
Fahrenheit
Setting temperature units 127
Fastening the seat belts 40
Fine adjustment
Cruise control 171
First aid kit 283
Flat tire 306
Lowering the vehicle 310
Mounting the spare wheel 307
Spare wheel 285
Page 358 of 376

358 IndexGear range 344
Automatic transmission 142
Limiting 142
Shifting into optimal 141
Transfer case 145
Gear range limit
Canceling 141
Gear selector lever
Cleaning 248
Position 142
Position (automatic
transmission) 140
Global
Locking 87
Unlocking 87
Global Positioning System (GPS) 345
Glove box 23, 183
Closing 183
Opening 183
Good visibility 152
GPS 345
GVW 344
GVWR 344H
Hard plastic trim items
Cleaning 248
Hazard warning flasher 108
Switching off 108
Switching on 108
Head restraints 95
Power seats 36
Synchronizing 95
Headlamp cleaning system 234
Headlamps
Automatic control 105
Cleaning 246
Cleaning system 153, 234
Switching off 52
Switching on 46
Washer fluid 339
Washer system 339Headlight switch-off delay see Delayed
switch-off, exterior lamps
Headliner
Cleaning 248
Heated seats 98
Heated steering wheel 203
Height adjustment
Head restraints 36
Seat belts 42
Steering wheel 37
High beam flasher 47, 108
High beam headlamps
Messages in display 275
Replacing bulbs 295, 297
Switching on 108
High mounted brake lamp 296
Hood 227
Closing 228
Messages in display 273
Opening 227
Hydroplaning 210
Page 363 of 376

363 Index
Oil
Adding 231
Consumption 228
Dipstick 228
Oil dipstick 232
Viscosity 344
Oil level
Checking 226
One-touch gearshifting 141
Canceling gear range limit 141
Downshifting 141
Upshifting 141
Opening
Ashtray 186
Doors from the inside 89
Fuel filler flap 224
Fuel filler flap manually 290
Glove box 183
Hood 227
Side windows 164
Sliding/pop-up roof 166, 292Sliding/pop-up roof in an
emergency 292
Sliding/pop-up roof with
SmartKey 167
Tailgate 89, 90
Windows 164
Windows with SmartKey 165
Operating
CD player 121
COMAND see separate operating in-
structions
Navigation system 122
Radio 121
Radio transmitters 221
Telephone 137
Operator’s Manual 10
Ornamental moldings 246
Outside temperature indicator 114
Overdue service 242
Overhead control panel 29
Overspeed range 345P
Paintwork 245
Panic alarm 73
Panic button on SmartKey 73
Parcel net
In front passenger footwell 186
Parking 51, 209
Parking brake 44, 51
Engaging 51
Message in display 267
Releasing 44
Parking lamp, front
Replacing bulbs 297
Parking lamps
Replacing bulbs 295, 296
Switching on 104
Parking position
Exterior rear view mirrors 103, 135,
153
Parktronic see Rear Parking Assist*
Partition net* 178
Installing behind front seats 179
Installing behind rear seat bench 178
Removing 180
Parts see Spare parts service