Page 275 of 376

275 Practical hints
What to do if …
Display symbol
Display message
Possible cause
Possible solution
.
BRAKE LIGHT, R
CHECK LIGHT!
The right brake lamp is malfunctioning.
�
Visit an authorized Mercedes-Benz
Center as soon as possible.
FRONT FOGLIGHT, L
CHECK LIGHT!
The left front fog lamp is malfunctioning.
�
Replace the bulb as soon as possible.
FRONT FOGLIGHT, R
CHECK LIGHT!
The right front fog lamp is malfunctioning.
�
Replace the bulb as soon as possible.
FR. L. PARK. LAMP
CHECK LIGHT!
BACK-UP LIGHT ON!
The left parking lamps are malfunction-
ing. A backup bulb is being used.
�
Replace the bulb as soon as possible.
FR. R. PARK LAMP
CHECK LIGHT!
BACK-UP LIGHT ON!
The right parking lamps are malfunction-
ing. A backup bulb is being used.
�
Replace the bulb as soon as possible.
HIGH BEAM, L
CHECK LIGHT!
The left high beam lamp is malfunction-
ing.
�
Replace the bulb as soon as possible.
HIGH BEAM, R
CHECK LIGHT!
The right high beam lamp is malfunction-
ing.
�
Replace the bulb as soon as possible.
Page 277 of 376

277 Practical hints
What to do if …
Display symbol
Display message
Possible cause
Possible solution
.
MARKER LIGHT, FL
CHECK LIGHT!
The left front side marker lamp is mal-
functioning.
�
Replace the bulb as soon as possible.
MARKER LIGHT, FR
CHECK LIGHT!
The right front side marker lamp is mal-
functioning.
�
Replace the bulb as soon as possible.
REAR FOGLIGHT
CHECK LIGHT!
The rear fog lamp is malfunctioning.
�
Replace the bulb as soon as possible.
REAR FOGLIGHT
TURN OFF
BACK-UP LIGHT ON!
A lamp is malfunctioning. A backup bulb
is being used.
�
Turn the rear fog lamp off.
REVERSE LIGHT, R
CHECK LIGHT!
The right backup lamp is malfunctioning.
�
Replace the bulb as soon as possible.
TAIL LIGHT, L
CHECK LIGHT!
BACK-UP LIGHT ON!
The left tail lamp is malfunctioning. A
backup bulb is being used.
�
Replace the bulb as soon as possible.
TAIL LIGHT, R
CHECK LIGHT!
BACK-UP LIGHT ON!
The right tail lamp is malfunctioning. A
backup bulb is being used.
�
Replace the bulb as soon as possible.
TURN SIG., LF
CHECK LIGHT!
BACK-UP LIGHT ON!
The left front turn signal lamp is malfunc-
tioning. A backup bulb is being used.
�
Replace the bulb as soon as possible.
Page 295 of 376
295 Practical hints
Replacing bulbs
�Replacing bulbs
Safe vehicle operation depends on proper
exterior lighting and signaling. It is there-
fore essential that all bulbs and lamp as-
semblies are in good working order at all
times.
Correct headlamp adjustment is extremely
important. Have headlamps checked and
readjusted at regular intervals and when a
bulb has been replaced. See your autho-
rized Mercedes-Benz Light Truck Center
for headlamp adjustment.
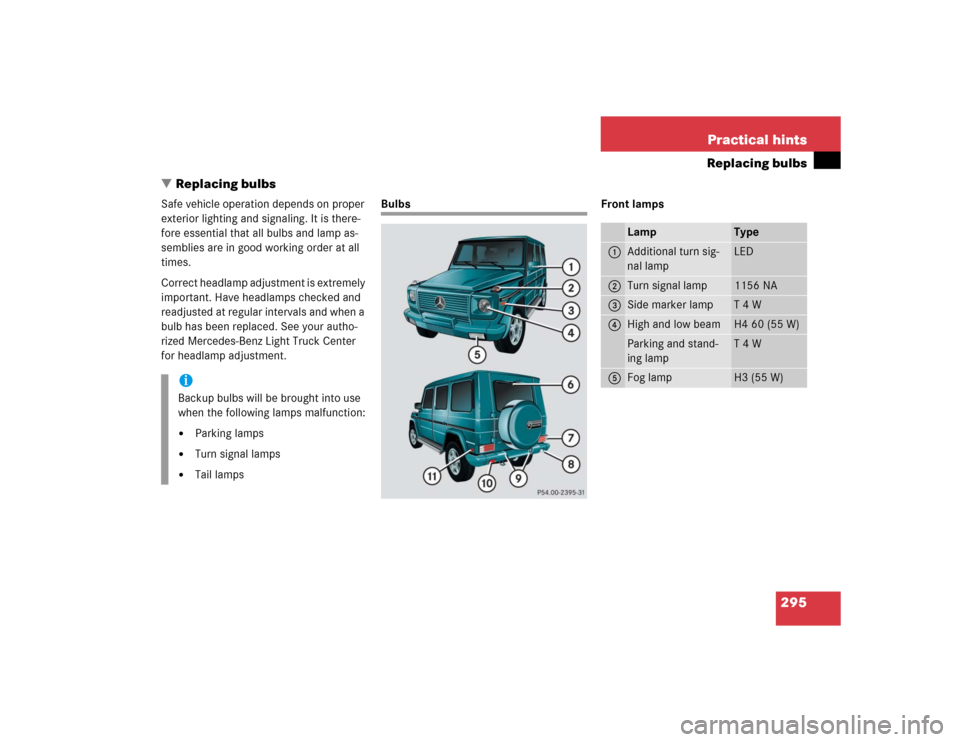
Bulbs Front lamps
iBackup bulbs will be brought into use
when the following lamps malfunction:�
Parking lamps
�
Turn signal lamps
�
Tail lamps
Lamp
Type
1
Additional turn sig-
nal lamp
LED
2
Turn signal lamp
1156 NA
3
Side marker lamp
T 4 W
4
High and low beam
H4 60 (55 W)
Parking and stand-
ing lamp
T 4 W
5
Fog lamp
H3 (55 W)
Page 296 of 376

296 Practical hintsReplacing bulbsRear lamps Notes on bulb replacement
�
Use only 12 volt bulbs of the same type
and with the specified watt rating.
�
Switch lights off before changing a bulb
to prevent short circuits.
�
Always use a clean lint-free cloth when
handling bulbs.
�
Your hands should be dry and free of oil
and grease.
�
If the newly installed bulb does not
come on, visit an authorized
Mercedes-Benz Light Truck Center.
�
Have the LEDs for the following lamps
replaced by an authorized
Mercedes-Benz Light Truck Center.�
The additional turn signals in the ex-
terior rear view mirrors
�
The high mounted brake lamp
Lamp
Type
6
High mounted brake
lamp
LED
7
Turn signal lamp
PY 21 W
Brake lamp
P 21 W
Tail, parking and
standing lamp
R 5 W
8
Backup lamp
P 21 W
9
License plate lamps
C 5 W
a
Rear fog lamp
P 21 W
b
Side marker lamp
T 4 W
Warning!
G
Keep bulbs out of reach of children.
Bulbs and bulb sockets can be very hot. Al-
low the lamp to cool down before changing
a bulb.
Halogen lamps contain pressurized gas. A
bulb can explode if you:�
touch or move it when hot
�
drop the bulb
�
scratch the bulb
Wear eye and hand protection.
iHave the headlamp settings checked
regularly by a Mercedes-Benz Light
Truck Center.
Do not turn the headlamp adjusting
screws. If the adjusting screws are
turned, the headlamp setting must be
checked by a Mercedes-Benz Light
Truck Center.
Page 299 of 376
299 Practical hints
Replacing bulbs
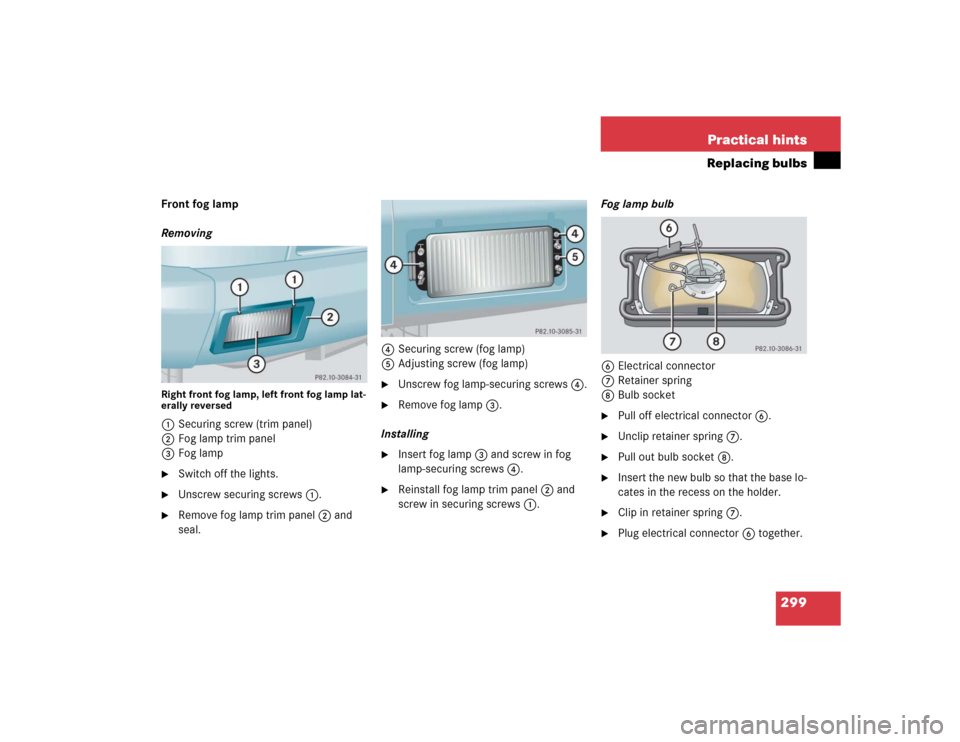
Front fog lamp
RemovingRight front fog lamp, left front fog lamp lat-
erally reversed1Securing screw (trim panel)
2Fog lamp trim panel
3Fog lamp�
Switch off the lights.
�
Unscrew securing screws1.
�
Remove fog lamp trim panel2 and
seal.4Securing screw (fog lamp)
5Adjusting screw (fog lamp)
�
Unscrew fog lamp-securing screws4.
�
Remove fog lamp3.
Installing
�
Insert fog lamp3 and screw in fog
lamp-securing screws4.
�
Reinstall fog lamp trim panel2 and
screw in securing screws1.Fog lamp bulb
6Electrical connector
7Retainer spring
8Bulb socket
�
Pull off electrical connector6.
�
Unclip retainer spring7.
�
Pull out bulb socket8.
�
Insert the new bulb so that the base lo-
cates in the recess on the holder.
�
Clip in retainer spring7.
�
Plug electrical connector6 together.
Page 302 of 376
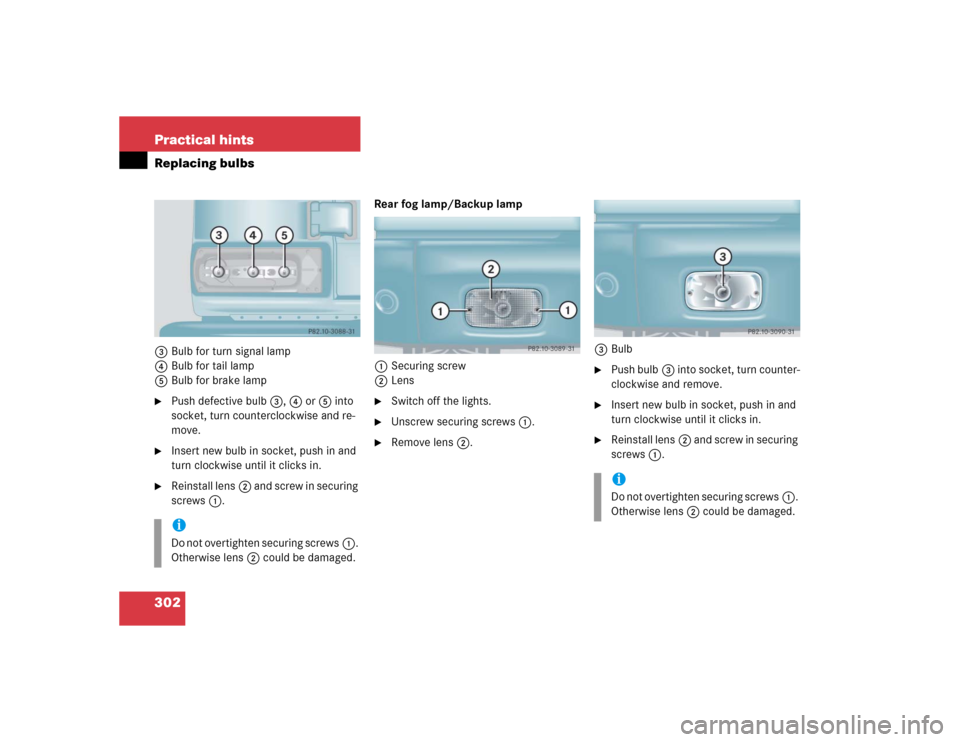
302 Practical hintsReplacing bulbs3Bulb for turn signal lamp
4Bulb for tail lamp
5Bulb for brake lamp�
Push defective bulb3, 4 or5 into
socket, turn counterclockwise and re-
move.
�
Insert new bulb in socket, push in and
turn clockwise until it clicks in.
�
Reinstall lens2 and screw in securing
screws1.Rear fog lamp/Backup lamp
1Securing screw
2Lens
�
Switch off the lights.
�
Unscrew securing screws1.
�
Remove lens2.3Bulb
�
Push bulb3 into socket, turn counter-
clockwise and remove.
�
Insert new bulb in socket, push in and
turn clockwise until it clicks in.
�
Reinstall lens2 and screw in securing
screws1.
iDo not overtighten securing screws1.
Otherwise lens2 could be damaged.
iDo not overtighten securing screws1.
Otherwise lens2 could be damaged.
Page 360 of 376

360 IndexKeys 86
Kickdown 144, 345
Kilometers/miles in speedometer 128
Km/h or mph in speedometer 128
L
Labels, identification 326
Lamp bulbs, exterior 295
Lamps, exterior
Front 295
Light sensor 276
Messages in display 274, 276
Rear 296
Replacing bulbs for rear 301
Lamps, indicator and warning
ABS 252, 253
Battery (SmartKey) 87
Brakes 254, 255
CHECK ENGINE 256
Engine diagnostics 256
ESP 257
Fuel reserve 258
Instrument cluster 258
Seat belts 258
Service indicator 242
SRS 57
Turn signals 25Language
Multifunction display 128
Setting 128
LATCH child seat anchors 70
Layout of poly-V-belt drive 327
Leather upholstery
Cleaning 249
License plate lamps
Messages in display 276
Replacing bulbs 296, 303
Light alloy wheels
Cleaning 248
Technical data 329, 330
Light sensor 276
Lighter see Cigarette lighter
Lighting 104
Automatic headlamp mode 105
Combination switch 108
Daytime running lamp mode 106
Exterior lamp switch 104
Front fog lamps 107
High beam flasher 108
High beams 108
Instrument cluster illumination 112Interior 109
Locator lighting 106
Low beams 104
Manual headlamp mode 105
Night security illumination 106
Parking lamps 104
Rear fog lamp 107
Settings (control system) 129
Limiting the gear range 142
Limp Home Mode 144
Line of fall 345
Loading 175
Cargo compartment cover 175
Cargo tie-down rings 182
Instructions 180
Partition net* 178
Roof rack 175
Split rear bench seat 176
Locator lighting 106
Setting 130