Page 224 of 376

224 OperationAt the gas station
�At the gas stationRefueling
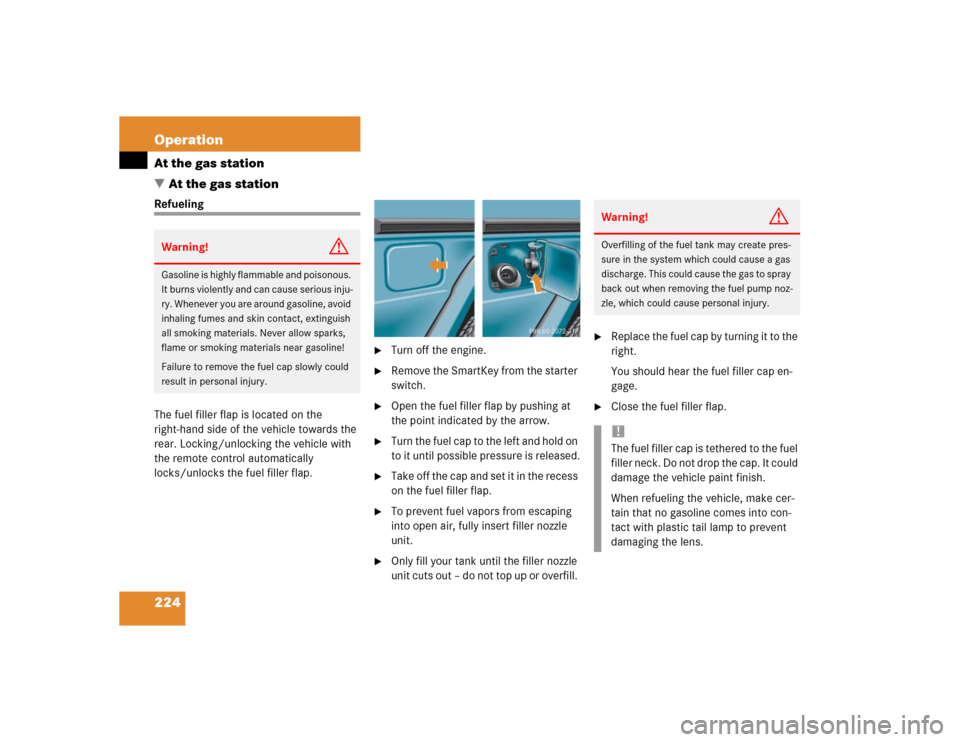
The fuel filler flap is located on the
right-hand side of the vehicle towards the
rear. Locking/unlocking the vehicle with
the remote control automatically
locks/unlocks the fuel filler flap.
�
Turn off the engine.
�
Remove the SmartKey from the starter
switch.
�
Open the fuel filler flap by pushing at
the point indicated by the arrow.
�
Turn the fuel cap to the left and hold on
to it until possible pressure is released.
�
Take off the cap and set it in the recess
on the fuel filler flap.
�
To prevent fuel vapors from escaping
into open air, fully insert filler nozzle
unit.
�
Only fill your tank until the filler nozzle
unit cuts out – do not top up or overfill.
�
Replace the fuel cap by turning it to the
right.
You should hear the fuel filler cap en-
gage.
�
Close the fuel filler flap.
Warning!
G
Gasoline is highly flammable and poisonous.
It burns violently and can cause serious inju-
ry. Whenever you are around gasoline, avoid
inhaling fumes and skin contact, extinguish
all smoking materials. Never allow sparks,
flame or smoking materials near gasoline!
Failure to remove the fuel cap slowly could
result in personal injury.
Warning!
G
Overfilling of the fuel tank may create pres-
sure in the system which could cause a gas
discharge. This could cause the gas to spray
back out when removing the fuel pump noz-
zle, which could cause personal injury.!The fuel filler cap is tethered to the fuel
filler neck. Do not drop the cap. It could
damage the vehicle paint finish.
When refueling the vehicle, make cer-
tain that no gasoline comes into con-
tact with plastic tail lamp to prevent
damaging the lens.
Page 225 of 376

225 Operation
At the gas station
Check regularly and before a long trip
1Coolant
2Brake fluid
Coolant
For normal replenishing, use water (pota-
ble water quality). For more information,
see “Coolant level” (
�page 232) and see
“Fuels, coolants, lubricants, etc.”
(
�page 333).Brake fluid
Windshield/rear window washer sys-
tem and headlamp cleaning system
For more information on refilling the reser-
voir, see “Windshield/rear window washer
system and headlamp cleaning system”
(
�page 234).
iUse only premium unleaded gasoline
with a minimum Posted Octane Rating
of 91 (average of 96 RON / 86 MON).
Information on gasoline quality can
normally be found on the fuel pump.
More information on gasoline can be
found in the Factory Approved Service
Products pamphlet. iLeaving the engine running and the fuel
cap open can cause the ? malfunc-
tion indicator lamp to illuminate.
See also “Practical hints” section
(�page 256).
iOpening the hood, see (
�page 227).
!If you find that the brake fluid in the
brake fluid reservoir has fallen to the
minimum mark or below, have the
brake system checked for brake pad
thickness and leaks immediately. Noti-
fy an authorized Mercedes-Benz Light
Truck Center immediately. Do not add
brake fluid as this will not solve the
problem. For more information, see
“Practical hints” (
�page 254) .
Page 310 of 376

310 Practical hintsFlat tireLowering the vehicle�
Using the pump lever, open the lower-
ing screw on the jack approximately
one turn (
�page 308).
The vehicle is resting fully on its own
weight.
�
Remove the jack.
After use, disassemble pump handle
(�page 308) and store jack in the des-
ignated storage compartment
(�page 284).
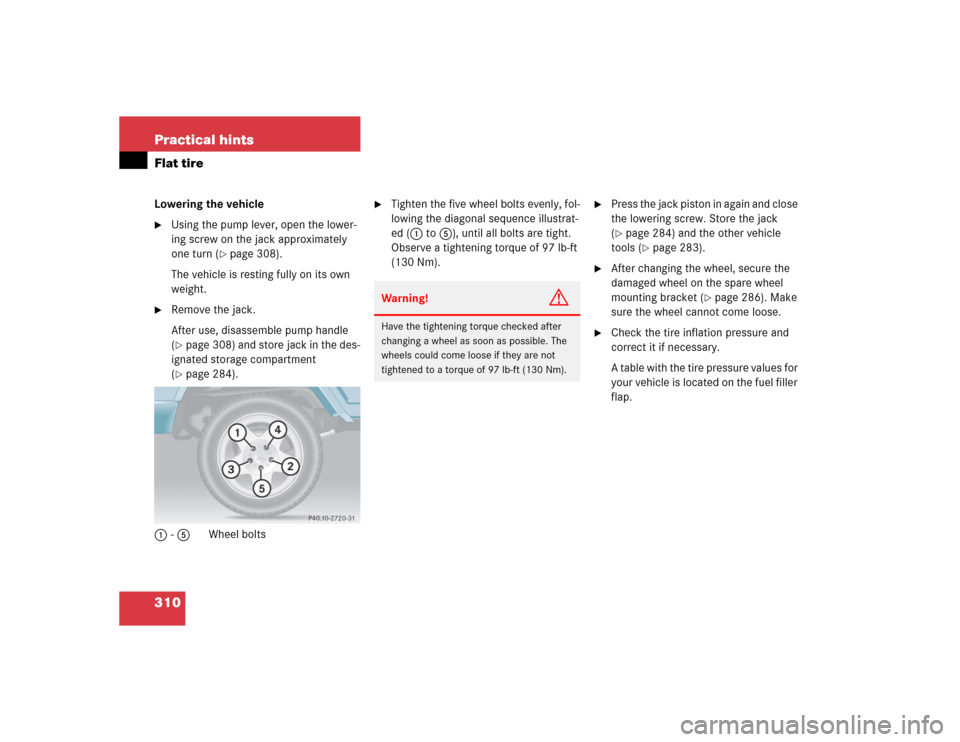
1-5 Wheel bolts
�
Tighten the five wheel bolts evenly, fol-
lowing the diagonal sequence illustrat-
ed (1 to 5), until all bolts are tight.
Observe a tightening torque of 97 lb-ft
(130 Nm).
�
Press the jack piston in again and close
the lowering screw. Store the jack
(�page 284) and the other vehicle
tools (
�page 283).
�
After changing the wheel, secure the
damaged wheel on the spare wheel
mounting bracket (
�page 286). Make
sure the wheel cannot come loose.
�
Check the tire inflation pressure and
correct it if necessary.
A table with the tire pressure values for
your vehicle is located on the fuel filler
flap.
Warning!
G
Have the tightening torque checked after
changing a wheel as soon as possible. The
wheels could come loose if they are not
tightened to a torque of 97 lb-ft (130 Nm).
Page 345 of 376

345 Technical terms
GPS
(G
lobal P
ositioning S
ystem)
Satellite-based system for relaying
geographic location information to and
from vehicles equipped with special re-
ceivers. Employs CD digital maps for
navigation.
Instrument cluster
The displays and indicator/warning
lamps in the driver’s field of vision, in-
cluding the tachometer, speedometer,
engine temperature and fuel gauge.
Kickdown
Depressing the accelerator past the
point of resistance shifts the transmis-
sion down to the lowest possible gear.
This very quickly accelerates the vehi-
cle and should not be used for normal
acceleration needs.
Line of fall
The direct line that an object moves
downhill when influenced by the force
of gravity alone. Lock button
Button on the door which indicates
whether the door is locked or un-
locked. Pushing the lock button down
on an individual door from inside will
lock that door.
Memory function*
Used to store three individual seat,
steering wheel and mirror positions for
each key.
Menu
The control system displays are ar-
ranged in menus. Each menu contains
a number of commands for particular
systems. In the Audio menu, for exam-
ple, you will find the commands
Select
radio station
or Operate CD player
.
Using commands, you can directly
change the settings for your vehicle.MON
(M
otor O
ctane N
umber)
The Motor Octane Number for gasoline
as determined by a standardized meth-
od. It is an indication of a gasoline's
ability to resist undesired detonation
(knocking). The average of both the
MON (Motor Octane Number) and
->RON (Research Octane Number) is
posted at the pump, also known as
ANTI-KNOCK INDEX.
Multifunction display
A display field in the instrument cluster
used to present information provided
by the control system.
Overspeed range
Engine speeds within the red marking
of the tachometer dial. Avoid this en-
gine speed range, as it may result in se-
rious engine damage that is not
covered by the Mercedes-Benz Limited
Warranty.