Page 89 of 376
89 Controls in detail
Locking and unlocking
Opening the doors from the inside
You can open a locked door from the in-
side. Open door only when conditions are
safe to do so.
1Locking knob
2Inside door handle�
Pull on door handle2.
If the door was locked, locking knob1
moves up.
Opening the tailgateOpening the tailgate from the outside
1Handle
2Lock cylinder
�
Press lock cylinder2 and pull on tail-
gate handle1.
�
Open the tailgate to the side.
iIf the vehicle has previously been
locked from the outside with the
SmartKey, opening a door from the in-
side will trigger the alarm.
To cancel the alarm do one the follow-
ing:�
Press the Œ or ‹ button on
the SmartKey.
�
Insert the SmartKey in the starter
switch.
Warning!
G
The tailgate swings open to one side. Always
make sure there is sufficient clearance for
the tailgate.
Only drive with the tailgate closed as other-
wise exhaust fumes may enter the vehicle
interior.
iThe vehicle must be unlocked.
Page 90 of 376
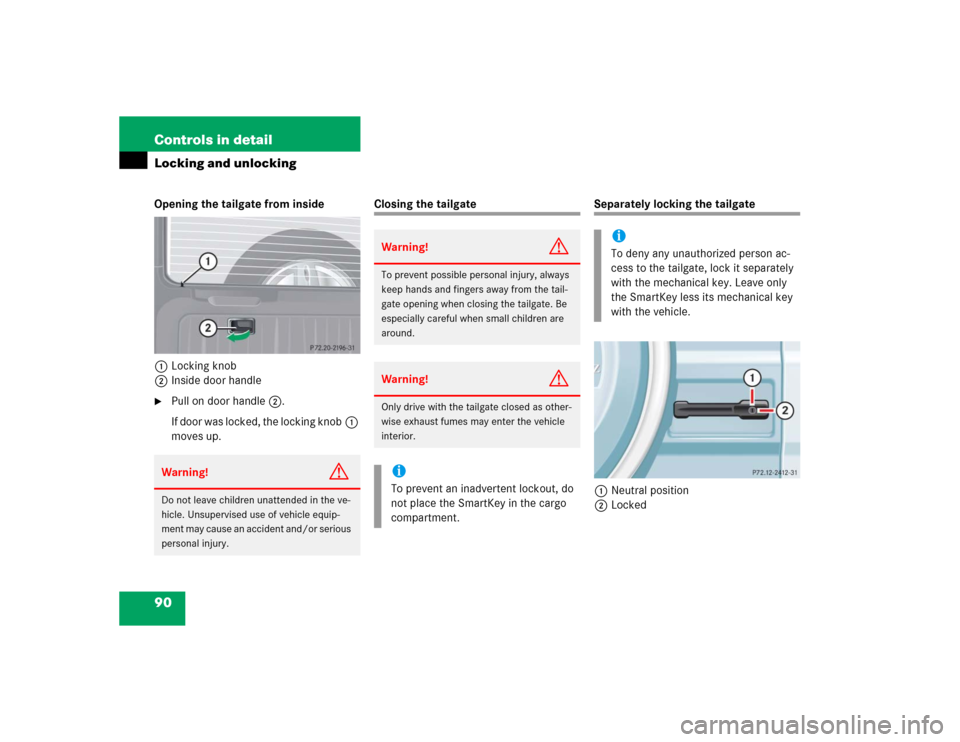
90 Controls in detailLocking and unlockingOpening the tailgate from inside
1Locking knob
2Inside door handle�
Pull on door handle2.
If door was locked, the locking knob1
moves up.
Closing the tailgate
Separately locking the tailgate
1Neutral position
2Locked
Warning!
G
Do not leave children unattended in the ve-
hicle. Unsupervised use of vehicle equip-
ment may cause an accident and/or serious
personal injury.
Warning!
G
To prevent possible personal injury, always
keep hands and fingers away from the tail-
gate opening when closing the tailgate. Be
especially careful when small children are
around.Warning!
G
Only drive with the tailgate closed as other-
wise exhaust fumes may enter the vehicle
interior.iTo prevent an inadvertent lockout, do
not place the SmartKey in the cargo
compartment.
iTo deny any unauthorized person ac-
cess to the tailgate, lock it separately
with the mechanical key. Leave only
the SmartKey less its mechanical key
with the vehicle.
Page 91 of 376
.
�
Pull the mechanical key out of the
SmartKey (
�page 287).
�
Insert the mechanical key in the lock
cylinder.
�
Turn the")
91 Controls in detail
Locking and unlocking
�
Close the tailgate (
�page 90).
�
Pull the mechanical key out of the
SmartKey (
�page 287).
�
Insert the mechanical key in the lock
cylinder.
�
Turn the mechanical key clockwise to
position2.
The tailgate remains locked even when the
vehicle is centrally unlocked.
Separately unlocking the tailgate�
Pull the mechanical key out of the
SmartKey (
�page 287).
�
Insert the mechanical key in the lock
cylinder.
�
Turn the mechanical key to neutral
position1 (
�page 90).
You can now open the tailgate
(
�page 89).
Automatic central locking
The doors and the tailgate automatically
lock when the ignition is switched on and
the wheels are turning at vehicle speeds of
approximately 9 mph (15 km/h) or more.
You can open a locked door from the in-
side. Open door only when conditions are
safe to do so.
iYou can only cancel the separate tail-
gate locking mode by means of the me-
chanical key.
Warning!
G
Only drive with the tailgate closed as other-
wise exhaust fumes may enter the vehicle
interior.
Page 92 of 376
.
For information on towing the vehicle, see
“Towing the vehicle” (
�page")
92 Controls in detailLocking and unlockingYou can deactivate the automatic locking
using the control system (
�page 133).
For information on towing the vehicle, see
“Towing the vehicle” (
�page 315).
Locking and unlocking from the inside
You can lock or unlock the vehicle from in-
side using the central locking switches.
This can be useful, for example, if you want
to unlock the passenger door from the in-
side or want to lock the vehicle before
starting to drive.
The fuel filler flap cannot be locked or un-
locked with the central locking switch.The central locking switch is located in the
center console.
Central locking switch1Locking
2Unlocking
iThe doors and the tailgate unlock auto-
matically after an accident if the force
of the impact exceeds a preset thresh-
old.
The vehicle automatically locks when
the ignition is switched on and the
wheels are turning at vehicle speeds of
approximately 9 mph (15 km/h) or
more. You could therefore lock yourself
out when the vehicle�
is pushed
�
is on a test stand
Warning!
G
When leaving the vehicle, always remove the
SmartKey from the starter switch, and lock
the vehicle. Do not leave children unattend-
ed in the vehicle, or with access to an un-
locked vehicle. Unsupervised use of vehicle
equipment may cause an accident and/or
serious personal injury.
Page 94 of 376
.
Easy-entry/exit feature
With the easy-entry/exit feature activated
the st")
94 Controls in detailSeats
�SeatsFor more information on seat adjustment,
see the “Getting started” section
(�page 34).
Easy-entry/exit feature
With the easy-entry/exit feature activated
the steering wheel tilts upwards.
This allows easier entry into and exit from
the vehicle when the driver’s door is
opened. However, the engine must be
turned off.
When the SmartKey is inserted in the start-
er switch and the driver’s door is closed,
the steering wheel returns to the last set
position.The easy-entry/exit feature can be
switched on or off in the individual setting
menu
CONVENIENCE
- EASY-ENTRY FEATURE
ACTIVATE
(�page 133).
Warning!
G
You must ensure no one can become
trapped or injured by the moving steering
wheel when the easy-entry/exit feature is
activated, the driver’s door is being opened
and the engine is turned off.
Do not leave children unattended in the ve-
hicle, or with access to an unlocked vehicle.
Children could open the driver’s door and
unintentionally activate the easy-entry/exit
feature, which could result in an accident
and/or serious personal injury.
iTo cancel steering wheel movement,
do one the following:�
Move the steering column stalk
(�page 22)
�
Press the memory button
(�page 102)
Page 95 of 376
.
Front seat head r")
95 Controls in detail
Seats
Removing and installing front seat head restraints
For more information on head restraint ad-
justment, see the “Getting started” section
(�page 36).
Front seat head restraints
1Switch
Removing front seat head restraint
�
Press switch1 upwards and hold until
the head restraint is fully extended.
�
Pull head restraint out.Installing front seat head restraint
�
Press switch1 upwards and hold for
about five seconds.
�
Press the head restraint down until it
engages.
�
Adjust head restraint to the desired po-
sition.
Synchronizing head restraints and seat
adjustment fore and aft for front seats
If the power supply was interrupted (bat-
tery disconnected or discharged), the head
restraints and the seat adjustment fore
and aft are no longer adjusted automatical-
ly.
The head restraints and the seat adjust-
ment fore and aft must be resynchronized:�
Turn SmartKey in starter switch to
position2.
�
Move the seat completely forward
(�page 35) and the head restraint fully
down (
�page 36) and hold the switch-
es for approximately one second.
Warning!
G
For your protection, drive only with properly
positioned head restraints.
Adjust head restraint so that the head re-
straint supports the back of the head at eye
level. This will reduce the potential for injury
to the head and neck in the event of an ac-
cident or similar situation.
Do not drive the vehicle without the seat
head restraints. Head restraints are intend-
ed to help reduce injuries during an acci-
dent.
Do not interchange head restraints from
front and rear seat.
iTilt the seat backrest rearward for eas-
ier removal and installation of the head
restraints.
Page 96 of 376

96 Controls in detailSeatsRear seat head restraints Head restraint height
Manually adjust the height of the head re-
straint.
�
Push or pull on the head restraint.Removing and installing rear seat head
restraints
Warning!
G
For your protection, drive only with properly
positioned head restraints.
Adjust head restraint so that the head re-
straint supports the back of the head at eye
level. This will reduce the potential for injury
to the head and neck in the event of an ac-
cident or similar situation.
Do not drive the vehicle without the seat
head restraints. Head restraints are intend-
ed to help reduce injuries during an acci-
dent.
Do not interchange head restraints from
front and rear seat.
Page 101 of 376

101 Controls in detail
Memory function
�Memory function
The memory button and stored position
switch are located on the door.
You can store up to three different settings
per SmartKey.
The following settings are saved for each
stored position:�
Driver’s seat and seat backrest posi-
tion
�
Steering wheel position
�
Driver’s side exterior rear view mirror
position
�
Passenger-side exterior rear view mir-
ror position
�
Front passenger seat position
These key-dependent memory settings
can be deactivated if desired
(
�page 135).
!Prior to operating the vehicle, the driv-
er should check and adjust the seat
height, seat position fore and aft, and
seat backrest angle if necessary, to en-
sure adequate control, reach and com-
fort. The head restraint should also be
adjusted for proper height. See also the
section on airbags (
�page 57) for
proper seat positioning.
In addition, adjust the steering wheel to
ensure adequate control, reach, opera-
tion and comfort. Both the interior and
exterior rear view mirrors should be ad-
justed for adequate rear vision.
Fasten seat belts. Infants and small
children should be seated in a properly
secured restraint system that complies
with U.S. Federal Motor Vehicle Safety
Standards 213 and 225 and Canadian
Motor Vehicle Safety Standards 213
and 210.2.
Warning!
G
Do not activate the memory function while
driving. Activating the memory function
while driving could cause the driver to lose
control of the vehicle.