Page 92 of 376
.
For information on towing the vehicle, see
“Towing the vehicle” (
�page")
92 Controls in detailLocking and unlockingYou can deactivate the automatic locking
using the control system (
�page 133).
For information on towing the vehicle, see
“Towing the vehicle” (
�page 315).
Locking and unlocking from the inside
You can lock or unlock the vehicle from in-
side using the central locking switches.
This can be useful, for example, if you want
to unlock the passenger door from the in-
side or want to lock the vehicle before
starting to drive.
The fuel filler flap cannot be locked or un-
locked with the central locking switch.The central locking switch is located in the
center console.
Central locking switch1Locking
2Unlocking
iThe doors and the tailgate unlock auto-
matically after an accident if the force
of the impact exceeds a preset thresh-
old.
The vehicle automatically locks when
the ignition is switched on and the
wheels are turning at vehicle speeds of
approximately 9 mph (15 km/h) or
more. You could therefore lock yourself
out when the vehicle�
is pushed
�
is on a test stand
Warning!
G
When leaving the vehicle, always remove the
SmartKey from the starter switch, and lock
the vehicle. Do not leave children unattend-
ed in the vehicle, or with access to an un-
locked vehicle. Unsupervised use of vehicle
equipment may cause an accident and/or
serious personal injury.
Page 112 of 376
.
1Reset button")
112 Controls in detailInstrument cluster
�Instrument clusterA full view illustration of the instrument
cluster can be found in the “At a glance”
section of this manual (
�page 24).
1Reset button
The instrument cluster is activated when
you:
�
open a door
�
turn on the ignition
�
press reset button1
�
switch on the exterior lamps
You can change the instrument cluster set-
tings in the Instrument cluster submenu of
the control system (
�page 127).
Instrument cluster illumination
Use the reset button to adjust the illumina-
tion brightness for the instrument cluster.
To brighten illumination�
Turn reset button1 in the instrument
cluster clockwise.
The instrument cluster illumination will
brighten.To dim illumination
�
Turn reset button1 in the instrument
cluster counterclockwise.
The instrument cluster illumination will
dim.
Coolant temperature display
iThe instrument cluster illumination is
dimmed or brightened automatically to
suit ambient light conditions.
The instrument cluster illumination will
also be adjusted automatically when
you switch on the vehicle’s exterior
lamps.
Warning!
G
�
Driving when your engine is badly over-
heated can cause some fluids which
may have leaked into the engine com-
partment to catch fire. You could be se-
riously burned.
�
Steam from an overheated engine can
cause serious burns and can occur just
by opening the hood. Stay away from
the engine if you see or hear steam com-
ing from it.
Turn off the engine, get out of the vehicle
and do not stand near the vehicle until the
engine has cooled down.
Page 113 of 376

113 Controls in detail
Instrument cluster
�
Turn the SmartKey in the starter switch
to position1 or2.
�
Call up the trip odometer and main
odometer by pressing buttonè
orÿ on the multifunction steering
wheel (
�page 116).
�
Press buttonj ork until the
coolant temperature display appears.During severe operating conditions, e.g.
stop-and-go traffic, the coolant tempera-
ture may rise close to 248°F (120°C).
The engine should not be operated with
the coolant temperature above 248°F
(120°C). Doing so may cause serious en-
gine damage which is not covered by the
Mercedes-Benz Limited Warranty.
Trip odometer�
Make sure you are viewing the trip
odometer display (
�page 115).
�
I f i t i s n o t d i s p l a y e d , p r e s s b u t t o nè
orÿ on the multifunction steering
wheel (
�page 116) until the trip odom-
eter appears.
�
Press and hold the reset button on the
instrument cluster (
�page 112) until
the trip odometer is reset.
Tachometer
The red marking on the tachometer de-
notes excessive engine speed.
To help protect the engine, the fuel supply
is interrupted if the engine is operated
within the red marking.
iExcessive coolant temperature triggers
a warning in the multifunction display
(�page 269).
!Avoid driving at excessive engine
speeds, as it may result in serious en-
gine damage that is not covered by the
Mercedes-Benz Limited Warranty.
Page 119 of 376
119 Controls in detail
Control system
Menus, submenus and functions
Menu1
Menu2
Menu3
Menu4
Menu5
Menu6
Menu7
Standard
display
AUDIO
NAVI
Malfunction
memory
Settings
Trip computer
Telephone
Commands/submenuCoolant
temperature
display
Select radio
station
Activate route
guidance
Call up
malfunction
messages
Reset to factory
settings
Fuel
consumption
statistics after
start
Load phone book
Digital
speedometer
Operate CD
player
Instrument
cluster submenu
Fuel
consumption
statistics since
the last reset
Search for name
in phone book
Call up FSS
Lighting
submenu
Call up range
Check engine oil
level
Vehicle submenuConvenience
submenu
Page 123 of 376

123 Controls in detail
Control system
Should any malfunctions occur while driv-
ing, the number of malfunctions will reap-
pear in the display when the SmartKey in
the starter switch is turned to position0 or
removed from the starter switch.
Settings menu
In the
SETTINGS...
menu there are two
functions:
�
The function
RESET: R BUTTON FOR
3SEC.
, with which you can reset all the
settings to those set at the factory.
�
A collection of submenus with which
you can make individual settings for
your vehicle.
�
Press buttonè orÿ repeatedly
until the
SETTINGS
... menu is seen in
the display.Resetting all settings
You can reset all the functions of all sub-
menus to the factory settings.
�
Press the reset button in the instru-
ment cluster (
�page 112) for approxi-
mately three seconds.
In the display you will see the request
to press the reset button again to con-
firm.
�
Press the reset button again.
The functions of all the submenus will
reset to factory settings.
iThe message memory will be cleared
when you turn the SmartKey in the
starter switch to position1 or2. You
will then only see Priority 1 malfunc-
tions (
�page 260).
Page 124 of 376
124 Controls in detailControl system
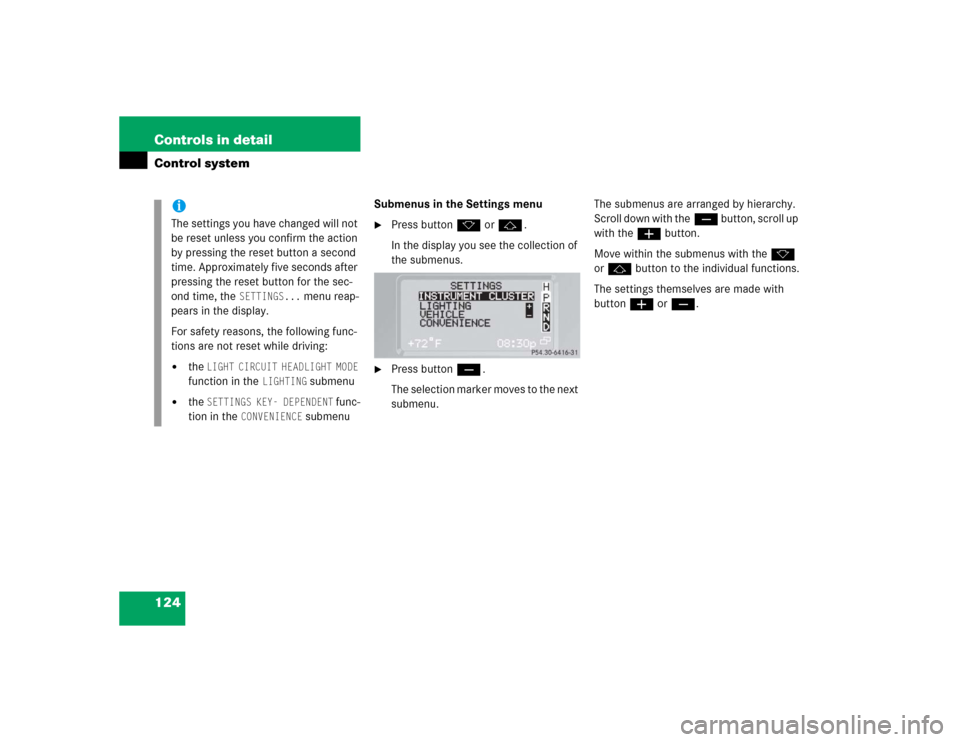
Submenus in the Settings menu�
Press buttonk orj.
In the display you see the collection of
the submenus.
�
Press buttonç.
The selection marker moves to the next
submenu.The submenus are arranged by hierarchy.
Scroll down with theç button, scroll up
with theæ button.
Move within the submenus with thek
orj button to the individual functions.
The settings themselves are made with
buttonæ orç.
iThe settings you have changed will not
be reset unless you confirm the action
by pressing the reset button a second
time. Approximately five seconds after
pressing the reset button for the sec-
ond time, the
SETTINGS...
menu reap-
pears in the display.
For safety reasons, the following func-
tions are not reset while driving:
�
the
LIGHT CIRCUIT HEADLIGHT MODE
function in the
LIGHTING
submenu
�
the
SETTINGS KEY- DEPENDENT
func-
tion in the
CONVENIENCE
submenu
Page 125 of 376
125 Controls in detail
Control system
Resetting the functions of a submenu
For each submenu you can reset all the
functions to the factory settings.�
Move to a function in the submenu.
�
Press the reset button in the instru-
ment cluster (
�page 112) for approxi-
mately three seconds.
In the display you will see the request
to press the reset button again to con-
firm.
�
Press the reset button again.
All functions of the submenu will reset
to factory settings
iThe settings you have changed will not
be reset unless you confirm the action
by pressing the reset button a second
time. Approximately five seconds after
pressing the reset button for the sec-
ond time, the
SETTINGS...
menu reap-
pears in the display.
Page 130 of 376

130 Controls in detailControl system
Setting locator lighting
During darkness, the following lamps will
come on when the exterior lamp switch is
in position U, the locator lighting fea-
ture is activated, and the vehicle is un-
locked by SmartKey:�
parking lamps
�
tail lamps
�
license plate lamps
�
front fog lamps
The locator lighting switches off when the
driver’s door is opened. It switches off au-
tomatically after a period of approximately
40 seconds.
�
Move the selection marker with
theæ orç button to the LIGHTING
submenu.
�
Press buttonj ork repeatedly
until you see this message in the dis-
play:
LOCATOR LIGHTING
.
The selection marker is on the current
setting.
�
Pressæ orç to select the de-
sired setting.
The locator lighting will be switched on
or off.
iIf you turn the exterior lamp switch to
another position, the corresponding
lamp(s) will switch on.
For safety reasons, resetting the LIGHTING
submenu to factory settings
(
�page 123) will not reset the daytime
running lamp mode.
In the display you will then see the mes-
sage:
LIGHTING – CANNOT BE TOTALLY
RESET TO FACTORY SETTINGS WHILE
DRIVING.
��