Page 27 of 376
27 At a glance
Center console
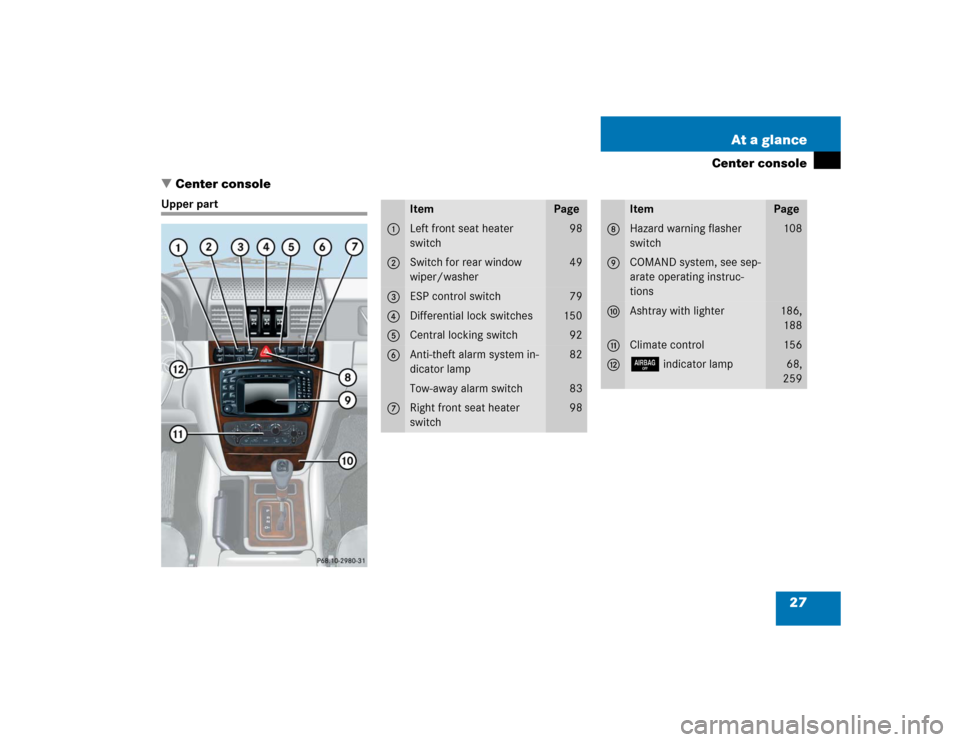
�Center console
Upper part
Item
Page
1
Left front seat heater
switch
98
2
Switch for rear window
wiper/washer
49
3
ESP control switch
79
4
Differential lock switches
150
5
Central locking switch
92
6
Anti-theft alarm system in-
dicator lamp
82
Tow-away alarm switch
83
7
Right front seat heater
switch
98
Item
Page
8
Hazard warning flasher
switch
108
9
COMAND system, see sep-
arate operating instruc-
tions
a
Ashtray with lighter
186,
188
b
Climate control
156
c
7
indicator lamp
68,
259
Page 29 of 376
29 At a glance
Overhead control panel
�Overhead control panel
Item
Page
1
Tele Aid (emergency call
system)
190
2
Cargo compartment lamps
110
3
Right front reading lamp
109
4
Sliding/pop-up roof
166
5
Interior rear view mirror
38
Item
Page
6
Signal transmitter keys for
garage door opener
198
7
Indicator lamp for garage
door opener
198
8
Interior lighting control
109
9
Left front reading lamp
109
Page 33 of 376

33 Getting started
Unlocking
Starter switch positionsStarter switch0For removing SmartKey
The steering is locked when the
SmartKey is removed from the starter
switch. If necessary, move steering
wheel slightly to allow the locking
mechanism to engage.
1Power supply to some electrical con-
sumers, such as seat adjustment
2Ignition (power supply for all electrical
consumers) and driving position
3Starting position
Warning!
G
When leaving the vehicle, always remove the
SmartKey from the starter switch and lock
the vehicle. Do not leave children unattend-
ed in the vehicle, or with access to an un-
locked vehicle. Unsupervised use of vehicle
equipment may cause an accident and/or
serious personal injury.iThe SmartKey can only be removed
from the starter switch with the gear
selector lever in positionP.
!If the SmartKey cannot be turned, the
battery may not be sufficiently
charged.�
Check the battery and charge it if
necessary (
�page 311).
�
Get a jump start (
�page 313).
To prevent accelerated battery dis-
charge and a possible dead battery, al-
ways remove the SmartKey from the
starter switch when the engine is not in
operation.
Page 36 of 376

36 Getting startedAdjustingSeat cushion tilt�
Press the switch up or down in the di-
rection of arrow4 until your upper
legs are lightly supported.
Seat backrest tilt
�
Press the switch forward or backward
in the direction of arrow2 until your
arms are slightly angled when holding
the steering wheel.
Seat height
�
Press the switch up or down in the di-
rection of arrow5.
Make sure you have sufficient head-
room.Head restraint height
�
Press the switch up or down in the di-
rection of arrow1.
Adjust head restraint to support the back
of the head approximately at eye level.Head restraint tilt
Manually adjust the angle of the head re-
straint.
�
Push or pull on the upper edge of the
head restraint cushion.
For more information, see “Seats”
(
�page 94).
Warning!
G
For your protection, drive only with properly
positioned head restraints.
Adjust head restraint so that the head re-
straint supports the back of the head at eye
level. This will reduce the potential for injury
to the head and neck in the event of an ac-
cident or similar situation.
Do not drive the vehicle without the seat
head restraints. Head restraints are intend-
ed to help reduce injuries during an acci-
dent.
Page 37 of 376
.
1Adjusting steering column, in or out
2Adjusting steering column, up or down
�
Turn the SmartKey i")
37 Getting started
Adjusting
Steering wheelThe stalk is located on the steering column
(lower left).
1Adjusting steering column, in or out
2Adjusting steering column, up or down
�
Turn the SmartKey in the starter switch
to position1 or2 (
�page 33).
or
�
Open the driver’s door.Adjusting steering column in or out
�
Move stalk forward or back in the direc-
tion of arrow1 until a comfortable
steering wheel position is reached with
your arms slightly bent at the elbow.
Adjusting steering column up or down
�
Move stalk up or down in the direction
of arrow2.
Make sure your legs can move freely
and that all the displays (incl. malfunc-
tion and indicator lamps) on the instru-
ment cluster are clearly visible.
For more information, see “Heated steer-
ing wheel” (
�page 203).
Warning!
G
Do not adjust the steering wheel while driv-
ing. Adjusting the steering wheel while driv-
ing, or driving without the adjustment
locked could cause the driver to lose control
of the vehicle.
When leaving the vehicle, always remove the
SmartKey from the starter switch, and lock
your vehicle.
The steering wheel adjustment feature can
also be operated with the driver’s door
open. Do not leave children unattended in
the vehicle, or with access to an unlocked
vehicle. Unsupervised use of vehicle equip-
ment may cause an accident and/or serious
personal injury.
iThe memory function (
�page 101) lets
you store the setting for the steering
wheel together with the setting for the
seat position and the exterior rear view
mirrors.
Page 39 of 376
39 Getting started
Adjusting
�
Make sure the ignition is switched on.
All the lights in the instrument cluster
come on.
�
Press button2 for driver’s side exteri-
or rear view mirror or button3 for
passenger-side exterior rear view mir-
ror.
�
Push adjustment button1 up, down,
left or right according to the setting de-
sired.
For more information, see “Storing exterior
rear view mirror parking position”
(
�page 103).iThe memory function (
�page 101) lets
you store the setting for the exterior
rear view mirrors together with the set-
ting for the steering wheel and the seat
position.
!If an exterior rear view mirror housing
is forcibly pushed forward or rearward,
reposition it by applying firm pressure
until it snaps into place. The exterior
rear view mirror housing is now proper-
ly positioned and you can adjust the
mirror normally.
Page 42 of 376

42 Getting startedDriving�
If necessary, tighten the lap portion to
a snug fit by pulling shoulder portion
up.
Proper use of seat belts
�
Do not twist the belt when fastening.
�
Adjust seat belt so that the shoulder
portion is located as close as possible
to the middle of the shoulder (it should
not touch the neck or pass under the
arm). For this purpose, you can adjust
the height of the belt outlet, see below.
�
Position the lap belt as low as possible
on your hips (over hip joint) and not
across the abdomen.
�
Place the seat backrest in a nearly up-
right position.
�
Never use a seat belt for more than one
person at a time.
�
Do not fasten a seat belt around a per-
son and another object at the same
time.
�
Check your seat belt during travel to
ensure it is properly positioned.
�
Make sure the seat belt is always fitted
snugly. You should avoid wearing bulky
clothing, such as winter coats, when
traveling in the vehicle.Seat belt height adjustment
Adjust the height so that the upper part of
the belt runs over the middle of the shoul-
der.
1Button for belt outlet height adjust-
mentWarning!
G
Do not pass belts over sharp edges. They
could tear.
Do not allow the belt to get caught in the
door or in the seat adjustment mechanism.
This could damage the belt.
Never attempt to make modifications to
seat belts. This could impair the effective-
ness of the belts.
Damaged seat belts or belts that were highly
stressed in an accident must be replaced.
Contact an authorized Mercedes-Benz Light
Truck Center.
��
Page 44 of 376

44 Getting startedDrivingStarting�
Make sure the gear selector lever is set
toP.
�
Do not depress accelerator.
�
Turn SmartKey in the starter switch to
position3 and hold until the engine
starts (
�page 33).
�
Depress the brake pedal.
The gear selector lever lock is released.
For information on turning off the engine,
see “Turning off engine” (
�page 52).Starting difficulties
If the engine does not start as described,
carry out the following steps:
�
Turn SmartKey in starter switch to
position0 and repeat starting proce-
dure.
�
Remember that extended starting at-
tempts can drain the battery.
�
Get a jump start (
�page 313).
If the engine does not start after several
starting attempts, there could be a mal-
function in the engine electronics or in the
fuel supply system.
�
Notify an authorized Mercedes-Benz
Light Truck Center.Parking brake
1Lever
2Button
iYou can also use the “touch-start”
function. Turn the SmartKey to
position3 and release it again immedi-
ately. The engine then starts automati-
cally.
Warning!
G
When leaving the vehicle, always remove the
SmartKey from the starter switch, and lock
the vehicle.
Do not leave children unattended in the ve-
hicle, or with access to an unlocked vehicle.
Children could release the parking brake,
which could result in an accident and/or se-
rious personal injury.