Page 49 of 376
49 Getting started
Driving
Rear window wiper/washer
The rear window wiper / washer switch is
located on the upper part of the center
console.
1Interval wiping on/off
2Indicator lamp
3Simultaneous operation of wiper and
washer
�
Make sure the ignition is switched on.
Interval wiping
Switching on
�
Press upper half1 of the switch.
The indicator lamp2 comes on.
Switching off
�
Press upper half1 of the switch
again.
The indicator lamp2 goes out.Wiping with windshield washer fluid
�
Press and hold lower half3 of the
switch.
The wiper operates with washer fluid.
The rear window will be wiped for ap-
proximately another five seconds after
the switch is released.
For information on filling up the washer
reservoir, see “Windshield/rear window
washer system and headlamp cleaning
system” (
�page 234).
iThe rear window wiper will also auto-
matically engage if�
the windshield wipers are engaged
�
the gear selector lever is placed
inR “Reverse”
Page 52 of 376
.
For more information, see “Exterior lamp
switch” (�page 104).
Turning off engine�
Pl")
52 Getting startedParking and locking
Switching off headlamps�
Turn the exterior lamp switch to M
(�page 46).
For more information, see “Exterior lamp
switch” (�page 104).
Turning off engine�
Place the gear selector lever in
positionP.
�
Turn SmartKey in the starter switch to
position0 and remove it.
The immobilizer is activated.
Warning!
G
When leaving the vehicle, always remove the
SmartKey from the starter switch, and lock
the vehicle. Do not leave children unattend-
ed in the vehicle, or with access to an un-
locked vehicle. Children could release the
parking brake and/or move the gear selec-
tor lever from positionP, either of which
could result in an accident and/or serious
personal injury.
Warning!
G
Getting out of your vehicle with the gear se-
lector lever not fully engaged in positionP is
dangerous. Also, when parked on an incline,
positionP alone may not prevent your vehi-
cle from moving, possibly hitting people or
objects.
Always set the parking brake in addition to
shifting to positionP.
When parked on an incline, turn front wheels
towards the road curb.
iAlways set the parking brake in addi-
tion to shifting to positionP.
On slopes, turn the front wheels to-
wards the road curb. iThe SmartKey can only be pulled out
when: �
it has been turned to position0 in
the starter switch
�
the gear selector lever for the auto-
matic transmission is in positionP
�
you are not depressing the brake
pedal
Page 104 of 376
104 Controls in detailLighting
�LightingFor notes on how to switch on the head-
lamps and use the turn signals, see the
“Getting started” section (
�page 46).
Exterior lamp switch
The exterior lamp switch is located on the
dashboard to the left of the steering wheel.MOff
UAutomatic headlamp mode
CParking lamps (also side marker
lamps, tail lamps, license plate
lamps, instrument panel lamps)
Canada only: When engine is run-
ning, the low beam is additionally
switched on.
BParking lamps plus low beam or
high beam headlamps (combination
switch pushed forward).
ˆStanding lamps, right (turn left one
stop)
‚Standing lamps, left (turn left two
stops)
iIf you drive in countries where vehicles
drive on the other side of the road than
the country where the vehicle is regis-
tered, you must have the headlamps
modified for symmetrical low beams.
Relevant information can be obtained
at your authorized Mercedes-Benz
Light Truck Center.
Page 105 of 376
.
Automatic headlamp mode
The")
105 Controls in detail
Lighting
Manual headlamp mode
The low beam headlamps and parking
lamps can be switched on and off with the
exterior lamp switch, see (
�page 104).
Automatic headlamp mode
The parking lamps, low beam headlamps
and license plate lamps switch on and off
automatically depending on the brightness
of the ambient light.
�
Turn the exterior lamp switch to U.
iIf you remove the SmartKey and open
the driver’s door while the parking
lamps or low beam headlamps are
switched on: �
a warning sounds
�
$ appears in the multifunction
display
�
the message
TURN OFF LIGHTS!
ap-
pears in the multifunction display
iWith the daytime running lamp mode
activated and the engine running, the
low beam headlamps cannot be
switched off manually.
Warning!
G
If the exterior lamp switch is set toU,�
the headlamps may switch off unexpect-
edly when the system senses bright am-
bient light, for example light from
oncoming traffic.
�
the headlamps will not be automatically
switched on under foggy conditions.
To minimize risk to you and to others, acti-
vate headlamps by turning exterior lamp
switch to
B
when driving or when traffic
and / or ambient lighting conditions require
you to do so.
In low ambient lighting conditions, only
switch from position
U
to
B
with the
vehicle at a standstill. Switching from U
to
B
will briefly switch off the head-
lamps. Doing so while driving in low ambient
lighting conditions may result in an acci-
dent.
The automatic headlamp feature is only an
aid to the driver. The driver is responsible for
the operation of the vehicle’s lights at all
times.
Page 106 of 376

106 Controls in detailLighting
Daytime running lamp mode�
Turn exterior lamp switch to
positionM orU.
When the engine is running, the low beam
headlamps are automatically switched on.
In low ambient light conditions the parking
lamps will also switch on.
Canada only
When you shift from a driving position to
positionN orP, the low beam switches off
(three minutes delay).
For nighttime driving, you should turn the
exterior lamp switch to positionB to
permit activation of the high beam head-
lamps.
USA only
The high beam headlamps can also be ac-
tivated when driving with the daytime run-
ning lamp mode activated and exterior
lamp switch in positionM.To activate the daytime running lamp
mode, see “Setting daytime running lamp
mode” (
�page 129).
Locator lighting and night security illu-
mination
Locator lighting and night security illumi-
nation are described in the control system
section under “Setting locator lighting”
(
�page 130) and “Setting night security il-
lumination” (
�page 131).
Exterior rear view mirror lamps
If the vehicle is centrally unlocked in the
darkness, the lamps in the exterior rear
view mirrors come on.
iWith the daytime running lamp mode
activated, the low beam headlamps will
not be switched off automatically.iFront fog lamps and rear fog lamp can
not be switched on manually with exte-
rior lamp switch in positionU. To
activate the fog lamps, turn exterior
lamp switch to positionB.
iSee notes on the exterior lamp switch
(�page 104).
Page 107 of 376

107 Controls in detail
Lighting
If a door is opened, the lamp on this side
goes out. If no doors are opened, the
lamps go out:�
when the ignition is switched on
�
after a maximum of 40 seconds
Switching on front fog lamps
�
Make sure the low beam headlamps
are switched on.
�
Pull out exterior lamp switch to first
stop.
The green indicator lamp‡ in the
lamp switch comes on.Switching on rear fog lamp
�
Check that the low beam headlamps
are switched on.
�
Pull out exterior lamp switch to second
stop.
The yellow indicator lamp† in the
lamp switch comes on.
Combination switch
The combination switch is located on the
left side of the steering column.
1High beam
2High beam flasher
Warning!
G
In low ambient lighting or foggy conditions,
only switch from position
U
to
B
with the vehicle at a standstill. Switching
from
U
to
B
will briefly switch off
the headlamps. Doing so while driving in low
ambient lighting conditions may result in an
accident.
iFog lamps will operate with the parking
lamps and/or the low beam headlamps
on. Fog lamps should only be used in
conjunction with low beam headlamps.
Consult your State or Province Motor
Vehicle Regulations regarding allow-
able lamp operation.
Page 108 of 376
108 Controls in detailLightingSwitching on high beams�
Turn exterior lamp switch to
positionB or toU
(�page 104).
�
Push the combination switch in
direction1.
The high beam headlamp
indicatorA in the instrument clus-
ter comes on.
High beam flasher
�
Pull the combination switch briefly in
direction2.
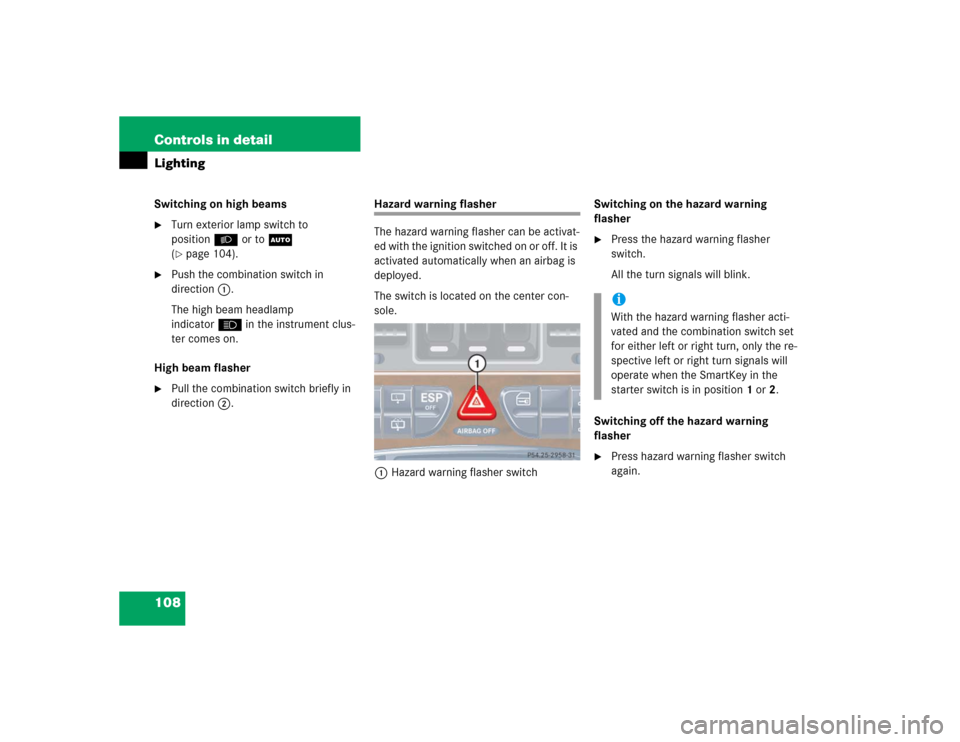
Hazard warning flasher
The hazard warning flasher can be activat-
ed with the ignition switched on or off. It is
activated automatically when an airbag is
deployed.
The switch is located on the center con-
sole.
1Hazard warning flasher switchSwitching on the hazard warning
flasher
�
Press the hazard warning flasher
switch.
All the turn signals will blink.
Switching off the hazard warning
flasher
�
Press hazard warning flasher switch
again.iWith the hazard warning flasher acti-
vated and the combination switch set
for either left or right turn, only the re-
spective left or right turn signals will
operate when the SmartKey in the
starter switch is in position1 or2.
Page 152 of 376
 and for
setting the exterior rear view mirrors, see
“Exterior r")
152 Controls in detailGood visibility
�Good visibilityFor information on windshield wipers, see
“Windshield wipers” (
�page 47) and for
setting the exterior rear view mirrors, see
“Exterior rear view mirror” (
�page 38).
Rear view mirror
Automatic antiglare rear view mirrors
The reflection brightness of the exterior
rear view mirrors and the interior rear view
mirror will respond automatically to glare
when �
the ignition is switched on, and
�
incoming light from headlamps falls on
the sensor in the interior rear view mir-
ror
The interior rear view mirror will not react if
�
reverse gear is engaged
�
the interior lighting is turned on
Warning!
G
The automatic antiglare function does not
react if incoming light is not aimed directly
at sensors in the interior rear view mirror.
The interior rear view mirror and the exterior
rear view mirrors do not react, for example,
if the cargo compartment is fully loaded.
Glare can endanger you and others.Warning!
G
Exercise care when using the passen-
ger-side exterior rear view mirror. The mirror
surface is convex (outwardly curved surface
for a wider field of view). Objects in mirror
are closer than they appear. Check your in-
side rear view mirror or glance over your
shoulder before changing lanes.
Warning!
G
In the case of an accident, liquid electrolyte
may escape from the mirror housing if the
mirror glass breaks.
Electrolyte has an irritating effect. Do not al-
low the liquid to come into contact with
eyes, skin, clothing, or the respiratory sys-
tem. In case it does, immediately flush af-
fected area with water, and seek medical
help if necessary.