Page 274 of 376

274 Practical hintsWhat to do if …Display symbol
Display message
Possible cause
Possible solution
.
3RD BRAKE LIGHT
CHECK LIGHT!
The high mounted brake lamp is malfunc-
tioning. This message will only appear if
all light emitting diodes have stopped
working.
�
Visit an authorized Mercedes-Benz
Center as soon as possible.
ADD. TURN SIG., L
CHECK LIGHT!
The left turn signal in the exterior rear
view mirror is malfunctioning. This mes-
sage will only appear if all light emitting
diodes have stopped working.
�
Have the LEDs replaced as soon as
possible.
ADD. TURN SIG., R
CHECK LIGHT!
The right turn signal in the exterior rear
view mirror is malfunctioning. This mes-
sage will only appear if all light emitting
diodes have stopped working.
�
Have the LEDs replaced as soon as
possible.
AUTOM. LIGHT ON
REMOVE KEY!
You have left the SmartKey in the starter
switch.
�
Remove the SmartKey from the starter
switch.
BRAKE LIGHT
DRIVE TO WORKSHOP!
Brake lamp illumination is delayed or
lamp is permanently on.
�
Visit an authorized Mercedes-Benz
Light Truck Center as soon as possi-
ble.
BRAKE LIGHT, L
CHECK LIGHT!
The left brake lamp is malfunctioning.
�
Visit an authorized Mercedes-Benz
Center as soon as possible.
Page 276 of 376

276 Practical hintsWhat to do if …Display symbol
Display message
Possible cause
Possible solution
.
LIGHT SENSOR
DRIVE TO WORKSHOP!
The lamp sensor is malfunctioning. The
headlamps switch on automatically.
�
In the control system, set lamp opera-
tion to manual (
�page 129).
�
Switch on headlamps using the exteri-
or lamp switch (
�page 104).
�
Visit an authorized Mercedes-Benz
Light Truck Center as soon as possi-
ble.
LICENSE PLATE LIGHT, L
CHECK LIGHT!
The left license plate lamp is malfunction-
ing.
�
Replace the bulb as soon as possible.
LICENSE PLATE LIGHT R
CHECK LIGHT!
The right license plate lamp is malfunc-
tioning.
�
Replace the bulb as soon as possible.
LIGHTS
TURN OFF LIGHTS!
The display appears if the driver’s door is
opened with the engine shut off and no
SmartKey in the starter switch.
�
Insert SmartKey in the starter switch.
�
Switch off the lights (
�page 104).
LOW BEAM, L
CHECK LIGHT!
The left low beam lamp is malfunctioning.
�
Visit an authorized Mercedes-Benz
Light Truck Center as soon as possi-
ble.
LOW BEAM, R
CHECK LIGHT!
The right low beam lamp is malfunction-
ing.
�
Visit an authorized Mercedes-Benz
Light Truck Center as soon as possi-
ble.
Page 281 of 376

281 Practical hints
What to do if …
Display symbol
Display message
Possible cause
Possible solution
§
TC SHIFT
CANCELLED
The shift process in the transfer case was
canceled because of a malfunction.
�
Repeat the shift process (
�page 145).
TC SHIFT CONDITIONS
NOT FULFILLED
You have not met the shift conditions for
a selection process in the transfer case.
�
Repeat the shift process (
�page 145).
TRANSFER CASE
VISIT WORKSHOP!
The transfer case is malfunctioning.
�
Do not switch the transfer case on.
�
Visit an authorized Mercedes-Benz
Light Truck Center as soon as possi-
ble.
K
CLOSE
SUNROOF!
You have opened the driver’s door with
the SmartKey removed from the starter
switch and the sliding/pop-up roof open.
�
Close the sliding/pop-up roof
(�page 166).
J
CLOSE
SUNROOF!
You have opened the driver’s door with
the SmartKey removed from the starter
switch and the sliding/pop-up roof open.
�
Close the sliding/pop-up roof
(�page 166).
L
TELE AID
DRIVE TO WORKSHOP!
One or more main functions of the Tele
Aid system are malfunctioning.
�
Have the Tele Aid system checked by
an authorized Mercedes-Benz Light
Truck Center.
ì
FUNCTION
NOT AVAILABLE!
This display appears if button ì or
í on the multifunction steering wheel
is pressed and the vehicle is not equipped
with a telephone.
Page 285 of 376
285 Practical hints
Where will I find ...?
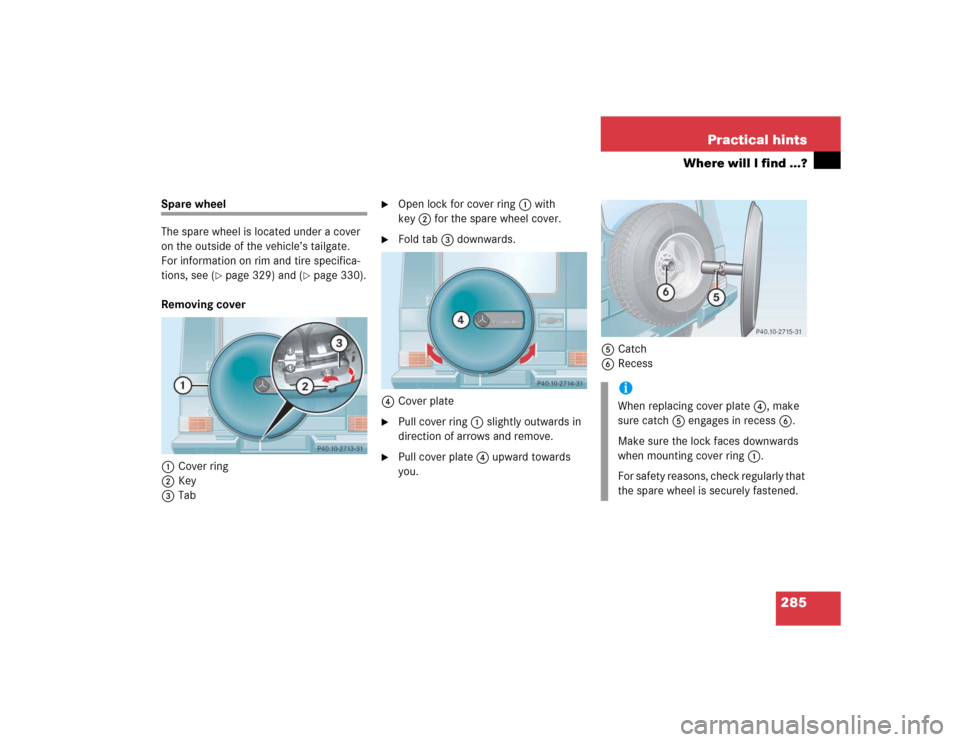
Spare wheel
The spare wheel is located under a cover
on the outside of the vehicle’s tailgate.
For information on rim and tire specifica-
tions, see (
�page 329) and (
�page 330).
Removing cover
1Cover ring
2Key
3Tab
�
Open lock for cover ring1 with
key2 for the spare wheel cover.
�
Fold tab3 downwards.
4Cover plate
�
Pull cover ring1 slightly outwards in
direction of arrows and remove.
�
Pull cover plate4 upward towards
you.5Catch
6Recess
iWhen replacing cover plate4, make
sure catch5 engages in recess6.
Make sure the lock faces downwards
when mounting cover ring1.
For safety reasons, check regularly that
the spare wheel is securely fastened.
Page 287 of 376

287 Practical hints
Unlocking/locking in an emergency
�Unlocking/locking in an emergency
Unlocking the vehicle
If you are unable to unlock the vehicle with
the SmartKey, open the driver’s door and
the tailgate using the mechanical key.
The passenger door cannot be unlocked
manually.
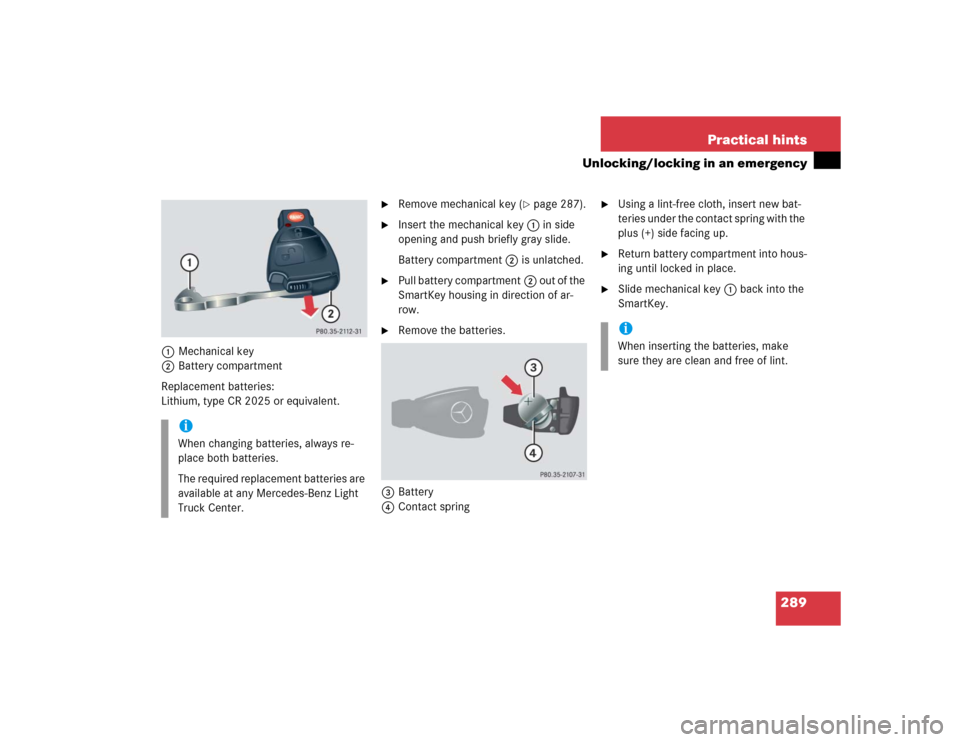
1Mechanical key locking tab
2Mechanical key
�
Move locking tab1 in direction of ar-
row and slide the mechanical key2
out of the housing.
Unlocking the driver’s door
�
Unlock the door with the mechanical
key. To do so, push the mechanical key
in the lock until it stops and turn it to
the left.Unlocking the tailgate
If you are unable to unlock the tailgate with
the SmartKey, open the tailgate with the
mechanical key as follows:
1Unlocking in an emergency
2Lock cylinder
3Handle
�
Insert the mechanical key into the tail-
gate lock.
�
Turn the mechanical key counterclock-
wise to position1 and hold it in this
position.
iUnlocking your vehicle with the me-
chanical key will trigger the anti-theft
alarm system. To cancel the alarm, do
one of the following:�
Press button Œ or ‹ on the
SmartKey.
�
Insert the SmartKey in the starter
switch.
��
Page 288 of 376

288 Practical hintsUnlocking/locking in an emergency�
Press lock cylinder2 and pull on tail-
gate handle3.
�
Open the tailgate to the side.
Locking the vehicle
If you are unable to lock the vehicle with
the SmartKey, lock it with the mechanical
key as follows:�
Close the passenger doors and the tail-
gate.
�
Press the central locking switch in the
cockpit (
�page 92).
�
Check to see whether the locking
knobs on the passenger doors are still
visible. If necessary, push them down
manually.
�
Slide the mechanical key2 out of the
SmartKey.
�
Lock the driver’s door with the me-
chanical key.
�
Check if the tailgate is locked. If nec-
cessary lock the tailgate with the me-
chanical key.
Changing batteries in the SmartKey
If the batteries in the SmartKey are dis-
charged, the vehicle can no longer be
locked or unlocked. It is recommended to
have the batteries replaced at an autho-
rized Mercedes-Benz Light Truck Center.
Batteries contain materials that can harm
the environment if disposed of improperly.
Recycling of batteries is the preferred
method of disposal. Many states require
sellers of batteries to accept old batteries
for recycling.
Warning!
G
The tailgate swings open to one side. Always
make sure there is sufficient clearance for
tailgate.iUnlocking your vehicle with the me-
chanical key will trigger the anti-theft
alarm system. To cancel the alarm, do
one of the following:�
Press button Œ or ‹ on the
SmartKey.
�
Insert the SmartKey in the starter
switch.
Warning!
G
Keep the batteries out of reach of children.
If a battery is swallowed, seek medical help
immediately.
��
Page 289 of 376
289 Practical hints
Unlocking/locking in an emergency
1Mechanical key
2Battery compartment
Replacement batteries:
Lithium, type CR 2025 or equivalent.
�
Remove mechanical key (
�page 287).
�
Insert the mechanical key1 in side
opening and push briefly gray slide.
Battery compartment2 is unlatched.
�
Pull battery compartment2 out of the
SmartKey housing in direction of ar-
row.
�
Remove the batteries.
3Battery
4Contact spring
�
Using a lint-free cloth, insert new bat-
teries under the contact spring with the
plus (+) side facing up.
�
Return battery compartment into hous-
ing until locked in place.
�
Slide mechanical key1 back into the
SmartKey.
iWhen changing batteries, always re-
place both batteries.
The required replacement batteries are
available at any Mercedes-Benz Light
Truck Center.
iWhen inserting the batteries, make
sure they are clean and free of lint.
Page 292 of 376
292 Practical hintsOpening/closing in an emergency
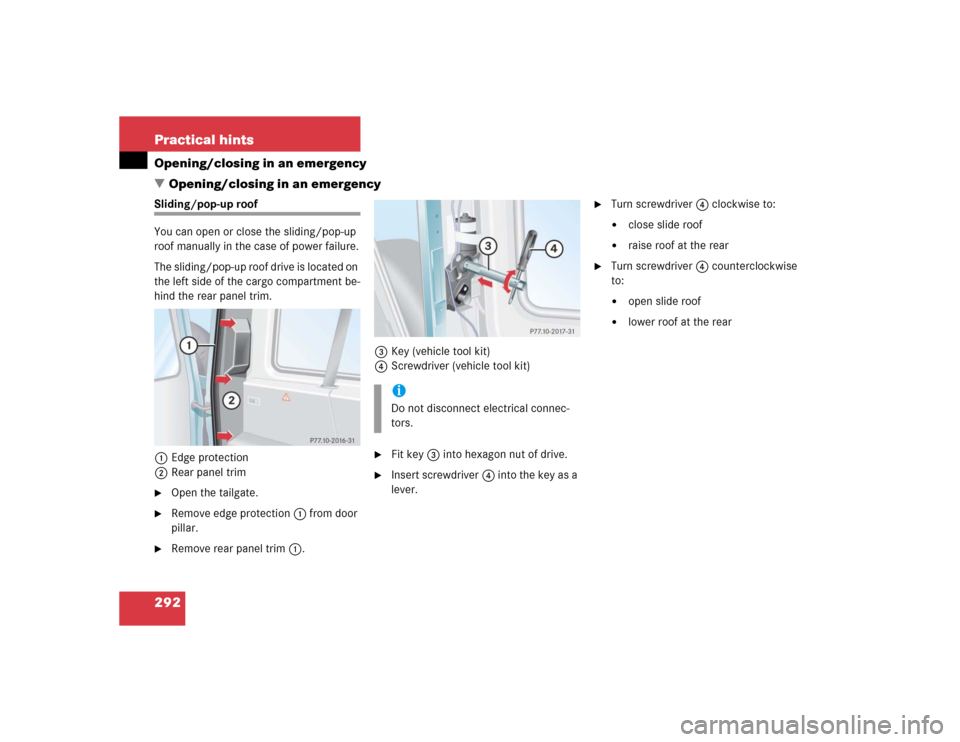
�Opening/closing in an emergencySliding/pop-up roof
You can open or close the sliding/pop-up
roof manually in the case of power failure.
The sliding/pop-up roof drive is located on
the left side of the cargo compartment be-
hind the rear panel trim.
1Edge protection
2Rear panel trim�
Open the tailgate.
�
Remove edge protection1 from door
pillar.
�
Remove rear panel trim1.3Key (vehicle tool kit)
4Screwdriver (vehicle tool kit)
�
Fit key3 into hexagon nut of drive.
�
Insert screwdriver4 into the key as a
lever.
�
Turn screwdriver4 clockwise to:�
close slide roof
�
raise roof at the rear
�
Turn screwdriver4 counterclockwise
to:�
open slide roof
�
lower roof at the rear
iDo not disconnect electrical connec-
tors.