Page 23 of 442

23 At a glance
Instrument cluster
Item
Page
1
LLeft turn signal indi-
cator lamp
2
vAntilock Brake Sys-
tem (ABS)/Electronic
Stability Program
(ESP) warning lamp
311
3
Speedometer
4
Multifunction display
with:Basic display with outside
temperature display
141
Status indicator with mal-
function warning messageTrip odometer
127
5
lDistance warning
lamp
1
1Vehicles without Distronic*: Warning lamp without
function. It illuminates with the ignition on. It should
go out when the engine is running.
315
6
KRight turn signal indi-
cator lamp
Item
Page
7
Coolant temperature dis-
play with:•Coolant tempera-
ture warning lamp
314
8
Tachometer with:1Supplemental
restraint system
indicator lamp
316
-Antilock Brake Sys-
tem (ABS) malfunc-
tion indicator lamp
310
warning lamp
315
AHigh beam head-
lamp indicator
123
9
Main odometer with:�
Selector lever position
43
�
Program mode
164
Item
Page
a
Clock with:
143
;Brake warning
lamp, except
Canada
312
3Brake warning
lamp, Canada only
312
?Engine malfunction
indicator lamp
313
b
Fuel display with:AFuel reserve warn-
ing lamp
315
c
Reset button for:�
Resetting trip
odometer
127
�
Adjusting instrument
cluster illumination
126
�
Confirming new time
settings
143
Page 45 of 442

45 Getting started
Driving
Starting difficulties
If the engine does not start as described,
carry out the following steps:�
If you are starting the engine with the
SmartKey, turn SmartKey in starter
switch to position0 and repeat starting
procedure.
�
If you are starting the engine with
KEYLESS-GO: Close any doors that
may be open to allow for better detec-
tion of the SmartKey with
KEYLESS-GO.
Or:
Start the engine with the SmartKey as
radio signals from another source may
be interfering with the SmartKey with
KEYLESS-GO.
�
Repeat the starting procedure
(�page 43). Remember that extended
starting attempts can drain the battery.
�
Get a jump start (
�page 378).If the engine does not start after several
starting attempts, there could be a mal-
function in the engine electronics or in the
fuel supply system.
�
Notify an authorized Mercedes-Benz
Center.
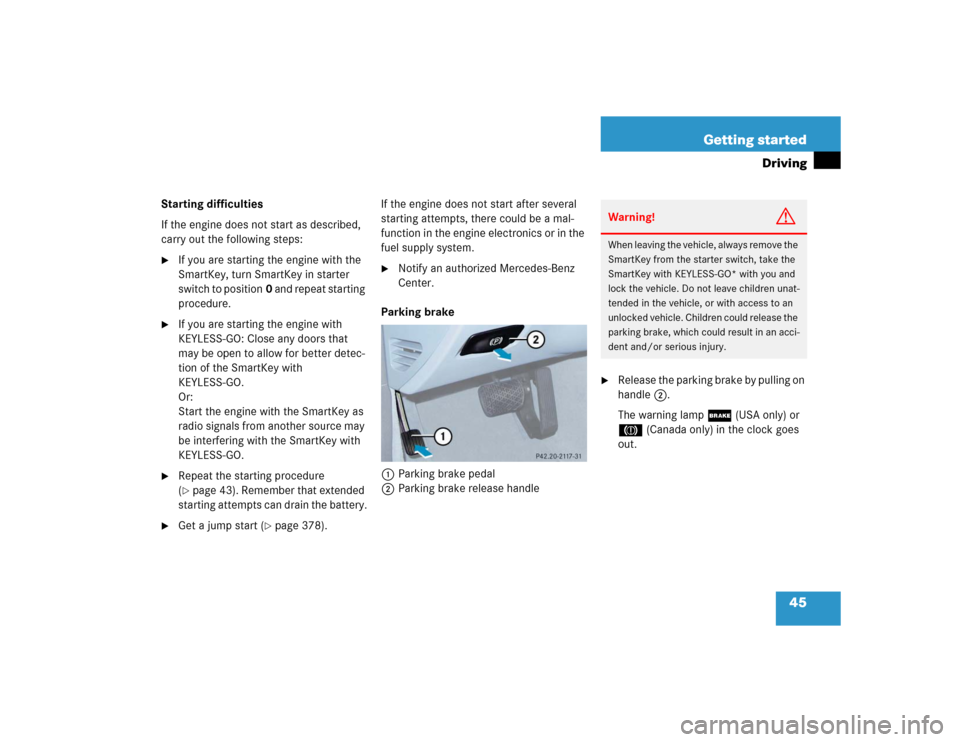
Parking brake
1Parking brake pedal
2Parking brake release handle
�
Release the parking brake by pulling on
handle2.
The warning lamp ; (USA only) or
3 (Canada only) in the clock goes
out.Warning!
G
When leaving the vehicle, always remove the
SmartKey from the starter switch, take the
SmartKey with KEYLESS-GO* with you and
lock the vehicle. Do not leave children unat-
tended in the vehicle, or with access to an
unlocked vehicle. Children could release the
parking brake, which could result in an acci-
dent and/or serious injury.
Page 105 of 442
105 Controls in detail
Locking and unlocking
Separately locking the trunk
Your vehicle may be equipped with a func-
tion permitting the separate locking of the
trunk using the mechanical key. If present,
this feature can permit you to deny any un-
authorized person access to the trunk by
locking the trunk separately and leaving
the SmartKey less the mechanical key with
the vehicle.
To verify the presence of this feature, use
the mechanical key to lock the trunk and
then attempt to open the trunk.The lock is located next to the recessed
handle.
1Unlocked
2Locked
�
Close the trunk lid (
�page 99).
�
Pull the mechanical key out of the
SmartKey (
�page 353).
�
Insert the mechanical key in the trunk
lid lock.
�
Turn the mechanical key clockwise to
position1.
The trunk remains locked even when the
vehicle is centrally unlocked.iYou can only cancel the separate trunk
locking mode by means of the mechan-
ical key.
Page 126 of 442

126 Controls in detailInstrument cluster
�Instrument clusterA full view illustration of the instrument
cluster can be found in the “At a glance”
section of this manual (
�page 22).
The instrument cluster is activated when
you
�
open a door
�
turn on the ignition
�
press the reset button (
�page 22)
�
switch on the exterior lamps
You can change the instrument cluster set-
tings in the instrument cluster submenu of
the control system (
�page 141).
Instrument cluster illumination
Use the reset button (
�page 22) to adjust
the illumination brightness for the instru-
ment cluster.To brighten illumination
�
Turn the reset button in the instrument
cluster clockwise (
�page 22).
The instrument cluster illumination will
brighten.
To dim illumination
�
Turn the reset button in the instrument
cluster counterclockwise (
�page 22).
The instrument cluster illumination will
dim.
iThe instrument cluster illumination is
dimmed or brightened automatically to
suit ambient light conditions.
The instrument cluster illumination will
also be adjusted automatically when
you switch on the vehicle’s exterior
lamps.
Page 144 of 442

144 Controls in detailControl systemSynchronizing the time
This function can only be seen on vehicles
with COMAND and navigation module*.�
Move the selection marker with
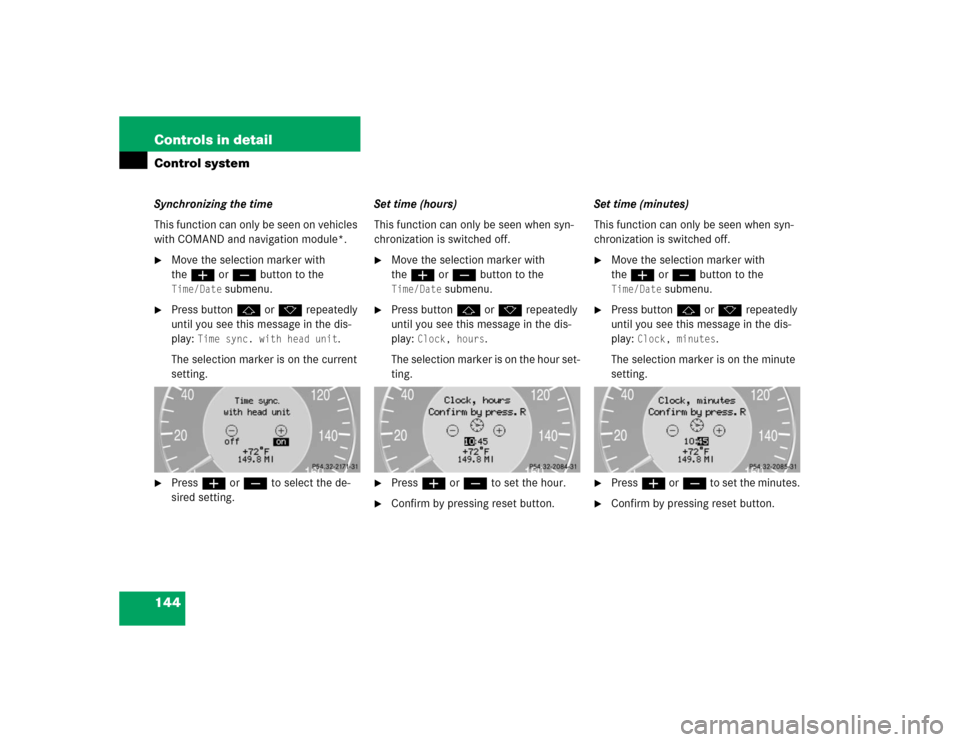
theæ orç button to the Time/Date
submenu.
�
Press buttonj ork repeatedly
until you see this message in the dis-
play:
Time sync. with head unit
.
The selection marker is on the current
setting.
�
Pressæ orç to select the de-
sired setting.Set time (hours)
This function can only be seen when syn-
chronization is switched off.
�
Move the selection marker with
theæ orç button to the Time/Date
submenu.
�
Press buttonj ork repeatedly
until you see this message in the dis-
play:
Clock, hours
.
The selection marker is on the hour set-
ting.
�
Pressæ orç to set the hour.
�
Confirm by pressing reset button.Set time (minutes)
This function can only be seen when syn-
chronization is switched off.
�
Move the selection marker with
theæ orç button to the Time/Date
submenu.
�
Press buttonj ork repeatedly
until you see this message in the dis-
play:
Clock, minutes
.
The selection marker is on the minute
setting.
�
Pressæ orç to set the minutes.
�
Confirm by pressing reset button.
Page 351 of 442

351 Practical hints
Where will I find ...?
Removing the spare wheel�
Turn luggage bowl counterclockwise.
�
Remove spare wheel2.
Storing the spare wheel
�
Place spare wheel2 in wheel well.
�
Turn luggage bowl clockwise to its stop
to secure the spare wheel.Minispare wheel
In the case of a flat tire, you may tempo-
rarily use the Minispare wheel when ob-
serving the following restrictions:
�
Do not exceed a vehicle speed of
50 mph (80 km / h).
�
Drive to the nearest tire repair facility
to have the flat tire repaired or re-
placed as appropriate.
�
Do not operate vehicle with more than
one spare wheel mounted.More information can be found in the
“Technical data” section (
�page 396).
Luggage box
Remove luggage box
1Fastening clip
2Luggage box�
Turn fastening clips1 to the left up-
wards from fastening bolts.
�
Lift luggage box in the area of the fas-
tening bolts and remove it from trunk.
!Always lower trunk floor before closing
trunk lid.
Warning!
G
The dimensions of the Minispare wheel are
different from those of the road wheels. As
a result, the vehicle handling characteristics
change when driving with a Minispare wheel
mounted.
The Minispare wheel should only be used
temporarily, and replaced with a regular
road wheel as quickly as possible.
Page 354 of 442

354 Practical hintsUnlocking / locking in an emergencyUnlocking the trunk
A minimum height clearance of 5.90 ft
(1.80 m) is required to open the trunk lid.
If you are unable to unlock the trunk with
the SmartKey or KEYLESS-GO*, open the
trunk with the mechanical key.
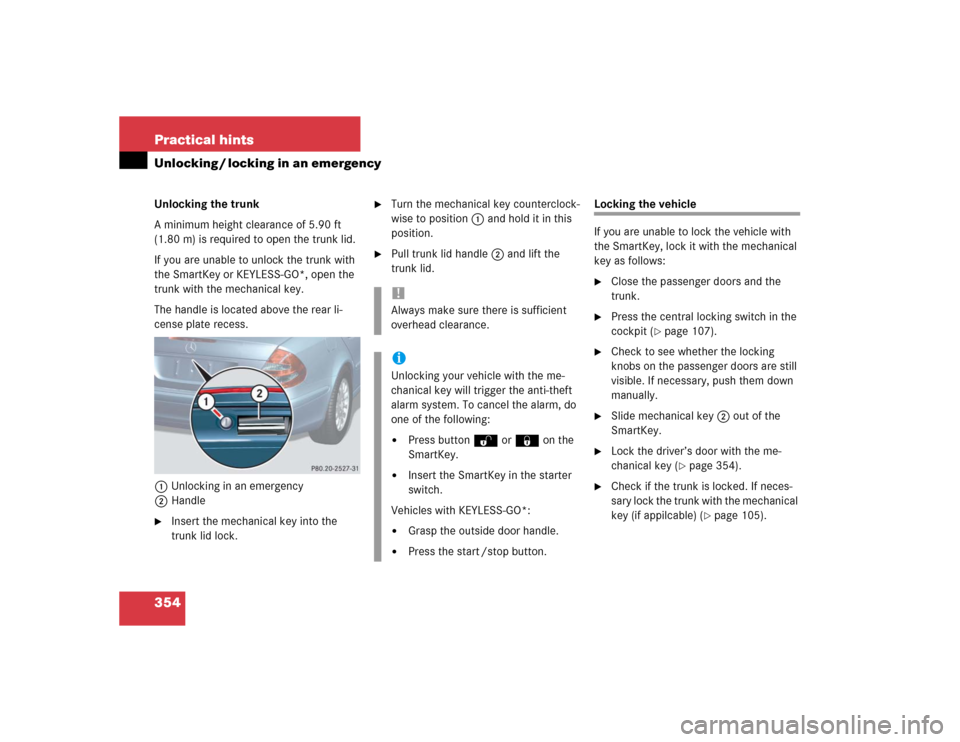
The handle is located above the rear li-
cense plate recess.
1Unlocking in an emergency
2Handle�
Insert the mechanical key into the
trunk lid lock.
�
Turn the mechanical key counterclock-
wise to position1 and hold it in this
position.
�
Pull trunk lid handle2 and lift the
trunk lid.
Locking the vehicle
If you are unable to lock the vehicle with
the SmartKey, lock it with the mechanical
key as follows:�
Close the passenger doors and the
trunk.
�
Press the central locking switch in the
cockpit (
�page 107).
�
Check to see whether the locking
knobs on the passenger doors are still
visible. If necessary, push them down
manually.
�
Slide mechanical key2 out of the
SmartKey.
�
Lock the driver’s door with the me-
chanical key (
�page 354).
�
Check if the trunk is locked. If neces-
sary lock the trunk with the mechanical
key (if appilcable) (
�page 105).
!Always make sure there is sufficient
overhead clearance.iUnlocking your vehicle with the me-
chanical key will trigger the anti-theft
alarm system. To cancel the alarm, do
one of the following:�
Press buttonŒ or‹ on the
SmartKey.
�
Insert the SmartKey in the starter
switch.
Vehicles with KEYLESS-GO*:
�
Grasp the outside door handle.
�
Press the start /stop button.
Page 357 of 442
357 Practical hints
Unlocking / locking in an emergency
Fuel filler flap emergency release
In case the central locking system does
not release the fuel filler flap, you can open
it manually.
1Release knob�
Open trunk lid.
�
Remove right-side tail trim.
�
Turn release knob1 clockwise (ar-
row).
The fuel filler flap can know be opened.Manually unlocking the transmission
selector lever
In the case of power failure, the transmis-
sion selector lever can be manually un-
locked, e.g. to tow the vehicle.
1Pin
�
Open the storage compartment in the
center console (
�page 244).
�
Take out the cup holder*.
Using two fingers in the horizontal slot
at the upper rear side of the cup holder,
lift cup holder upwards to remove.
�
Hold the cover at a 45° angle.
�
Insert a suitable object1 (e.g. a pin)
through the hole and press the pin
downward.
�
Remove pin1. iThe selector lever is locked again when
moving it to positionP.