Page 350 of 442
350 Practical hintsWhere will I find ...?
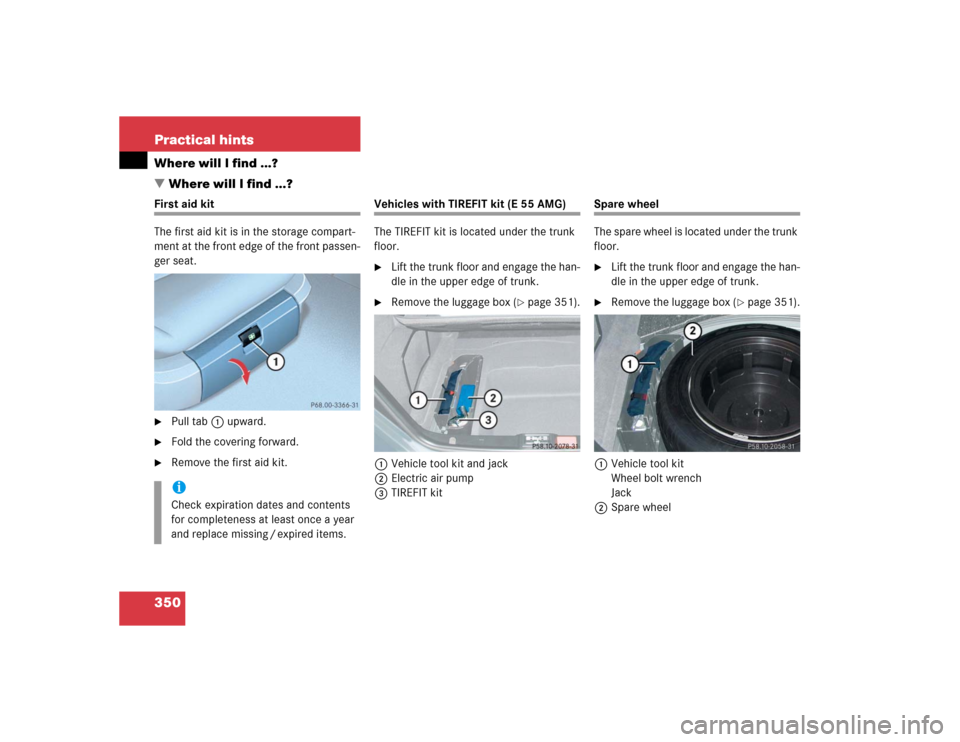
�Where will I find ...?First aid kit
The first aid kit is in the storage compart-
ment at the front edge of the front passen-
ger seat.�
Pull tab1 upward.
�
Fold the covering forward.
�
Remove the first aid kit.
Vehicles with TIREFIT kit (E 55 AMG)
The TIREFIT kit is located under the trunk
floor.�
Lift the trunk floor and engage the han-
dle in the upper edge of trunk.
�
Remove the luggage box (
�page 351).
1Vehicle tool kit and jack
2Electric air pump
3TIREFIT kit
Spare wheel
The spare wheel is located under the trunk
floor.�
Lift the trunk floor and engage the han-
dle in the upper edge of trunk.
�
Remove the luggage box (
�page 351).
1Vehicle tool kit
Wheel bolt wrench
Jack
2Spare wheel
iCheck expiration dates and contents
for completeness at least once a year
and replace missing / expired items.
Page 351 of 442

351 Practical hints
Where will I find ...?
Removing the spare wheel�
Turn luggage bowl counterclockwise.
�
Remove spare wheel2.
Storing the spare wheel
�
Place spare wheel2 in wheel well.
�
Turn luggage bowl clockwise to its stop
to secure the spare wheel.Minispare wheel
In the case of a flat tire, you may tempo-
rarily use the Minispare wheel when ob-
serving the following restrictions:
�
Do not exceed a vehicle speed of
50 mph (80 km / h).
�
Drive to the nearest tire repair facility
to have the flat tire repaired or re-
placed as appropriate.
�
Do not operate vehicle with more than
one spare wheel mounted.More information can be found in the
“Technical data” section (
�page 396).
Luggage box
Remove luggage box
1Fastening clip
2Luggage box�
Turn fastening clips1 to the left up-
wards from fastening bolts.
�
Lift luggage box in the area of the fas-
tening bolts and remove it from trunk.
!Always lower trunk floor before closing
trunk lid.
Warning!
G
The dimensions of the Minispare wheel are
different from those of the road wheels. As
a result, the vehicle handling characteristics
change when driving with a Minispare wheel
mounted.
The Minispare wheel should only be used
temporarily, and replaced with a regular
road wheel as quickly as possible.
Page 352 of 442
352 Practical hintsWhere will I find ...?Install luggage box�
Insert luggage box into trunk so that
fastening clips are in line with fastening
bolts.
�
Push front edge of luggage box in direc-
tion of arrow under cover of trunk sill.
�
Press fastening clips onto fastening
bolts until they lock into place.
Vehicle tool kit
The vehicle tool kit is stored in the com-
partment underneath the trunk floor
(�page 350).
The vehicle tool kit includes:
�
One towing eye bolt
�
One wheel wrench
�
One alignment bolt
�
One fuse extractor
�
Spare fuses
Page 353 of 442
353 Practical hints
Unlocking / locking in an emergency
�Unlocking / locking in an emergency
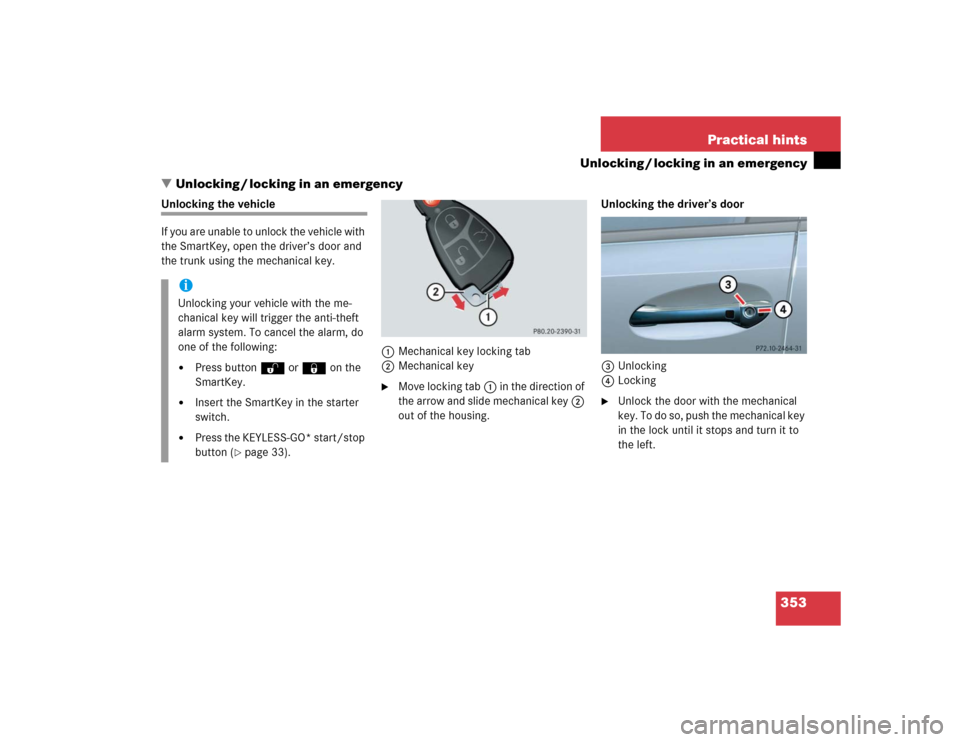
Unlocking the vehicle
If you are unable to unlock the vehicle with
the SmartKey, open the driver’s door and
the trunk using the mechanical key.
1Mechanical key locking tab
2Mechanical key
�
Move locking tab1 in the direction of
the arrow and slide mechanical key2
out of the housing.Unlocking the driver’s door
3Unlocking
4Locking
�
Unlock the door with the mechanical
key. To do so, push the mechanical key
in the lock until it stops and turn it to
the left.
iUnlocking your vehicle with the me-
chanical key will trigger the anti-theft
alarm system. To cancel the alarm, do
one of the following:�
Press button Œ or ‹ on the
SmartKey.
�
Insert the SmartKey in the starter
switch.
�
Press the KEYLESS-GO* start/stop
button (
�page 33).
Page 354 of 442
 is required to open the trunk lid.
If you are unable to unlock the trunk with")
354 Practical hintsUnlocking / locking in an emergencyUnlocking the trunk
A minimum height clearance of 5.90 ft
(1.80 m) is required to open the trunk lid.
If you are unable to unlock the trunk with
the SmartKey or KEYLESS-GO*, open the
trunk with the mechanical key.
The handle is located above the rear li-
cense plate recess.
1Unlocking in an emergency
2Handle�
Insert the mechanical key into the
trunk lid lock.
�
Turn the mechanical key counterclock-
wise to position1 and hold it in this
position.
�
Pull trunk lid handle2 and lift the
trunk lid.
Locking the vehicle
If you are unable to lock the vehicle with
the SmartKey, lock it with the mechanical
key as follows:�
Close the passenger doors and the
trunk.
�
Press the central locking switch in the
cockpit (
�page 107).
�
Check to see whether the locking
knobs on the passenger doors are still
visible. If necessary, push them down
manually.
�
Slide mechanical key2 out of the
SmartKey.
�
Lock the driver’s door with the me-
chanical key (
�page 354).
�
Check if the trunk is locked. If neces-
sary lock the trunk with the mechanical
key (if appilcable) (
�page 105).
!Always make sure there is sufficient
overhead clearance.iUnlocking your vehicle with the me-
chanical key will trigger the anti-theft
alarm system. To cancel the alarm, do
one of the following:�
Press buttonŒ or‹ on the
SmartKey.
�
Insert the SmartKey in the starter
switch.
Vehicles with KEYLESS-GO*:
�
Grasp the outside door handle.
�
Press the start /stop button.
Page 357 of 442
357 Practical hints
Unlocking / locking in an emergency
Fuel filler flap emergency release
In case the central locking system does
not release the fuel filler flap, you can open
it manually.
1Release knob�
Open trunk lid.
�
Remove right-side tail trim.
�
Turn release knob1 clockwise (ar-
row).
The fuel filler flap can know be opened.Manually unlocking the transmission
selector lever
In the case of power failure, the transmis-
sion selector lever can be manually un-
locked, e.g. to tow the vehicle.
1Pin
�
Open the storage compartment in the
center console (
�page 244).
�
Take out the cup holder*.
Using two fingers in the horizontal slot
at the upper rear side of the cup holder,
lift cup holder upwards to remove.
�
Hold the cover at a 45° angle.
�
Insert a suitable object1 (e.g. a pin)
through the hole and press the pin
downward.
�
Remove pin1. iThe selector lever is locked again when
moving it to positionP.
Page 367 of 442
.
�
Foreign objects (e.g. screws or nails)
should not be removed from the tire.
�
Attach the sticker where it will be")
367 Practical hints
Flat tire
�
Take the TIREFIT kit out of the trunk
(�page 350).
�
Foreign objects (e.g. screws or nails)
should not be removed from the tire.
�
Attach the sticker where it will be easily
seen by the driver on the instrument
cluster.Preparing TIREFIT
1TIREFIT container
2Flap
3Notch
4Electrical plug
5Air hose
6Flange
�
Open flap2 on the electric air pump.
�
Pull plug4 and air hose5 out of the
pump housing.
�
Screw the air pump’s air hose5 onto
flange6 of the TIREFIT container.
�
Stick TIREFIT container1 upside
down into notch3 of the electric air
pump.
7Tire valve
8Electric air pump switch
9Air hose with pressure gauge and vent
screw
aFiller hose
Warning!
G
TIREFIT is a limited repair device. TIREFIT
cannot be used for:�
cuts or punctures larger than approxi-
mately 0.16 in (4 mm)
�
on a flat tire, or a damaged wheel
�
tire damage caused by driving with ex-
tremely low tire pressure
Do not drive the vehicle under such circum-
stances.
Contact your nearest Mercedes-Benz
Center for assistance or call Roadside Assis-
tance.
Warning!
G
Observe safety instructions on air pump la-
bel.
Page 369 of 442
.
or
�
Press the KEYLESS-GO* start / stop
button (
�page 33) on the selector le-
ver twice. Do not depress bra")
369 Practical hints
Flat tire
�
Turn SmartKey in starter switch to
position0 (
�page 31).
or
�
Press the KEYLESS-GO* start / stop
button (
�page 33) on the selector le-
ver twice. Do not depress brake pedal.
�
Detach the electric air pump.
The air hose may still be hot. Please ex-
ercise appropriate caution.
�
Store the electrical plug and the air
hose behind the flap and place the air
pump back in the trunk.
�
Close the trunk lid.
�
Drive away immediately.
The TIREFIT sealant will distribute itself
evenly inside the tire.
�
After driving vehicle for an initial
10 minutes, check tire pressure using
the pressure gauge on the air pump.Warning!
G
Do not exceed vehicle speed of 50 mph
(80 km / h). A TIREFIT repair is not designed
to operate at higher speeds.
The sticker must be attached on the instru-
ment cluster where it will be easily seen by
the driver.
Vehicle handling characteristics may
change. Adapt your driving accordingly.
Warning!
G
If tire pressure has fallen below
20 psi (1.3 bar) do not continue to drive the
vehicle.
Park your vehicle safely away from the road-
way and contact the nearest authorized
Mercedes-Benz Center or Roadside Assis-
tance.
If ti re pre ss ur e i s at l ea st 2 0 psi (1 .3 ba r ), in -
flate tire to correct pressure (see label on
fuel filler flap), and drive vehicle to nearest
tire repair facility to have tire repaired or re-
placed.
Recommended maximum duration of use:
300 miles (500 km) at 50 mph (80 km / h)
with the recommended tire pressure.
��