Page 107 of 442

107 Controls in detail
Locking and unlocking
Locking and unlocking from the inside
You can lock or unlock the doors and the
trunk from inside using the central locking
switch. This can be useful, for example, if
y o u w a n t t o l o c k t h e v e h i c l e b e f o r e s t a r t i n g
to drive.
The fuel filler flap cannot be locked or un-
locked with the central locking switch.The switch is located in the center console.
Central locking switch1Locking
2Unlocking
Locking�
Press upper half1 of the central lock-
ing switch.
If both front doors are closed, the vehi-
cle locks.Unlocking
�
Press lower half2 of the central lock-
ing switch.
The vehicle unlocks.
Warning!
G
When leaving the vehicle, always remove the
SmartKey from the starter switch, take it
with you and lock the vehicle. Do not leave
children unattended in the vehicle, or with
access to an unlocked vehicle. Unsuper-
vised use of vehicle equipment may cause
an accident and / or serious personal injury.
iYou can open a locked door from the
inside. Open door only when conditions
are safe to do so.
If the vehicle was previously centrally
locked using the SmartKey, it will not
unlock using the central locking switch.
If the vehicle was previously locked
with the central locking switch�
while in the selective remote con-
trol mode, only the door opened
from the inside is unlocked.
�
while in the global remote control
mode, the vehicle is unlocked com-
pletely when a door is opened from
the inside.
Page 125 of 442

125 Controls in detail
Lighting
Deactivating automatic control�
Press the switch3.
The interior lighting remains switched
off, even when you�
centrally unlock the vehicle
�
open a door
�
remove the SmartKey from the
starter switch
Manual control
Switching rear interior lights on and off
�
Press button2.
The lights in the rear passenger com-
partment go on.
�
Press button2 again.
The lights in the rear passenger com-
partment go out.Switching left front reading lamp on and
off
�
Press button1.
The left reading lamp goes on.
�
Press button1 again.
The left reading lamp goes out.
Switching right front reading lamp on
and off
�
Press button5.
The right reading lamp goes on.
�
Press button5 again.
The right reading lamp goes out.
Door entry lamps
The appropriate door entry lamp switches
on if a door is opened in darkness and if
the interior lighting is switched to the auto-
matic function.
The entry lamp goes out automatically
when the door is closed.Trunk lamp
The trunk lamp switches on if the trunk lid
is opened.
If you leave the trunk open for an extended
period of time, the trunk lamp will switch
off automatically after approximately ten
minutes.
iIf you turn the SmartKey in the starter
switch to position0 or remove the
SmartKey, the door entry lamps will re-
main lit for approximately five minutes.
Page 149 of 442

149 Controls in detail
Control system
Interior lighting delayed shut-off
Use this function to set whether and for
how long you would like the interior light-
ing to remain lit during darkness after the
SmartKey is removed from the starter
switch.�
Move the selection marker with
theæ orç button to the
Light-
ing
submenu.
�
Press buttonj ork repeatedly
until you see this message in the dis-
play:
Interior lamp delayed
shut-off
.
The selection marker is on the current
setting.
�
Pressæ orç to select the de-
sired lamp-on time period. You can se-
lect:�
0 s
, the delayed shut-off feature is
deactivated.
�
5 s,
10 s
, 15 s
or
20 s
, the delayed
shut-off feature is activated.Vehicle submenu
Access the
Vehicle
submenu via the
Set-
tings
menu. Use the
Vehicle
submenu to
make general vehicle settings. The follow-
ing functions are available:
Setting automatic locking
Use this function to activate or deactivate
the automatic central locking. With the au-
tomatic central locking system activated,
the vehicle is centrally locked at vehicle
speeds of approximately 9 mph
(15 km / h).
Function
Page
Set automatic locking
149
Limiting opening height of trunk
lid*
150
Page 150 of 442

150 Controls in detailControl system�
Move the selection marker with
theæ orç button to the
Vehi-
cle
submenu.
�
Press buttonj ork repeatedly
until you see this message in the dis-
play:
Automatic door lock
.
The selection marker is on the current
setting.
�
Pressæ orç to switch
Automat-
ic door lock
on or
off
.Limiting opening height of trunk lid*
Use this function to activate or deactivate
the limiting opening height of trunk lid.
�
Move the selection marker with
theæ orç button to the
Vehi-
cle
submenu.
�
Press buttonj ork repeatedly
until you see this message in the dis-
play:
Opening limiter trunk lid
.
The selection marker is on the current
setting.
�
Pressæ orç to switch
Opening
limiter Trunk lid On
or
Off
.Convenience submenu
Access the
Convenience
submenu via the
Settings
menu. Use the
Convenience
sub-
menu to change the settings for a number
of convenience features. The following
functions are available:
Activating easy-entry / exit feature*
Use this function to activate and deacti-
vate the easy-entry / exit feature. When
the feature is activated, the steering wheel
and driver’s seat will move back to facili-
tate exiting when you
�
remove the SmartKey from the starter
switch
�
open the driver’s door
However, the engine must be turned off.
Function
Page
Activate easy-entry / exit feature
150
Set SmartKey-dependency
152
Set parking position for exterior
rear view mirror
152
Page 233 of 442
233 Controls in detail
Loading
�Loading
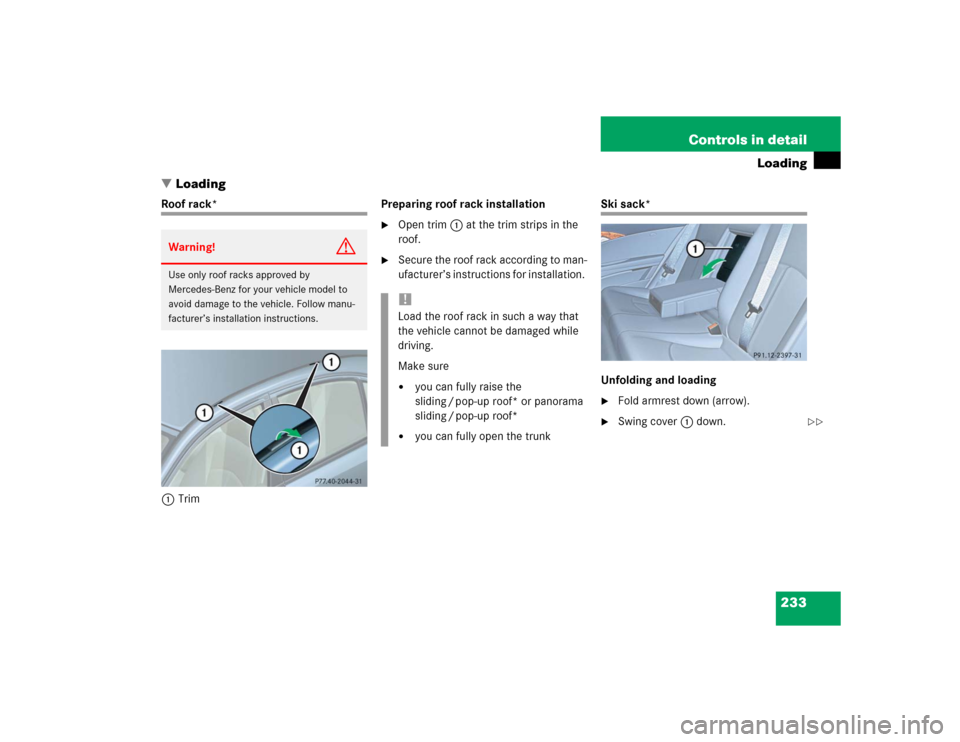
Roof rack*
1TrimPreparing roof rack installation
�
Open trim1 at the trim strips in the
roof.
�
Secure the roof rack according to man-
ufacturer’s instructions for installation.
Ski sack*
Unfolding and loading�
Fold armrest down (arrow).
�
Swing cover1 down.
Warning!
G
Use only roof racks approved by
Mercedes-Benz for your vehicle model to
avoid damage to the vehicle. Follow manu-
facturer’s installation instructions.
!Load the roof rack in such a way that
the vehicle cannot be damaged while
driving.
Make sure�
you can fully raise the
sliding / pop-up roof* or panorama
sliding / pop-up roof*
�
you can fully open the trunk
��
Page 234 of 442
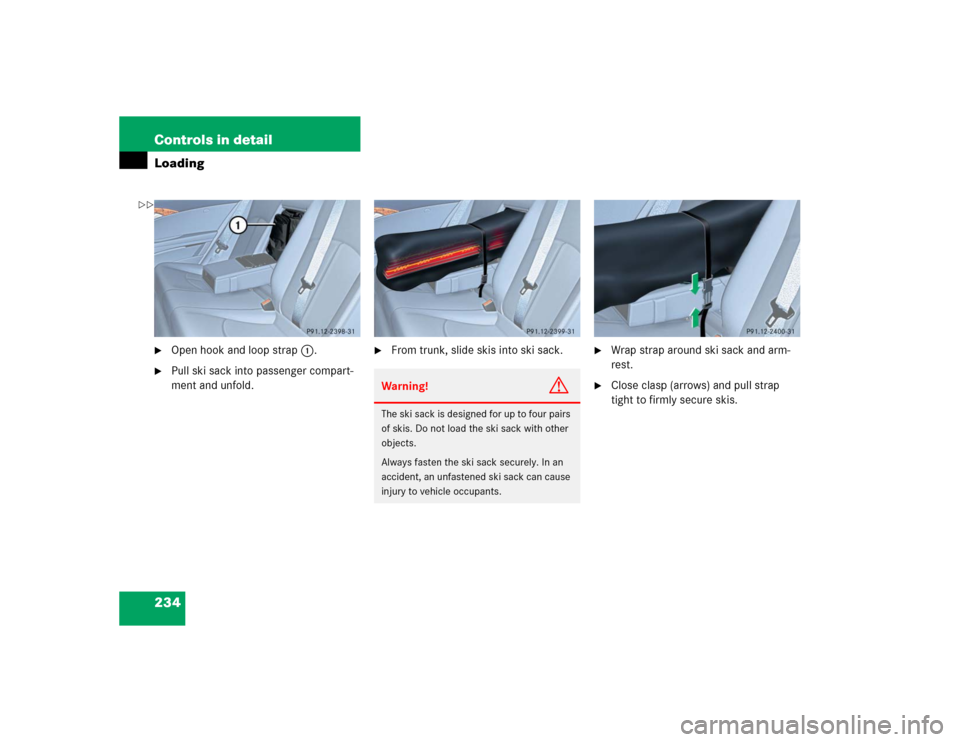
234 Controls in detailLoading�
Open hook and loop strap1.
�
Pull ski sack into passenger compart-
ment and unfold.
�
From trunk, slide skis into ski sack.
�
Wrap strap around ski sack and arm-
rest.
�
Close clasp (arrows) and pull strap
tight to firmly secure skis.
Warning!
G
The ski sack is designed for up to four pairs
of skis. Do not load the ski sack with other
objects.
Always fasten the ski sack securely. In an
accident, an unfastened ski sack can cause
injury to vehicle occupants.
��
Page 235 of 442
235 Controls in detail
Loading
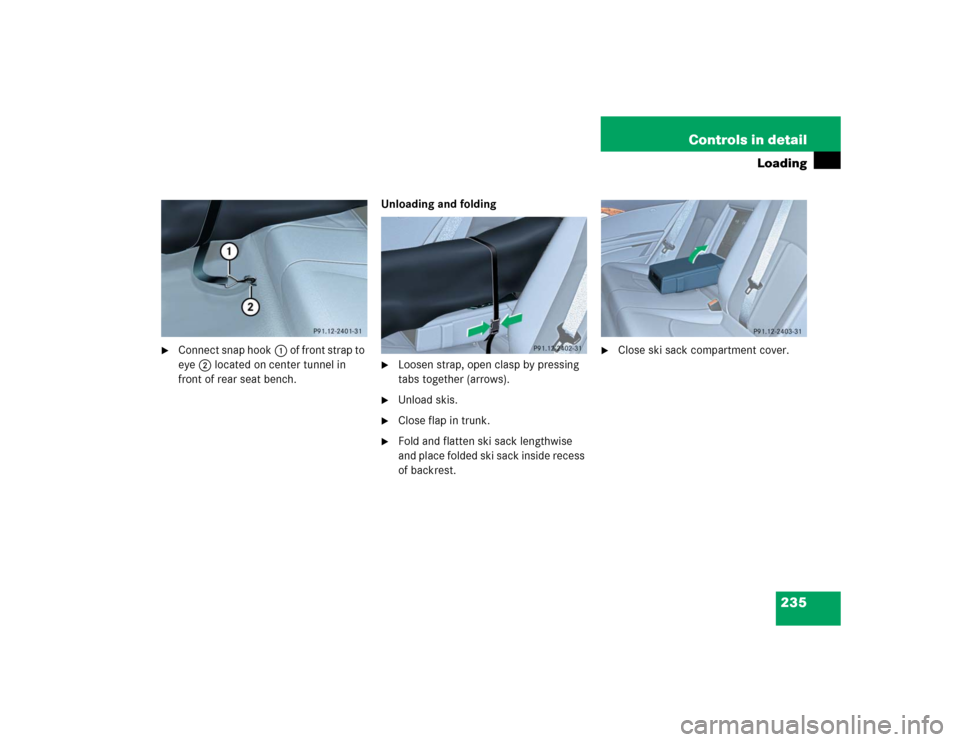
�
Connect snap hook1 of front strap to
eye2 located on center tunnel in
front of rear seat bench.Unloading and folding
�
Loosen strap, open clasp by pressing
tabs together (arrows).
�
Unload skis.
�
Close flap in trunk.
�
Fold and flatten ski sack lengthwise
and place folded ski sack inside recess
of backrest.
�
Close ski sack compartment cover.
Page 236 of 442

236 Controls in detailLoadingRemoval of ski sack
For removal of the ski sack we recommend
that you contact an authorized
Mercedes-Benz Center.
Split rear bench seat*
To expand the trunk, you can fold down the
left and right rear seat backrests.
The two sections can be folded down sep-
arately to enlarge the trunk.Folding the backrest forward
1Release handle
Warning!
G
Never drive vehicle with trunk open while
the ski sack is removed. Deadly carbon
monoxide (CO) gases may enter vehicle in-
terior, resulting in unconsciousness and
death.iTo prevent unauthorized persons from
access to the trunk, always close the
cover.
Warning!
G
When expanding the luggage compartment,
always fold the seat cushions fully forward.
Unless you are transporting cargo, the back-
rests must remain properly locked in the up-
right position.
In an accident, during hard braking or sud-
den maneuvers, loose items will be thrown
around inside the vehicle, and cause injury
to vehicle occupants unless the items are
securely fastened in the vehicle.
Always use the cargo tie down rings
(�page 241).
!You must always release the seat cush-
ion and fold it up before folding the seat
backrests forward. The upholstery on
the seat backrest may otherwise be
damaged.