Page 293 of 442
293 Operation
Tires and wheels
�
Press the reset button (
�page 22).
The following message will appear in
the multifunction display:
Check current tire pres.?
�
Press the æ button.
The following message will appear in
the multifunction display field:Tire pres. monitor acitvated
The tire inflation pressure monitor will
now monitor the tire inflation pressure
values of all four tires.
The following message will appear in
the multifunction display field:
Tire pres. monitor
Pres. display after driving a few
mins. Reactivate using R buttonThis display appears until the individual
inflation pressure values are matched
with the tires. The individual values are
then displayed (
�page 340).If you wish to cancel activation:
�
Press the ç button.
If the following message appears in the
multifunction display field:
Reactivate tire
Pres. monitor
or
Tire pres.
Check tires!
�
Check the tire inflation pressures and
correct them if necessary.
�
Reactivate the tire inflation pressure
monitor.
Rotating wheels
On vehicles with the same wheel size all
around, wheels can be rotated every 3000
to 6000 miles (5 000 to 10 000 km), or
sooner if necessary, according to the de-
gree of tire wear. The same direction of tire
rotation must be retained.
Rotate the wheels before the characteris-
tic tire wear pattern becomes visible
(shoulder wear on front wheels and tread
center wear on rear wheels).
Thoroughly clean the inner side of the
wheels after each rotation. Check and en-
sure proper tire inflation pressure.Warning!
G
Rotate front and rear wheels only if they are
of the same size.
Page 294 of 442
294 OperationTires and wheels
For information on wheel change, see the
“Practical hints” section (
�page 350) and
(
�page 366).
!If your ve hic le i s eq uip pe d with a ti re i n-
flation pressure monitor*, there are
electronic components built into the
wheel.
Do not use mounting tools in the area
of the valve as they could damage the
electronic components.
To prevent damage or incorrect instal-
lation, have the tires changed at an au-
thorized Mercedes-Benz Center.
Warning!
G
Have the tightening torque checked after
changing a wheel. Wheels could become
loose if not tightened with a torque of
96 lb-ft (130 Nm).
Use only genuine Mercedes-Benz wheel
bolts specified for your vehicle's rims.
Page 307 of 442
307 Operation
Vehicle care
Light alloy wheels
Mercedes-Benz approved Wheel Care
should be used for regular cleaning of the
light alloy wheels.
If possible, clean wheels once a week with
Mercedes-Benz approved Wheel Care, us-
ing a soft bristle brush and a strong spray
of water.
Follow the instructions on the container.
Instrument cluster
Use a gentle dishwashing detergent or
mild detergent for delicate fabrics as a
washing solution. Wipe with a cloth moist-
ened in a lukewarm solution. Do not use
scouring agents.Steering wheel and gear selector lever
Wipe with a damp cloth and dry thoroughly
or clean with Mercedes-Benz approved
Leather Care.
Cup holder
Use a gentle dishwashing detergent or
mild detergent for delicate fabrics as a
washing solution. Wipe with a cloth moist-
ened in lukewarm solution. Do not use
scouring agents.
Hard plastic trim items
Pour Mercedes-Benz approved Interior
Care onto a soft, lint-free cloth and apply
with light pressure.
Headliner and shelf below rear window
Clean with a soft bristle brush, or use a
dry-shampoo cleaner in case of excessive
dirt.Seat belts
The webbing must not be treated with
chemical cleaning agents. Use only clear,
lukewarm water and soap. Do not dry the
webbing at temperatures above 176°F
(80°C) or in direct sunlight.
iUse only acid-free cleaning materials.
Acid could lead to corrosion.
Warning!
G
Do not bleach or dye seat belts as this may
severely weaken them. In a crash they may
not be able to provide adequate protection.
Page 308 of 442

308 OperationVehicle careLeather upholstery
Using aftermarket seat covers or wearing
clothing that has the tendency to give off
coloring (e.g. when wet, etc.) may cause
the upholstery to become permanently dis-
colored. By lining the seats with a proper
intermediate cover, contact-discoloration
will be prevented.
Wipe leather upholstery with a damp cloth
and dry thoroughly or clean with
Mercedes-Benz approved Leather Care.
E x e r c i s e p a r t i c u l a r c a r e w h e n c l e a n i n g p e r -
forated leather as its underside should not
become wet.
Nubuck leather upholstery (E 55 AMG)
The nubuck leather upholstery is treated
with a protective coating. Wipe nubuck
leather upholstery with damp microfiber
cloth to remove dust and other light stains.
Carefully dab nubuck leather upholstery
with a microfiber cloth to remove oil stains.MB Tex upholstery
Pour Mercedes-Benz approved Interior
Care onto a soft, lint-free cloth and apply
with light pressure.
Plastic and rubber parts
Do not use oil or wax on these parts.
Wood trims
Dampen cloth using water and use damp
cloth to clean wood trims in your vehicle.
Do not use solvents like tar remover or
wheel cleaner nor polishes or waxes as
these may be abrasive.
!Do not use Mercedes-Benz approved
Leather Care or any solvents to clean
nubuck leather upholstery.
Avoid hard scrubbing on nubuck leath-
er upholstery.
Page 328 of 442
328 Practical hintsWhat to do if …Display symbol
Display messages
Possible cause
Possible solution
Except Canada:;Canada only:3
Brake fluid
Visit workshop!
There is insufficient brake fluid in the
reservoir.
�
Risk of accident! Stop the vehicle and
notify an authorized Mercedes-Benz
Center. Do not add brake fluid! This
will not solve the problem.
Warning!
G
Driving while these messages are displayed
can result in an accident. Have your brake
system checked immediately.
If there is a malfunction in the SBC brake
system, we recommend that the vehicle be
transported with all wheels off the ground
using flatbed or appropriate wheel lift / dolly
equipment.
A tow bar must be used if circumstances do
not permit the use of the recommended
towing methods and the vehicle requires
towing with all four wheels on the ground.
Towing the vehicle with all four wheels on
the ground is only permissible for distances
up to 30 miles (50 km) and at a speed not to
exceed 30 mph (50 km / h). For more infor-
mation, refer to “Towing the vehicle”
(�page 381).
If the SBC brake system enters its emergen-
cy operation mode, the driver must apply
significantly greater brake pedal pressure
and depress the pedal much further than
normal to obtain braking effect. If neces-
sary, apply full pressure to the brake pedal.
Brakes may only be applied to the front
wheels. Stopping distance is increased!
Low brake fluid in the reservoir may cause
the braking system to fail!
Don’t add brake fluid before checking the
brake system. Overfilling the brake fluid res-
ervoir can result in spilling brake fluid on hot
engine parts and the brake fluid catching
fire. You can be seriously burned.iIf you find that the brake fluid in the
brake fluid reservoir has fallen to the
minimum mark or below, have the
brake system checked for brake pad
thickness and leaks.!Brake pad thickness must be visually
inspected by a qualified technician at
the intervals specified in the Service
Booklet.
Page 340 of 442
340 Practical hintsWhat to do if …Display symbol
Display messages
Possible cause
Possible solution
.
Turn signal, rear left
Back-up light on!
The left rear turn signal lamp is malfunc-
tioning. A backup bulb is being used.
�
Replace the bulb as soon as possible.
Turn signal, rear right
Back-up light on!
The right rear turn signal lamp is malfunc-
tioning. A backup bulb is being used.
�
Replace the bulb as soon as possible.
Turn sig., front left
Back-up light on!
The left front turn signal lamp is malfunc-
tioning. A backup bulb is being used.
�
Replace the bulb as soon as possible.
Turn sig., front right
Back-up light on!
The right front turn signal lamp is mal-
functioning. A backup bulb is being used.
�
Replace the bulb as soon as possible.
Turn sig.,
left
mirror
The left turn signal in the side mirror is
malfunctioning. This message will only
appear if all light emitting diodes have
stopped working.
�
Have the LEDs replaced as soon as
possible.
Turn sig.,
right
mirror
The right turn signal in the side mirror is
malfunctioning. This message will only
appear if all light emitting diodes have
stopped working.
�
Have the LEDs replaced as soon as
possible.
H
Tire pres. monitor
activated
!
The tire pressure is being checked.
Tire pres. monitor
Reactivate
The tire inflation pressure monitor* is de-
activated.
�
Activate the tire inflation pressure
monitor* (
�page 292).
Page 341 of 442
341 Practical hints
What to do if …
Display symbol
Display messages
Possible cause
Possible solution
H
Tire pres. monitor
not activated!
The tire inflation pressure monitor* is un-
able to monitor the tire pressure due to�
the presence of several wheel sensors
in the vehicle.
�
excessive wheel sensor tempera-
tures.
�
a nearby radio interference source.
�
unrecognized wheel sensors mount-
ed.
�
Check the tire pressure at the next
service station.
Tire pres. monitor
Pres. display after
driving a few mins. Re-
activate using R button
The tire pressure is being checked.
Warning!
G
Do not drive with a flat tire. A flat tire affects
the ability to steer or brake the vehicle.
You may lose control of the vehicle. Contin-
ued driving with a flat tire will cause exces-
sive heat build-up and possibly a fire.
Page 342 of 442
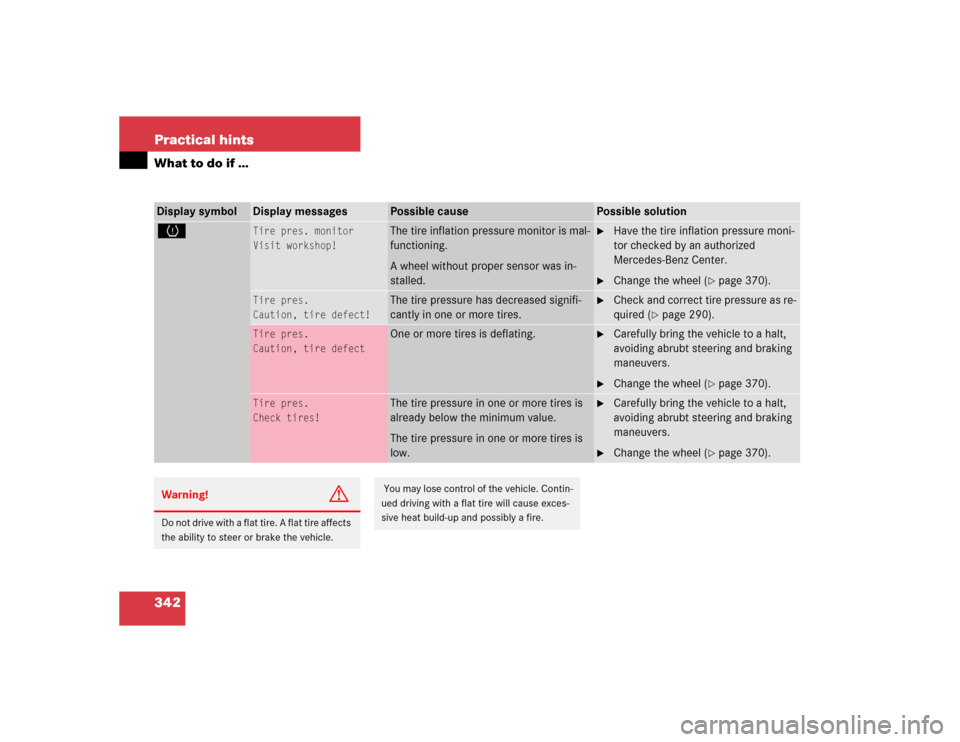
342 Practical hintsWhat to do if …Display symbol
Display messages
Possible cause
Possible solution
H
Tire pres. monitor
Visit workshop!
The tire inflation pressure monitor is mal-
functioning.
A wheel without proper sensor was in-
stalled.
�
Have the tire inflation pressure moni-
tor checked by an authorized
Mercedes-Benz Center.
�
Change the wheel (
�page 370).
Tire pres.
Caution, tire defect!
The tire pressure has decreased signifi-
cantly in one or more tires.
�
Check and correct tire pressure as re-
quired (
�page 290).
Tire pres.
Caution, tire defect
One or more tires is deflating.
�
Carefully bring the vehicle to a halt,
avoiding abrubt steering and braking
maneuvers.
�
Change the wheel (
�page 370).
Tire pres.
Check tires!
The tire pressure in one or more tires is
already below the minimum value.
The tire pressure in one or more tires is
low.
�
Carefully bring the vehicle to a halt,
avoiding abrubt steering and braking
maneuvers.
�
Change the wheel (
�page 370).
Warning!
G
Do not drive with a flat tire. A flat tire affects
the ability to steer or brake the vehicle.
You may lose control of the vehicle. Contin-
ued driving with a flat tire will cause exces-
sive heat build-up and possibly a fire.