Page 314 of 442

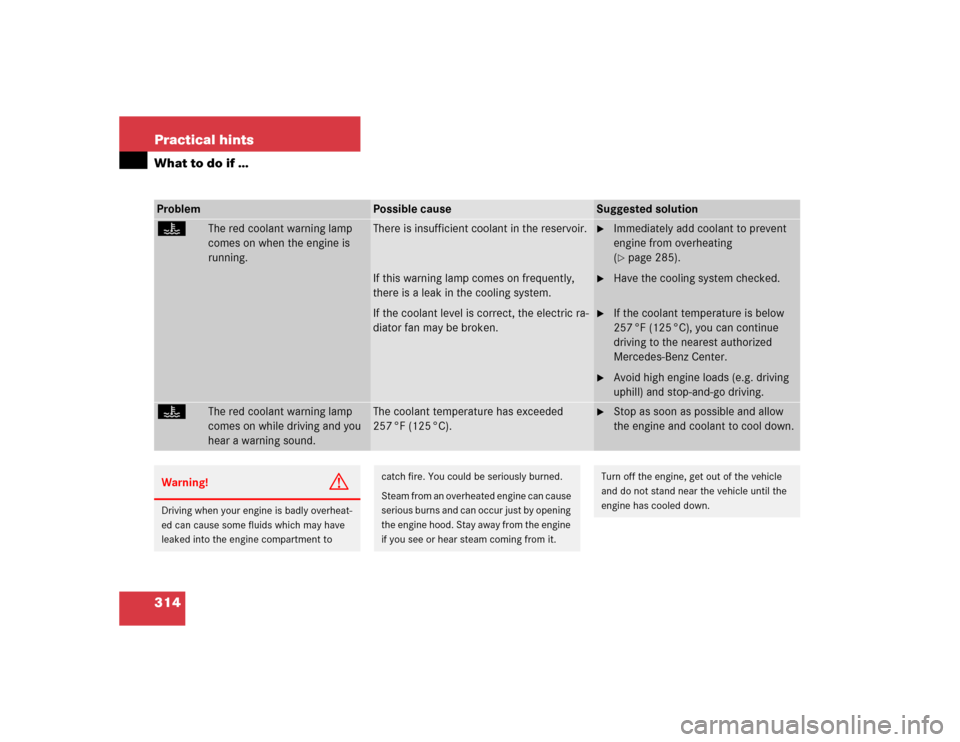
314 Practical hintsWhat to do if …Problem
Possible cause
Suggested solution
D
The red coolant warning lamp
comes on when the engine is
running.
There is insufficient coolant in the reservoir.
If this warning lamp comes on frequently,
there is a leak in the cooling system.
If the coolant level is correct, the electric ra-
diator fan may be broken.
�
Immediately add coolant to prevent
engine from overheating
(�page 285).
�
Have the cooling system checked.
�
If the coolant temperature is below
257 °F (125 °C), you can continue
driving to the nearest authorized
Mercedes-Benz Center.
�
Avoid high engine loads (e.g. driving
uphill) and stop-and-go driving.
D
The red coolant warning lamp
comes on while driving and you
hear a warning sound.
The coolant temperature has exceeded
257 °F (125 °C).
�
Stop as soon as possible and allow
the engine and coolant to cool down.
Warning!
G
Driving when your engine is badly overheat-
ed can cause some fluids which may have
leaked into the engine compartment to
catch fire. You could be seriously burned.
Steam from an overheated engine can cause
serious burns and can occur just by opening
the engine hood. Stay away from the engine
if you see or hear steam coming from it.
Turn off the engine, get out of the vehicle
and do not stand near the vehicle until the
engine has cooled down.
Page 330 of 442

330 Practical hintsWhat to do if …
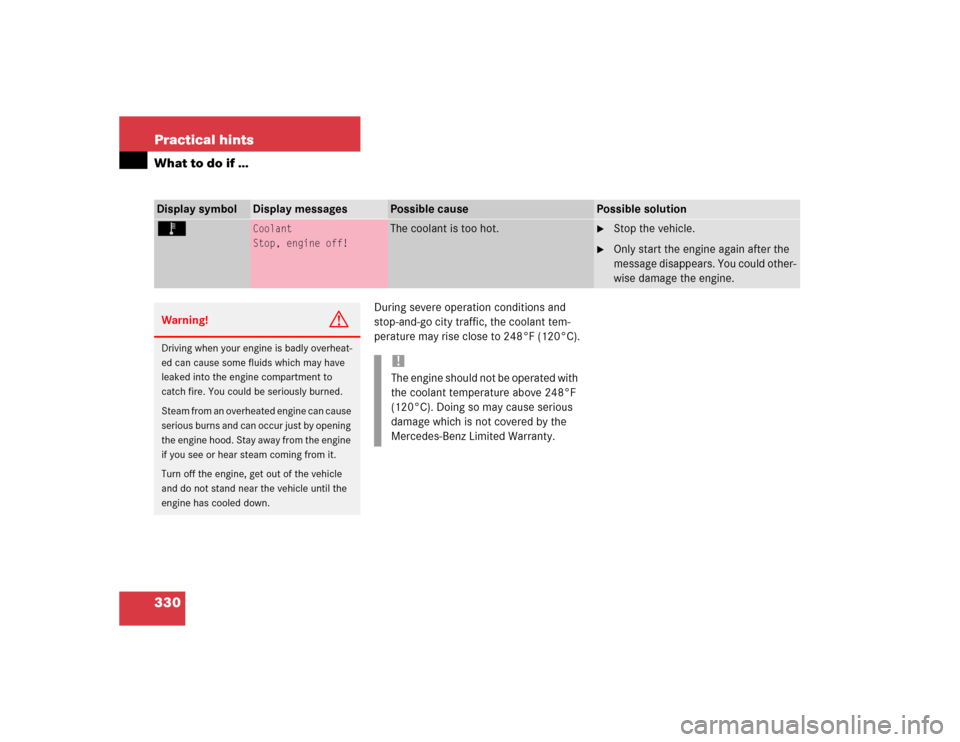
During severe operation conditions and
stop-and-go city traffic, the coolant tem-
perature may rise close to 248°F (120°C).
Display symbol
Display messages
Possible cause
Possible solution
Ï
Coolant
Stop, engine off!
The coolant is too hot.
�
Stop the vehicle.
�
Only start the engine again after the
message disappears. You could other-
wise damage the engine.
Warning!
G
Driving when your engine is badly overheat-
ed can cause some fluids which may have
leaked into the engine compartment to
catch fire. You could be seriously burned.
Steam from an overheated engine can cause
serious burns and can occur just by opening
the engine hood. Stay away from the engine
if you see or hear steam coming from it.
Turn off the engine, get out of the vehicle
and do not stand near the vehicle until the
engine has cooled down.
!The engine should not be operated with
the coolant temperature above 248°F
(120°C). Doing so may cause serious
damage which is not covered by the
Mercedes-Benz Limited Warranty.
Page 335 of 442

335 Practical hints
What to do if …
Display symbol
Display messages
Possible cause
Possible solution
A
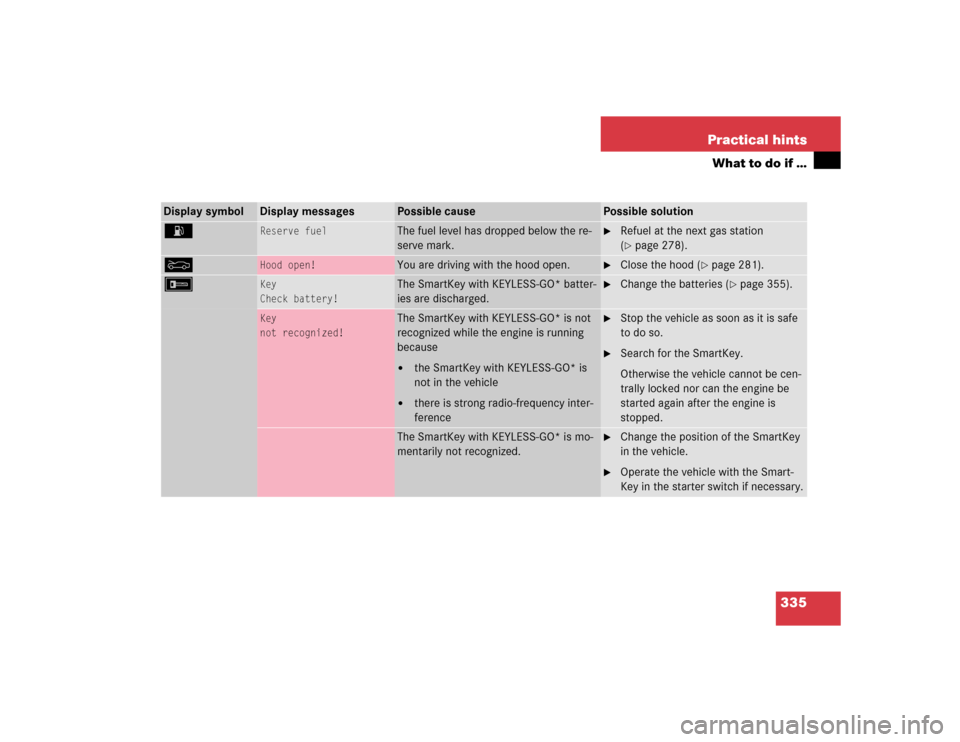
Reserve fuel
The fuel level has dropped below the re-
serve mark.
�
Refuel at the next gas station
(�page 278).
Y
Hood open!
You are driving with the hood open.
�
Close the hood (
�page 281).
F
Key
Check battery!
The SmartKey with KEYLESS-GO* batter-
ies are discharged.
�
Change the batteries (
�page 355).
Key
not recognized!
The SmartKey with KEYLESS-GO* is not
recognized while the engine is running
because�
the SmartKey with KEYLESS-GO* is
not in the vehicle
�
there is strong radio-frequency inter-
ference
�
Stop the vehicle as soon as it is safe
to do so.
�
Search for the SmartKey.
Otherwise the vehicle cannot be cen-
trally locked nor can the engine be
started again after the engine is
stopped.
The SmartKey with KEYLESS-GO* is mo-
mentarily not recognized.
�
Change the position of the SmartKey
in the vehicle.
�
Operate the vehicle with the Smart-
Key in the starter switch if necessary.
Page 361 of 442
361 Practical hints
Replacing bulbs
Replacing bulbs for front lamps
1Bulb socket for turn signal lamp
2High beam halogen bulb
3Bulb socket for parking and standing
lamp
4Cover for Bi-Xenon* (low beam and
high beam) or halogen (low beam)
headlampBi-Xenon* headlamps Low beam halogen bulb
�
Switch off the lights.
�
Open the hood (
�page 281).
�
Turn the locking mechanism counter-
clockwise and remove headlamp
cover4.
�
Pull electrical connector off.
�
Release the retaining springs and take
out the bulb.
�
Insert the new bulb in the socket so
that the base is in the recess on the
lower left.
�
Attach the retaining springs.
�
Insert connector into the bulb.
�
Align headlamp cover and click into
place.
Warning!
G
Do not remove the cover4 for the Bi-Xe-
non headlamp. Because of high voltage in
Xenon lamps, it is dangerous to replace the
bulb or repair the lamp and its components.
We recommend that you have such work
done by a qualified technician.
Page 362 of 442

362 Practical hintsReplacing bulbsHigh beam halogen bulb �
Switch off the lights.
�
Open the hood (
�page 281).
�
Press the clamp and remove headlamp
cover.
�
Pull electrical connector off.
�
Turn the locking mechanism counter-
clockwise and take out the high beam
bulb2.
�
Insert the new bulb in the socket so
that the base is in the recess on the
lower left.
�
Attach the retaining springs.
�
Insert connector into the bulb.
�
Align headlamp cover and click into
place.Front turn signal lamp bulb
�
Switch off the lights.
�
Open the hood (
�page 281).
�
Twist bulb socket 1 counterclockwise
and pull out.
�
Push bulb into socket, turn counter-
clockwise and remove.
�
Insert new bulb in socket, push in and
twist clockwise.
�
Reinsert bulb socket in lamp and twist
clockwise.Parking and standing lamp bulb
�
Switch off the lights.
�
Open the hood (
�page 281).
�
Press the clamp and remove headlamp
cover.
�
Pull out the bulb socket3 with the
bulb.
�
Pull the bulb out of the bulb socket.
�
Insert a new bulb in the socket.
�
Reinstall the bulb socket.
�
Align headlamp cover and click into
place.
Page 365 of 442
365 Practical hints
Replacing wiper blades
Installing wiper blades�
Slide wiper blade onto wiper arm until
it locks in place.
�
Rotate wiper blade into position paral-
lel to wiper arm.
�
Fold the wiper arm backward to rest on
the windshield. Make sure you hold on
to the wiper when folding the wiper arm
back.
!Never open the hood when the wiper
arm is folded forward.
Hold on to the wiper when folding the
wiper arm back. If released, the force
of the impact from the tensioning
spring could crack the windshield.
Do not allow the wiper arms to contact
the windshield glass without a wiper
blade inserted.
Make certain that the wiper blades are
properly installed. Improperly installed
wiper blades may cause windshield
damage.
For your convenience, we recommend
that you have this work carried out by
an authorized Mercedes-Benz Center.
Page 424 of 442

424 IndexElectronic Stability Program see ESP 76,
412
Emergency call system* 250
Emergency calls
Initiating an emergency call 253
With Tele Aid* 252
Emergency operation (Limp Home
Mode) 167
Opening/closing Sliding/pop-up roof*
or panorama sliding/pop-up
roof* 358
Releasing trunk lid from inside 104
Emergency operations
Remote door unlock 257
Unlocking the trunk lid 354
Unlocking the vehicle 353
Emergency tensioning device see
ETD 64, 412
Emission control 276
Ending
A call (telephone) 156Engine 392
Compartment 281
Message in the display 313
Starting 43
Starting with KEYLESS-GO* 44
Starting with the SmartKey 44
Turning off with the key 53
Engine compartment
Hood 281
Engine malfunction indicator lamp 313
Engine number 412
Engine oil
Adding 284
Additives 403
Checking level 282
Consumption 282
Display messages 333
Filler neck 285
Messages in display 283
Viscosity 412
Entry position
Messages in the display 347ESP 76, 412
Four wheel electronic traction system
with ESP 82
Switching off 78
Switching on 79
Synchronizing 323
Warning lamp 311
ETD 412
Safety guidelines 60
Exterior lamp switch 119
Exterior rear view mirrors
Adjusting 38
Parking position for 152
F
Fahrenheit
Setting temperature units 141
Fastening the seat belts 40
Fine adjustment
Cruise control 213
First aid kit 350
Flat tire 366
Mounting the spare wheel 370
Spare wheel 370
Flexible 297
Page 426 of 442

426 IndexGPS 413
GPS see COMAND 251
H
Hand-held transmitter
Programming integrated remote
control 259
Reprogramming integrated remote
control 263
Hazard warning flasher 123
Switching off 124
Switching on 124
Headlamps
Automatic control 120
Bi-Xenon* 411
Cleaning system* 170
Switching off 52
Switching on 47
Headlamps, tail lamps, side markers, turn
signal lenses 304
Heated seats* 113
Heated steering wheel* 248
Height adjustment
Head restraints 36
Steering wheel 37
Vehicle level 227High beam flasher 47, 123
High beam headlamps
Messages in display 338
Replacing bulbs 359
Switching on 123
Hood 281
Closing 281
Message in display 335
Opening 281
Hydroplaning 271
I
Identification labels 390
Ignition 31, 33
Switching on 44
Immobilizer 83
Activating 83
Deactivating 83
Indicator lamps see Lamps, indicator and
warning
Infant and child restraint systems 65
Installing 69
LATCH child seat anchors 71Information
About service and warranty 10
Button for Tele Aid* 255
Inside rear view mirror
Antiglare 168
Installing
Infant and child restraint systems 69
Towing eye bolt 384
Wiper blades 365
Instrument cluster 22, 126, 307, 413
Coolant temperature gauge 127
Illumination 126
Multifunction display 129
Outside temperature indicator 128
Selecting language 142
Instrument lighting 126, 127
Integrated remote control
Canadian programming 262
Erasing memory 263
Gate operator 262
Hand-held transmitter 259
Operation 262
Rolling code programming 261