Page 128 of 442

128 Controls in detailInstrument clusterTachometer
The red marking on the tachometer de-
notes excessive engine speed.
To help protect the engine, the fuel supply
is interrupted if the engine is operated
within the red marking.
E 55 AMG
The tachometer of the E 55 AMG does not
have a red marking denoting excessive en-
gine speed.
To help protect the engine, the fuel supply
is interrupted if the engine is operated at
an excessive engine speed.
Outside temperature indicator
The outside temperature is displayed in
the instrument cluster (
�page 22). For in-
formation on how to select the unit of the
displayed temperature, i.e. degrees Cel-
sius (°C) or degrees Fahrenheit (°F), see
“Selecting temperature display mode”
(
�page 141).The temperature sensor is located in the
front bumper area. Due to its location, the
sensor can be affected by road or engine
heat during idling or slow driving. This
means that the accuracy of the displayed
temperature can only be verified by com-
parison to a thermometer placed next to
the sensor, not by comparison to external
displays (e.g. bank signs etc.).
When moving the vehicle into colder ambi-
ent temperatures (e.g. when leaving your
garage), you will notice a delay before the
lower temperature is displayed.
A delay also occurs when ambient temper-
atures rise. This prevents inaccurate tem-
perature indications caused by heat
radiated from the engine during idling or
slow driving.
!Avoid driving at excessive engine
speeds, as it may result in serious en-
gine damage that is not covered by the
Mercedes-Benz Limited Warranty.
Warning!
G
The outside temperature indicator is not de-
signed to serve as an ice-warning device and
is therefore unsuitable for that purpose.
Indicated temperatures just above the freez-
ing point do not guarantee that the road sur-
face is free of ice. The road may still be icy,
especially in wooded areas or on bridges.
Page 129 of 442

129 Controls in detail
Control system
�Control system
The control system is activated as soon as
the SmartKey in the starter switch is
turned to position1 or as soon as the
KEYLESS-GO start/stop button* is in
position1. The control system enables you
to:�
call up information about your vehicle
�
change vehicle settings.
For example, you can use the control sys-
tem to find out when your vehicle is next
due for service, to set the language for
messages in the instrument cluster dis-
play, and much more.
The control system relays information to
the multifunction display.
Multifunction display
1Segment ring
2Standard display
3Trip odometer
iThe displays for the audio systems (ra-
dio, CD player) will appear in English,
regardless of the language selected.
Warning!
G
A driver’s attention to the road and traffic
conditions must always be his / her primary
focus when driving.
For your safety and the safety of others, se-
lecting features through the multifunction
steering wheel should only be done by the
driver when traffic and road conditions per-
mit it to be done safely.
Bear in mind that at a speed of just 30 mph
(approximately 50 km / h), your vehicle is
covering a distance of 44 feet (approximate-
ly 13.5 m) every second.
Page 139 of 442
139 Controls in detail
Control system
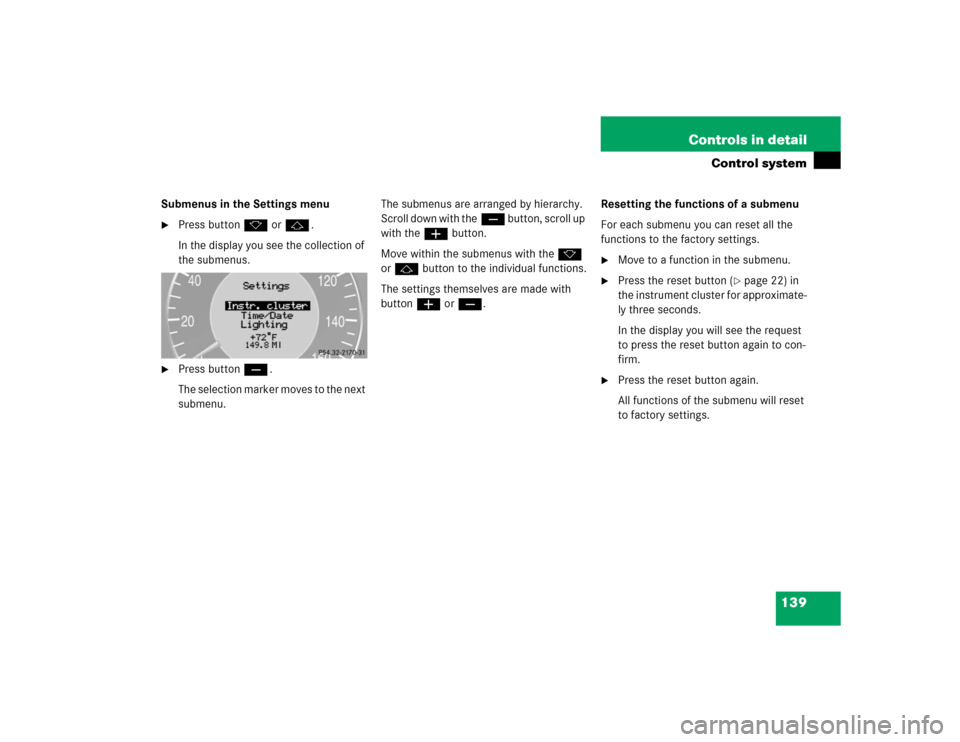
Submenus in the Settings menu�
Press buttonk orj.
In the display you see the collection of
the submenus.
�
Press buttonç.
The selection marker moves to the next
submenu.The submenus are arranged by hierarchy.
Scroll down with theç button, scroll up
with theæ button.
Move within the submenus with thek
orj button to the individual functions.
The settings themselves are made with
buttonæ orç.Resetting the functions of a submenu
For each submenu you can reset all the
functions to the factory settings.
�
Move to a function in the submenu.
�
Press the reset button (
�page 22) in
the instrument cluster for approximate-
ly three seconds.
In the display you will see the request
to press the reset button again to con-
firm.
�
Press the reset button again.
All functions of the submenu will reset
to factory settings.
Page 140 of 442

140 Controls in detailControl systemThe table below shows what settings can
be changed within the various menus. De-
tailed instructions on making individual
settings can be found on the following pag-
es.INSTRUMENT CLUSTER
TIME/DATE
LIGHTING
VEHICLE
CONVENIENCE
DYNAMIC SEAT*
Select temperature dis-
play mode
Synchronizing the
time
Set daytime running
lamp mode
(USA only)
Set automatic lock-
ing
Activate
easy-entry / exit
feature
Set level for dynam-
ic seat, driver
Select speedometer dis-
play mode
Set time (hours)
Set locator lighting
Set SmartKey-de-
pendency
Set level for dynam-
ic seat, passenger
Select language
Set time (minutes)
Ambient lighting
Set parking position
for exterior rear
view mirror
Select display (speed dis-
play or outside tempera-
ture) for status line
Set date (month)
Exterior lamps de-
layed shut-off
Select display (speed dis-
play or outside tempera-
ture) for basic display
Set date (day)
Interior lighting de-
layed shut-off
Tire pressure unit dis-
play*
Set date (year)
Page 141 of 442

141 Controls in detail
Control system
Instrument cluster submenu
Access the
Instr. cluster
submenu via
the
Settings
menu. Use the
Instr. clus-
ter
submenu to change the instrument
cluster display settings. The following
functions are available:Selecting temperature display mode
�
Move the selection marker with
theæ orç button to the
Instr.
cluster
submenu.
�
Press buttonj ork repeatedly
until you see this message in the dis-
play:
Temp. indicator
.
The selection marker is on the current
setting.
�
Pressæ orç to set the temper-
ature unit to degrees Celsius (°C) or
degrees Fahrenheit (°F).Selecting speedometer display mode
�
Move the selection marker with
theæ orç button to the
Instr.
cluster
submenu.
�
Press buttonj ork repeatedly
until you see this message in the dis-
play:
Display unit Speed-/odometer
.
The selection marker is on the current
setting.
�
Press æ or ç to set speedome-
ter unit to
km or
miles
.
Function
Page
Select temperature display
mode
141
Select speedometer display
mode
141
Select language
142
Select display (speed display or
outside temperature) for status
display
142
Select display (speed display or
outside temperature) for basic
display
143
Tire pressure display*
143
Page 154 of 442

154 Controls in detailControl systemFuel consumption since last reset�
Press buttonÿ orè repeatedly
until you see the first function of the
Trip computer menu.
�
Press buttonj ork repeatedly
until you see this message in the dis-
play:
After reset
.
1Distance driven since last reset
2Time elapsed since last reset
3Average speed since last reset
4Average fuel consumption since last re-
setResetting fuel consumption statistics
�
Press buttonÿ orè repeatedly
until you see the first function of the
Trip computer menu.
�
Press buttonj ork repeatedly
until you see the reading that you want
to reset in the display.
�
Press and hold the reset button in the
instrument cluster (
�page 22) until
the value is reset to 0.Call up range (distance to empty)
�
Press buttonÿ orè repeatedly
until you see the first function of the
Trip computer menu.
�
Press buttonj ork repeatedly
until you see this message in the dis-
play:
Range:
In the display you will see the calculat-
ed range based on the current fuel tank
level.
iAll statistics stored since the last en-
gine start will be reset approximately
four hours after the SmartKey in the
starter switch is turned to position0 or
removed from the starter switch.
Resetting will not occur if you turn the
SmartKey back to position1 or2 with-
in this time period.
Page 217 of 442

217 Controls in detail
Driving systems
Distronic menu in the control system
In the Distronic menu you can read the cur-
rent settings for Distronic. What appears in
the display depends on whether Distronic
and the distance warning function are
turned on or off.�
Press buttonè orÿ repeatedly
until you see one of the following dis-
plays.
Warning!
G
An intermittent warning sounds and the
DTR warning lamp in the instrument cluster
is illuminated if the Distronic system calcu-
lates that the distance to the vehicle ahead
and your vehicle’s current speed indicate
that Distronic will not be capable of slowing
the vehicle sufficiently to maintain the pre-
set following distance, which creates a dan-
ger of a collision.
Immediately brake the vehicle to increase
the distance to the vehicle in front of you.
The warning sound is intended as a final cau-
tion that you have not interceded with your
own braking inputs to avoid a potentially
dangerous situation. Do not wait for the op-
eration of the warning signal to intercede
with your own braking, as that will result in
potentially dangerous emergency braking
which will not always result in an impact be-
ing avoided.
Tailgating increases the risk of an accident.
Warning!
G
Distronic brakes your vehicle with a maxi-
mum deceleration of 6.5 ft / s
2 (2 m / s
2).
This corresponds to about 20% of the maxi-
mum deceleration ability of your vehicle.
Distronic brakes the vehicle in an effort to
restore the preset distance or to maintain
the speed. The brake pedal is automatically
applied as this happens which results in the
brake pedal moving.
Keep driver’s foot area clear at all times, in-
cluding the area under the brake pedal. Ob-
jects stored in this area may impair pedal
movement which could interfere with the
braking ability of the Distronic system.
Do not place your foot under the brake pedal
– your foot could become caught.
Page 222 of 442

222 Controls in detailDriving systems1Distance warning function on / off
switch
2Control lamp
3Thumbwheel for setting distance
Increasing distance
Increasing the distance setting tells
Distronic to maintain a greater following
distance to the vehicle ahead.�
Turn thumbwheel3 towards¯.Decreasing distance
Decreasing the distance setting tells
Distronic to maintain a shorter following
distance to the vehicle ahead.
�
Turn thumbwheel3 towards®.
Distance warning function
When Distronic is deactivated, this func-
tion will continue to warn you when recog-
nizing a stationary obstacle or a slower
vehicle moving in the vehicle’s path and
the danger of a collision exists:
�
The distance warning lampl in the
instrument cluster comes on.
�
An intermittent warning sounds.
If these warnings are issued, you must
brake manually to maintain a safe distance
and avoid a collision with the vehicle
ahead.
When pressing the brake pedal, the warn-
ing sound stops. The warning sound also
stops when the distance to the vehicle ahead is sufficient again without applying
the brake pedal. In this case the distance
warning lamp also extinguishes.
Warning!
G
If the DTR warning lampl in the instru-
ment cluster comes on while driving and / or
an intermittent warning sounds, immediate
attention on the part of the driver is re-
quired.
As required by the traffic situation, apply the
brakes and navigate around a possible ob-
stacle. However, do not drive by relying on
the distance warning function, as this will re-
sult in an emergency braking application.
Especially depending on road surface condi-
tions and driver reaction, this will not always
enable you to avoid a collision.iComplex driving situations are not al-
ways fully recognized by Distronic. This
could result in wrong or missing dis-
tance warnings.