Page 87 of 442
87 Controls in detail
Locking and unlocking
Seats
Memory function
Lighting
Instrument cluster
Control system
Automatic transmission
Good visibility
Climate control
Automatic climate control*
Power windows
Sliding / pop-up roof*
Panorama sliding / pop-up roof*
Driving systems
Loading
Useful features
Page 110 of 442
110 Controls in detailSeatsRear seat head restraints
Folding head restraints back with
switch in the center console
The rear seat head restraints can be folded
backward for increased visibility.
1Head restraint release switch
�
Make sure the ignition is switched on.
All the lights in the instrument cluster
come on.
�
Press the symbol-side on rocker
switch1to release the head re-
straints.
The head restraints will fold backward.Placing head restraints upright
�
Pull the head restraint forward until it
locks into position.
!The rear seat head restraints cannot be
adjusted.
Warning!
G
For safety reasons, always drive with the
rear head restraints in the upright position
when the rear seats are occupied.
Keep the area around head restraints clear
of articles (e.g. clothing) to not obstruct the
folding operation of the head restraints.
!Make sure the head restraints engage
when placing them upright. Otherwise
their protective function cannot be as-
sured.
Page 111 of 442

Multicontour s")
111 Controls in detailSeats
Removing and installing rear seat head
restraints
For removing and installing rear seat head
restraints, see “Expanding the cargo ar-
ea*” (
�page 239)
Multicontour seat*
The multicontour seat has a movable seat
cushion and inflatable air cushions built
into the backrest to provide additional lum-
bar and side support.
The seat cushion movement, backrest
cushion height and curvature can be con-
tinuously varied with switches on the right
side of the seat after turning the SmartKey
in the starter switch to position2 or press-
ing the KEYLESS-GO* start/stop button
twice.1Seat cushion depth
2Backrest bottom
3Backrest center
4Backrest side bolster adjustment
�
Make sure the ignition is switched on.
All lights in the instrument cluster
come on.Seat cushion depth
�
Adjust the seat cushion depth to the
length of your upper leg using
switch1.
Backrest contour
�
Adjust the contour of the backrest to
the desired position using æ or
ç.
�
Move the backrest support to the bot-
tom by using button2 or to the center
by using button3.
Backrest side bolsters
�
Adjust the side bolsters so that they
provide good lateral support using
switch4.
Page 113 of 442

The massage function can help prevent
muscle tension during long drives.�
Press button6.
The indicator lamp in button2 comes
on. The air cushions")
113 Controls in detailSeats
Massage function (PULSE)
The massage function can help prevent
muscle tension during long drives.�
Press button6.
The indicator lamp in button2 comes
on. The air cushions in the lumbar area
pulsate.
Heated seats*
Both switches for the front seats are locat-
ed in the center console. The red indicator
lamps in the switch come on to show
which heating level you have selected.
1Seat heating switch
�
Make sure the ignition is switched on.
All lights in the instrument cluster
come on.
Switching seat heating on
�
Press button1 repeatedly until the
desired heating level is set.
One or more red indicator lamps on the
switch show the selected heater level
iThe massage function turns off auto-
matically after approximately five min-
utes.
Leveloff
No indicator lamps on
1
One indicator lamp on
2
Two indicator lamps onThe seat heater automatically
switches to level 1 after approxi-
mately ten minutes.
3
Three indicator lamps onThe seat heater automatically
switches to level 2 after approxi-
mately five minutes.
Page 114 of 442

114 Controls in detailSeatsSwitching seat heating off�
Press button1 repeatedly until all in-
dicator lamps go out.
Seat ventilation*
The switch is located on the center con-
sole. Seat ventilation can be activated
manually with the ignition on, or by the
summer opening feature (
�page 199).
The blue indicator lamps on the switch
show the ventilation level selected:
1Seat ventilation switch
�
Make sure the ignition has been
switched on.
All lights in the instrument cluster
come on.
iThe seat heating will be automatically
switched off after approximately
20 minutes.!If one or more of the lamps on the seat
heater switch are flashing, there is in-
sufficient voltage available since too
many electrical consumers are turned
on. The seat heater switches off auto-
matically.
The seat heater will switch back on
again automatically as soon as suffi-
cient voltage is available.
Level3
Three indicator lamps lit
2
Two indicator lamps lit
1
One indicator lamp lit
off
No indicator lamp lit
Page 123 of 442
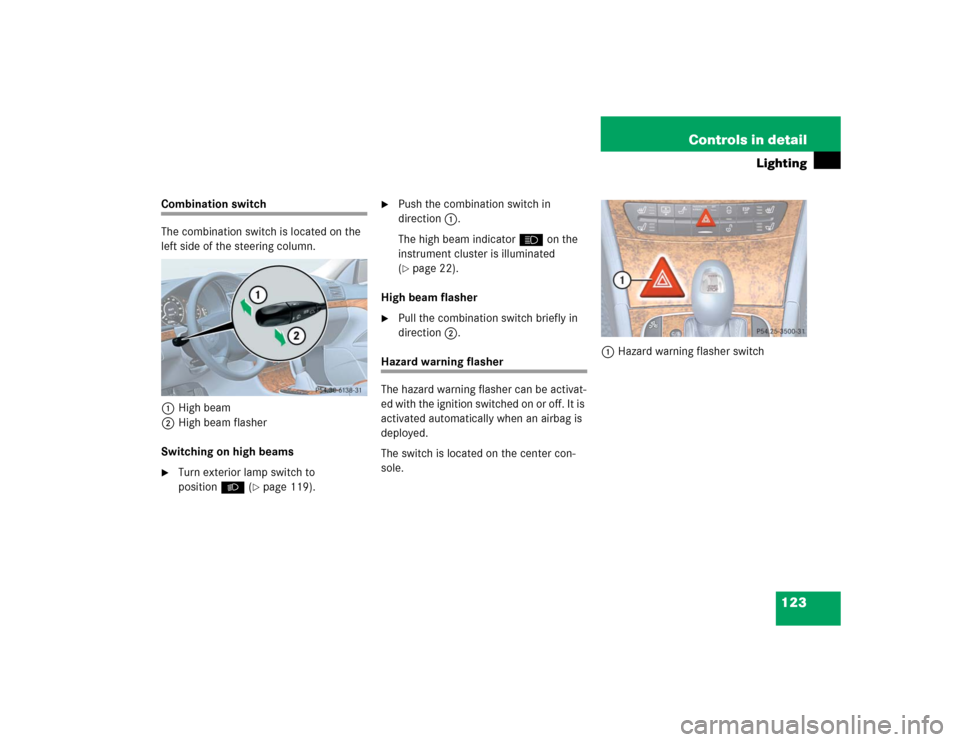
123 Controls in detail
Lighting
Combination switch
The combination switch is located on the
left side of the steering column.
1High beam
2High beam flasher
Switching on high beams�
Turn exterior lamp switch to
positionB (
�page 119).
�
Push the combination switch in
direction1.
The high beam indicatorA on the
instrument cluster is illuminated
(�page 22).
High beam flasher
�
Pull the combination switch briefly in
direction2.
Hazard warning flasher
The hazard warning flasher can be activat-
ed with the ignition switched on or off. It is
activated automatically when an airbag is
deployed.
The switch is located on the center con-
sole.1Hazard warning flasher switch
Page 126 of 442
.
The instrumen")
126 Controls in detailInstrument cluster
�Instrument clusterA full view illustration of the instrument
cluster can be found in the “At a glance”
section of this manual (
�page 22).
The instrument cluster is activated when
you
�
open a door
�
turn on the ignition
�
press the reset button (
�page 22)
�
switch on the exterior lamps
You can change the instrument cluster set-
tings in the instrument cluster submenu of
the control system (
�page 141).
Instrument cluster illumination
Use the reset button (
�page 22) to adjust
the illumination brightness for the instru-
ment cluster.To brighten illumination
�
Turn the reset button in the instrument
cluster clockwise (
�page 22).
The instrument cluster illumination will
brighten.
To dim illumination
�
Turn the reset button in the instrument
cluster counterclockwise (
�page 22).
The instrument cluster illumination will
dim.
iThe instrument cluster illumination is
dimmed or brightened automatically to
suit ambient light conditions.
The instrument cluster illumination will
also be adjusted automatically when
you switch on the vehicle’s exterior
lamps.
Page 127 of 442
.
The eng")
127 Controls in detail
Instrument cluster
Coolant temperature gauge
During severe operating conditions, e. g.
stop-and-go traffic, the coolant tempera-
ture may rise close to 248°F (120°C).
The engine should not be operated with
the coolant temperature above 248°F
(120°C). Doing so may cause serious en-
gine damage which is not covered by the
Mercedes-Benz Limited Warranty.
Trip odometer
Make sure you are viewing the trip odome-
ter display (
�page 129).
�
If it is not displayed, press the è or
ÿ repeatedly until the trip odome-
ter appears.
�
Press and hold the reset button on the
instrument cluster (
�page 22) until
the trip odometer is reset.
Warning!
G
�
Driving when your engine is overheated
can cause some fluids which may have
leaked into the engine compartment to
catch fire. You could be seriously
burned.
�
Steam from an overheated engine can
cause serious burns and can occur just
by opening the hood. Stay away from
the engine if you see or hear steam com-
ing from it.
Turn off the engine, get out of the vehicle
and do not stand near the vehicle until the
engine has cooled down.
iExcessive coolant temperature trigger
a warning in the multifunction display
(�page 314).