Page 295 of 442
295 Operation
Winter driving
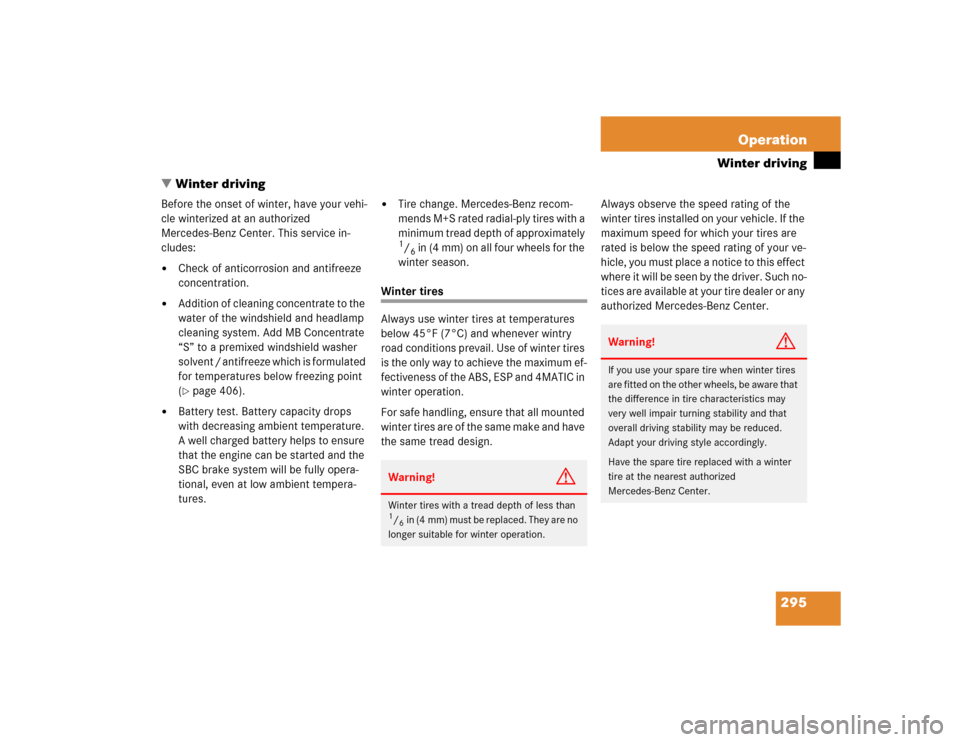
�Winter driving
Before the onset of winter, have your vehi-
cle winterized at an authorized
Mercedes-Benz Center. This service in-
cludes:�
Check of anticorrosion and antifreeze
concentration.
�
Addition of cleaning concentrate to the
water of the windshield and headlamp
cleaning system. Add MB Concentrate
“S” to a premixed windshield washer
solvent / antifreeze which is formulated
for temperatures below freezing point
(�page 406).
�
Battery test. Battery capacity drops
with decreasing ambient temperature.
A well charged battery helps to ensure
that the engine can be started and the
SBC brake system will be fully opera-
tional, even at low ambient tempera-
tures.
�
Tire change. Mercedes-Benz recom-
mends M+S rated radial-ply tires with a
minimum tread depth of approximately 1/6 in (4 mm) on all four wheels for the
winter season.
Winter tires
Always use winter tires at temperatures
below 45°F (7°C) and whenever wintry
road conditions prevail. Use of winter tires
is the only way to achieve the maximum ef-
fectiveness of the ABS, ESP and 4MATIC in
winter operation.
For safe handling, ensure that all mounted
winter tires are of the same make and have
the same tread design.Always observe the speed rating of the
winter tires installed on your vehicle. If the
maximum speed for which your tires are
rated is below the speed rating of your ve-
hicle, you must place a notice to this effect
where it will be seen by the driver. Such no-
tices are available at your tire dealer or any
authorized Mercedes-Benz Center.Warning!
G
Winter tires with a tread depth of less than 1/6in (4 mm) must be replaced. They are no
longer suitable for winter operation.
Warning!
G
If you use your spare tire when winter tires
are fitted on the other wheels, be aware that
the difference in tire characteristics may
very well impair turning stability and that
overall driving stability may be reduced.
Adapt your driving style accordingly.
Have the spare tire replaced with a winter
tire at the nearest authorized
Mercedes-Benz Center.
Page 342 of 442
342 Practical hintsWhat to do if …Display symbol
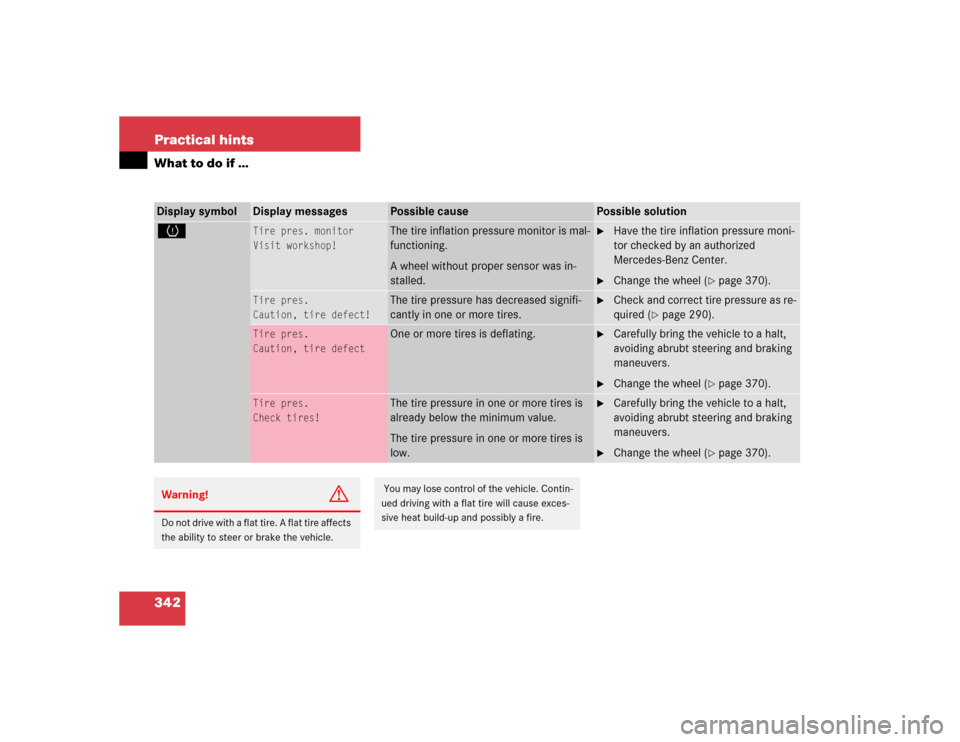
Display messages
Possible cause
Possible solution
H
Tire pres. monitor
Visit workshop!
The tire inflation pressure monitor is mal-
functioning.
A wheel without proper sensor was in-
stalled.
�
Have the tire inflation pressure moni-
tor checked by an authorized
Mercedes-Benz Center.
�
Change the wheel (
�page 370).
Tire pres.
Caution, tire defect!
The tire pressure has decreased signifi-
cantly in one or more tires.
�
Check and correct tire pressure as re-
quired (
�page 290).
Tire pres.
Caution, tire defect
One or more tires is deflating.
�
Carefully bring the vehicle to a halt,
avoiding abrubt steering and braking
maneuvers.
�
Change the wheel (
�page 370).
Tire pres.
Check tires!
The tire pressure in one or more tires is
already below the minimum value.
The tire pressure in one or more tires is
low.
�
Carefully bring the vehicle to a halt,
avoiding abrubt steering and braking
maneuvers.
�
Change the wheel (
�page 370).
Warning!
G
Do not drive with a flat tire. A flat tire affects
the ability to steer or brake the vehicle.
You may lose control of the vehicle. Contin-
ued driving with a flat tire will cause exces-
sive heat build-up and possibly a fire.
Page 343 of 442
343 Practical hints
What to do if …
Display symbol
Display messages
Possible cause
Possible solution
H
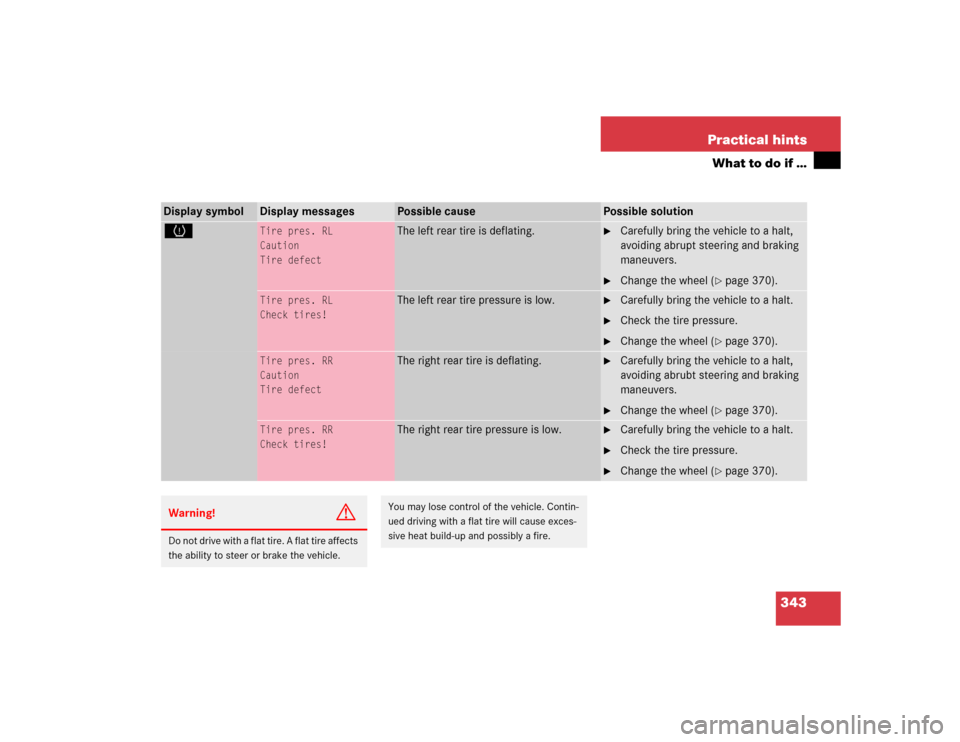
Tire pres. RL
Caution
Tire defect
The left rear tire is deflating.
�
Carefully bring the vehicle to a halt,
avoiding abrupt steering and braking
maneuvers.
�
Change the wheel (
�page 370).
Tire pres. RL
Check tires!
The left rear tire pressure is low.
�
Carefully bring the vehicle to a halt.
�
Check the tire pressure.
�
Change the wheel (
�page 370).
Tire pres. RR
Caution
Tire defect
The right rear tire is deflating.
�
Carefully bring the vehicle to a halt,
avoiding abrubt steering and braking
maneuvers.
�
Change the wheel (
�page 370).
Tire pres. RR
Check tires!
The right rear tire pressure is low.
�
Carefully bring the vehicle to a halt.
�
Check the tire pressure.
�
Change the wheel (
�page 370).
Warning!
G
Do not drive with a flat tire. A flat tire affects
the ability to steer or brake the vehicle.
You may lose control of the vehicle. Contin-
ued driving with a flat tire will cause exces-
sive heat build-up and possibly a fire.
Page 344 of 442
344 Practical hintsWhat to do if …Display symbol
Display messages
Possible cause
Possible solution
H
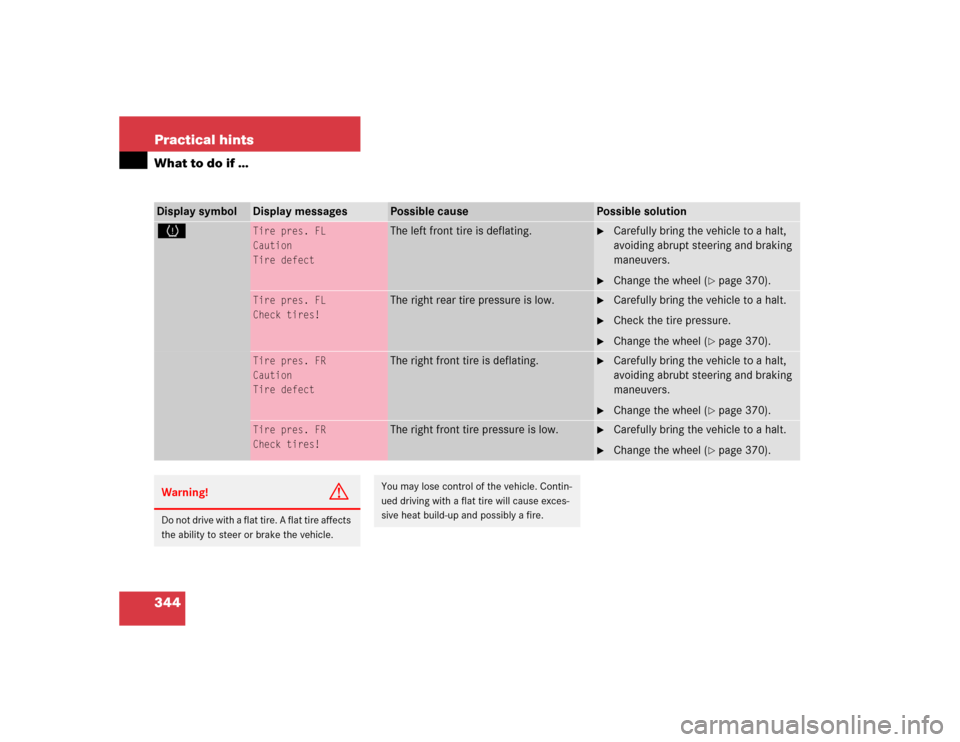
Tire pres. FL
Caution
Tire defect
The left front tire is deflating.
�
Carefully bring the vehicle to a halt,
avoiding abrupt steering and braking
maneuvers.
�
Change the wheel (
�page 370).
Tire pres. FL
Check tires!
The right rear tire pressure is low.
�
Carefully bring the vehicle to a halt.
�
Check the tire pressure.
�
Change the wheel (
�page 370).
Tire pres. FR
Caution
Tire defect
The right front tire is deflating.
�
Carefully bring the vehicle to a halt,
avoiding abrubt steering and braking
maneuvers.
�
Change the wheel (
�page 370).
Tire pres. FR
Check tires!
The right front tire pressure is low.
�
Carefully bring the vehicle to a halt.
�
Change the wheel (
�page 370).
Warning!
G
Do not drive with a flat tire. A flat tire affects
the ability to steer or brake the vehicle.
You may lose control of the vehicle. Contin-
ued driving with a flat tire will cause exces-
sive heat build-up and possibly a fire.
Page 351 of 442

351 Practical hints
Where will I find ...?
Removing the spare wheel�
Turn luggage bowl counterclockwise.
�
Remove spare wheel2.
Storing the spare wheel
�
Place spare wheel2 in wheel well.
�
Turn luggage bowl clockwise to its stop
to secure the spare wheel.Minispare wheel
In the case of a flat tire, you may tempo-
rarily use the Minispare wheel when ob-
serving the following restrictions:
�
Do not exceed a vehicle speed of
50 mph (80 km / h).
�
Drive to the nearest tire repair facility
to have the flat tire repaired or re-
placed as appropriate.
�
Do not operate vehicle with more than
one spare wheel mounted.More information can be found in the
“Technical data” section (
�page 396).
Luggage box
Remove luggage box
1Fastening clip
2Luggage box�
Turn fastening clips1 to the left up-
wards from fastening bolts.
�
Lift luggage box in the area of the fas-
tening bolts and remove it from trunk.
!Always lower trunk floor before closing
trunk lid.
Warning!
G
The dimensions of the Minispare wheel are
different from those of the road wheels. As
a result, the vehicle handling characteristics
change when driving with a Minispare wheel
mounted.
The Minispare wheel should only be used
temporarily, and replaced with a regular
road wheel as quickly as possible.
Page 366 of 442
366 Practical hintsFlat tire
�Flat tirePreparing the vehicle�
Park the vehicle as far as possible from
moving traffic on a hard surface.
�
Turn on the hazard warning flashers.
�
Engage the steering wheel lock in the
straight-ahead position and set the
parking brake.
�
Move the selector lever toP.
�
Have any passenger exit the vehicle at
a safe distance from the roadway.
Sealing tires with TIREFIT (E 55 AMG) Small tire punctures, only those in the
tread, can be sealed with TIREFIT.
TIREFIT can be used in ambient tempera-
tures down to -4°F (-20°C).Warning!
G
Keep TIREFIT away from sparks, open flame
or heat source.
Do not smoke.
Warning!
G
Take care not to allow the contents of
TIREFIT to come in contact with hair, eyes or
clothing. TIREFIT is harmful if inhaled, swal-
lowed or absorbed through the skin. It caus-
es skin, eye and respiratory irritation.
Any contact with eyes or skin should be
flushed immediately with plenty of water.
If clothing comes in contact with TIREFIT,
change clothing as soon as possible.
In case of allergic reaction or rash, consult a
physician immediately.
Warning!
G
Keep TIREFIT out of reach of children.
If swallowed, rinse mouth immediately with
plenty of water and drink plenty of water.
Do not induce vomiting!
Consult a physician immediately.
Keep away from open flame or heat source.
Page 370 of 442
370 Practical hintsFlat tire
�
Visit an authorized Mercedes-Benz
Center as soon as possible to obtain a
new TIREFIT container.
�
Bring used TIREFIT materials to an au-
thorized Mercedes-Benz Center for
proper disposal.
�
Replace your TIREFIT container every
four years. Replacement containers are
available at your authorized
Mercedes-Benz Center.
Mounting the spare wheel
Preparing the vehicle
Prepare the vehicle as described under
“Preparing the vehicle” on this page.�
Take the spare wheel out of the trunk
(�page 350).
Lifting the vehicle
�
Prevent the vehicle from rolling away
by blocking wheels with wheel chocks
(not included) or other sizable objects.
When changing wheel on a level surface:
�
Place one chock in front of and one be-
hind the wheel that is diagonally oppo-
site to the wheel being changed.
Warning!
G
Follow recommend inflation pressures.
Do not overinflate tires. Overinflating tires
can result in sudden deflation (blowout) be-
cause they are more likely to become punc-
tured or damaged by road debris, potholes
etc.
Do not underinflate tires. Underinflated tires
wear unevenly, adversely affect handling
and fuel economy, and are more likely to fail
from being overheated.
Do not overload the tires by exceeding the
specified vehicle capacity weight (as indicat-
ed by the label on the pillar in the driver’s
door opening). Overloading the tires can
overheat them, possibly causing a blowout.
Warning!
G
Do not exceed vehicle speed of 50 mph
(80 km / h). A TIREFIT repair is not designed
to operate at higher speeds.
The sticker must be attached on the instru-
ment cluster where it will be easily seen by
the driver.
Vehicle handling characteristics may
change. Adapt your driving accordingly.
��
Page 371 of 442
371 Practical hints
Flat tire
When changing wheel on a hill:�
Place chocks on the downhill side
blocking both wheels of the other axle.
�
Take the two-piece wheel wrench and
the jack out of the trunk (
�page 352).
Assemble wheel wrench.
�
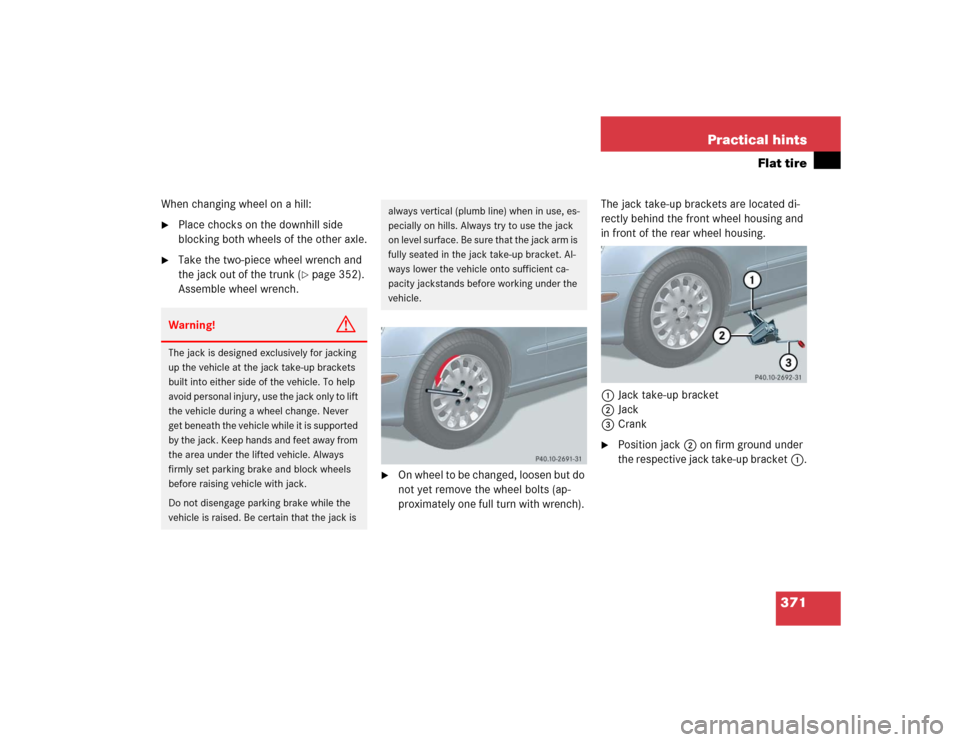
On wheel to be changed, loosen but do
not yet remove the wheel bolts (ap-
proximately one full turn with wrench). The jack take-up brackets are located di-
rectly behind the front wheel housing and
in front of the rear wheel housing.
1Jack take-up bracket
2Jack
3Crank
�
Position jack2 on firm ground under
the respective jack take-up bracket1.
Warning!
G
The jack is designed exclusively for jacking
up the vehicle at the jack take-up brackets
built into either side of the vehicle. To help
avoid personal injury, use the jack only to lift
the vehicle during a wheel change. Never
get beneath the vehicle while it is supported
by the jack. Keep hands and feet away from
the area under the lifted vehicle. Always
firmly set parking brake and block wheels
before raising vehicle with jack.
Do not disengage parking brake while the
vehicle is raised. Be certain that the jack is
always vertical (plumb line) when in use, es-
pecially on hills. Always try to use the jack
on level surface. Be sure that the jack arm is
fully seated in the jack take-up bracket. Al-
ways lower the vehicle onto sufficient ca-
pacity jackstands before working under the
vehicle.