Page 356 of 442
 side facing up.
�
Return battery compartment into h")
356 Practical hintsUnlocking / locking in an emergency�
Using a lint-free cloth, insert new bat-
teries under the contact spring with the
plus (+) side facing up.
�
Return battery compartment into hous-
ing until it locks into place.
SmartKey with KEYLESS-GO*
1Battery
2Tilt battery up
3Mechanical key
Replacement batteries: Lithium, type
CR 2025 or equivalent.
�
Remove mechanical key (
�page 353).
�
Insert the mechanical key in side open-
ing and push grey slide.
The battery compartment is unlatched.
�
Pull the battery compartment out of the
SmartKey housing in direction of ar-
row.
�
Using mechanical key3 apply pres-
sure to position2.
Battery1 tilts up slightly.
�
Pull out batteries1 in direction of ar-
row.
�
Using a lint-free cloth, insert new bat-
teries with the plus (+) side facing up.
�
Return battery compartment into hous-
ing until it locks into place.
iWhen changing batteries, always re-
place both batteries.
The required replacement batteries are
available at any Mercedes-Benz
Center.
Page 357 of 442
357 Practical hints
Unlocking / locking in an emergency
Fuel filler flap emergency release
In case the central locking system does
not release the fuel filler flap, you can open
it manually.
1Release knob�
Open trunk lid.
�
Remove right-side tail trim.
�
Turn release knob1 clockwise (ar-
row).
The fuel filler flap can know be opened.Manually unlocking the transmission
selector lever
In the case of power failure, the transmis-
sion selector lever can be manually un-
locked, e.g. to tow the vehicle.
1Pin
�
Open the storage compartment in the
center console (
�page 244).
�
Take out the cup holder*.
Using two fingers in the horizontal slot
at the upper rear side of the cup holder,
lift cup holder upwards to remove.
�
Hold the cover at a 45° angle.
�
Insert a suitable object1 (e.g. a pin)
through the hole and press the pin
downward.
�
Remove pin1. iThe selector lever is locked again when
moving it to positionP.
Page 358 of 442
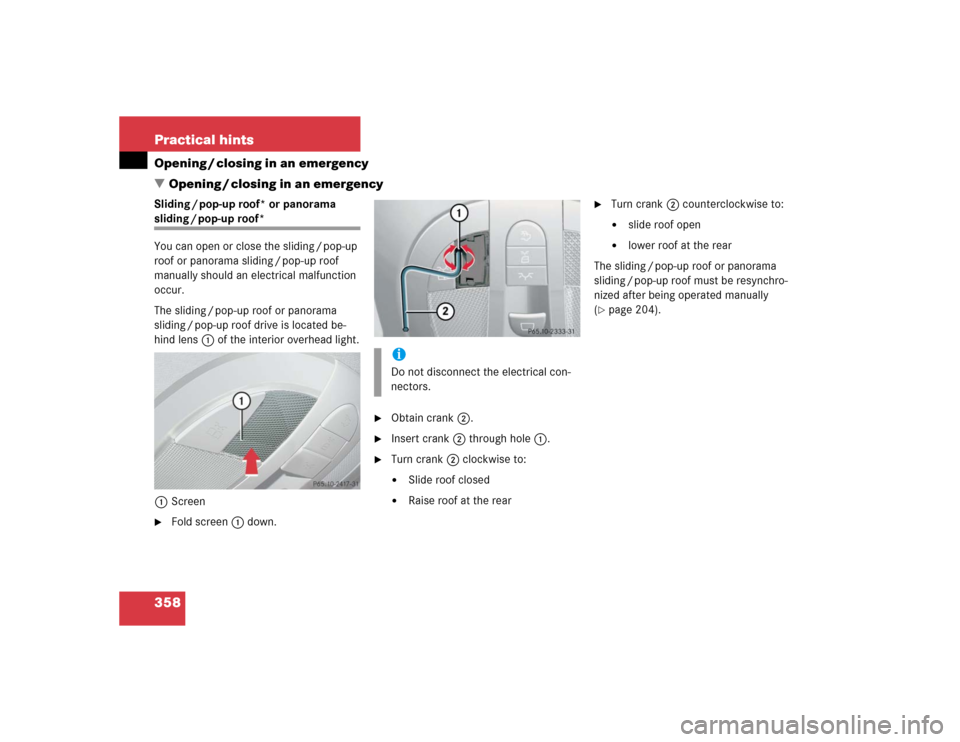
358 Practical hintsOpening / closing in an emergency
�Opening / closing in an emergencySliding / pop-up roof* or panorama sliding / pop-up roof*
You can open or close the sliding / pop-up
roof or panorama sliding / pop-up roof
manually should an electrical malfunction
occur.
The sliding / pop-up roof or panorama
sliding / pop-up roof drive is located be-
hind lens1 of the interior overhead light.
1Screen�
Fold screen1 down.
�
Obtain crank2.
�
Insert crank2 through hole1.
�
Turn crank2 clockwise to:�
Slide roof closed
�
Raise roof at the rear
�
Turn crank2 counterclockwise to:�
slide roof open
�
lower roof at the rear
The sliding / pop-up roof or panorama
sliding / pop-up roof must be resynchro-
nized after being operated manually
(
�page 204).
iDo not disconnect the electrical con-
nectors.
Page 361 of 442
361 Practical hints
Replacing bulbs
Replacing bulbs for front lamps
1Bulb socket for turn signal lamp
2High beam halogen bulb
3Bulb socket for parking and standing
lamp
4Cover for Bi-Xenon* (low beam and
high beam) or halogen (low beam)
headlampBi-Xenon* headlamps Low beam halogen bulb
�
Switch off the lights.
�
Open the hood (
�page 281).
�
Turn the locking mechanism counter-
clockwise and remove headlamp
cover4.
�
Pull electrical connector off.
�
Release the retaining springs and take
out the bulb.
�
Insert the new bulb in the socket so
that the base is in the recess on the
lower left.
�
Attach the retaining springs.
�
Insert connector into the bulb.
�
Align headlamp cover and click into
place.
Warning!
G
Do not remove the cover4 for the Bi-Xe-
non headlamp. Because of high voltage in
Xenon lamps, it is dangerous to replace the
bulb or repair the lamp and its components.
We recommend that you have such work
done by a qualified technician.
Page 362 of 442
.
�
Press the clamp and remove headlamp
cover.
�
Pull electrical connector off.
�
Turn th")
362 Practical hintsReplacing bulbsHigh beam halogen bulb �
Switch off the lights.
�
Open the hood (
�page 281).
�
Press the clamp and remove headlamp
cover.
�
Pull electrical connector off.
�
Turn the locking mechanism counter-
clockwise and take out the high beam
bulb2.
�
Insert the new bulb in the socket so
that the base is in the recess on the
lower left.
�
Attach the retaining springs.
�
Insert connector into the bulb.
�
Align headlamp cover and click into
place.Front turn signal lamp bulb
�
Switch off the lights.
�
Open the hood (
�page 281).
�
Twist bulb socket 1 counterclockwise
and pull out.
�
Push bulb into socket, turn counter-
clockwise and remove.
�
Insert new bulb in socket, push in and
twist clockwise.
�
Reinsert bulb socket in lamp and twist
clockwise.Parking and standing lamp bulb
�
Switch off the lights.
�
Open the hood (
�page 281).
�
Press the clamp and remove headlamp
cover.
�
Pull out the bulb socket3 with the
bulb.
�
Pull the bulb out of the bulb socket.
�
Insert a new bulb in the socket.
�
Reinstall the bulb socket.
�
Align headlamp cover and click into
place.
Page 364 of 442
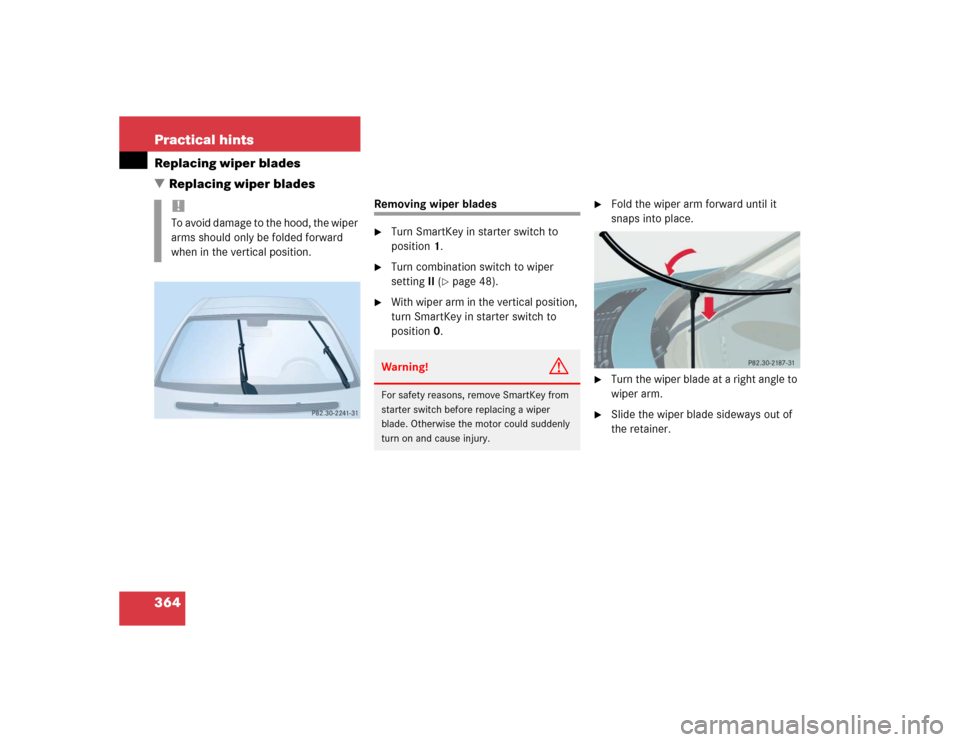
364 Practical hintsReplacing wiper blades
�Replacing wiper blades
Removing wiper blades�
Turn SmartKey in starter switch to
position1.
�
Turn combination switch to wiper
settingII (
�page 48).
�
With wiper arm in the vertical position,
turn SmartKey in starter switch to
position0.
�
Fold the wiper arm forward until it
snaps into place.
�
Turn the wiper blade at a right angle to
wiper arm.
�
Slide the wiper blade sideways out of
the retainer.
!To avoid damage to the hood, the wiper
arms should only be folded forward
when in the vertical position.
Warning!
G
For safety reasons, remove SmartKey from
starter switch before replacing a wiper
blade. Otherwise the motor could suddenly
turn on and cause injury.
Page 367 of 442
.
�
Foreign objects (e.g. screws or nails)
should not be removed from the tire.
�
Attach the sticker where it will be")
367 Practical hints
Flat tire
�
Take the TIREFIT kit out of the trunk
(�page 350).
�
Foreign objects (e.g. screws or nails)
should not be removed from the tire.
�
Attach the sticker where it will be easily
seen by the driver on the instrument
cluster.Preparing TIREFIT
1TIREFIT container
2Flap
3Notch
4Electrical plug
5Air hose
6Flange
�
Open flap2 on the electric air pump.
�
Pull plug4 and air hose5 out of the
pump housing.
�
Screw the air pump’s air hose5 onto
flange6 of the TIREFIT container.
�
Stick TIREFIT container1 upside
down into notch3 of the electric air
pump.
7Tire valve
8Electric air pump switch
9Air hose with pressure gauge and vent
screw
aFiller hose
Warning!
G
TIREFIT is a limited repair device. TIREFIT
cannot be used for:�
cuts or punctures larger than approxi-
mately 0.16 in (4 mm)
�
on a flat tire, or a damaged wheel
�
tire damage caused by driving with ex-
tremely low tire pressure
Do not drive the vehicle under such circum-
stances.
Contact your nearest Mercedes-Benz
Center for assistance or call Roadside Assis-
tance.
Warning!
G
Observe safety instructions on air pump la-
bel.
Page 368 of 442

368 Practical hintsFlat tire�
Unscrew the valve cap from tire
valve7.
�
Screw filler hosea onto tire valve7.
�
Insert electrical plug4 into vehicle
cigarette lighter socket.
�
Turn SmartKey in starter switch to
position1 (
�page 31).
or
�
Press the KEYLESS-GO* start / stop
button (
�page 33) on the selector le-
ver once. Do not depress brake pedal.
�
Press I on electric air pump switch8.
The electric air pump should now
switch on and inflate the tire.After five minutes, the pressure gauge
must display at least 26 psi (1.8 bar). The
air hose can become hot during inflation.
Please exercise appropriate caution.
�
If this tire pressure is not attained, turn
off the electric air pump, detach the fill-
er hose from the tire valve, and drive
vehicle back and forth very slowly ap-
proximately 30 ft (10 m).
This serves to better distribute the
TIREFIT sealant material inside the tire.
�
Unscrew the air pump’s air hose5
from flange6 of the TIREFIT contain-
er.
�
Screw air hose5 onto tire valve7.
Inflate the tire again.
�
After attaining a tire pressure of 26 psi
(1.8 bar), press 0 on electric air pump
switch8.
The electric air pump should now be
switched off.
iIf sealant has leaked out, let it dry. You
can then peel it off.
!Do not operate the electric air pump
longer than eight minutes without in-
terruption. Otherwise it may overheat.
You may operate the air pump again af-
ter it has cooled off.
Warning!
G
If a tire pressure of 26 psi (1.8 bar) is not at-
tained, tire is too severely damaged for
TIREFIT to provide a reliable tire repair.
In this case, TIREFIT cannot properly seal
the tire.
Do not drive the vehicle.
Contact the nearest Mercedes-Benz Center
or call Roadside Assistance.