Page 347 of 442

347 Practical hints
What to do if …
Display symbol
Display messages
Possible cause
Possible solution
_
Steering oil
Visit workshop!
The steering gear oil level is too low.
There is a danger of steering gear dam-
age.
�
Have the system checked by an au-
thorized Mercedes-Benz Center.
Entry position
Do not drive!
Seat, mirrors and steering wheel have not
yet moved to their preset driving posi-
tions.
�
Wait until the seat, mirrors and steer-
ing wheel have moved to their driving
positions.
The message disappears.
Ê
Trunk open!
This message will appear whenever the
trunk lid is open.
�
Close the trunk lid.
W
Washer fluid
Check level!
The fluid level has dropped to about
1/3
of total reservoir capacity.�
Add washer fluid (
�page 288).
Warning!
G
If the level of steering gear oil in reservoir is
too low, the steering power assistance could
fail. Much greater effort will then be needed
to turn the steering wheel.
Do not add steering oil without checking the
steering system.
Do not drive the vehicle. Have the system
checked at your authorized Mercedes-Benz
Center as soon as possible.
Page 349 of 442

349 Practical hints
What to do if …
Warning!
G
Driving while these messages are displayed
can result in an accident. Have your brake
system checked immediately.
If there is a malfunction in the SBC brake
system, we recommend that the vehicle be
transported with all wheels off the ground
using flatbed or appropriate wheel lift / dolly
equipment.
A tow bar must be used if circumstances do
not permit the use of the recommended
towing methods and the vehicle requires
towing with all four wheels on the ground.
Towing the vehicle with all four wheels on
the ground is only permissible for distances
u p t o 3 0 m i l e s ( 5 0 k m ) a n d a t a s p e e d n o t t o
exceed 30 mph (50 km / h). For more infor-
mation, refer to “Towing the vehicle”
(�page 381).
If the SBC brake system enters its emergen-
cy operation mode, the driver must apply
significantly greater brake pedal pressure
and depress the pedal much further than
normal to obtain braking effect. If neces-
sary, apply full pressure to the brake pedal.
Brakes may only be applied to the front
wheels. Stopping distance is increased!
Low brake fluid in the reservoir may cause
the braking system to fail!
Don’t add brake fluid before checking the
brake system. Overfilling the brake fluid res-
ervoir can result in spilling brake fluid on hot
engine parts and the brake fluid catching
fire. You can be seriously burned.
iIf you find that the brake fluid in the
brake fluid reservoir has fallen to the
minimum mark or below, have the
brake system checked for brake pad
thickness and leaks.!Brake pad thickness must be visually
inspected by a qualified technician at
the intervals specified in the Service
Booklet.
Page 350 of 442
350 Practical hintsWhere will I find ...?
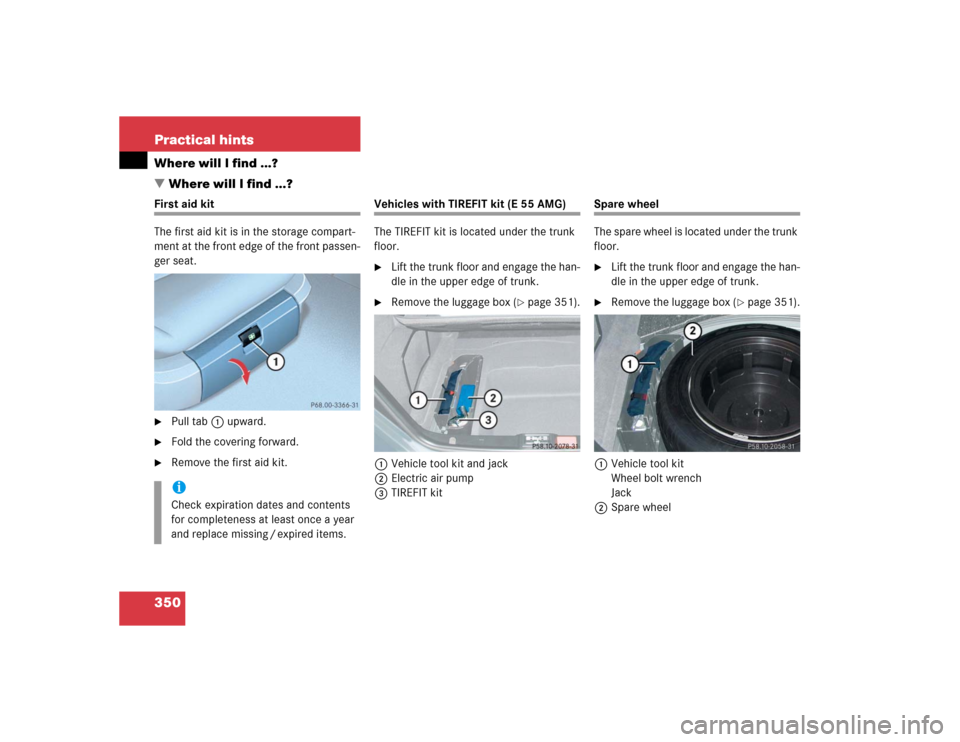
�Where will I find ...?First aid kit
The first aid kit is in the storage compart-
ment at the front edge of the front passen-
ger seat.�
Pull tab1 upward.
�
Fold the covering forward.
�
Remove the first aid kit.
Vehicles with TIREFIT kit (E 55 AMG)
The TIREFIT kit is located under the trunk
floor.�
Lift the trunk floor and engage the han-
dle in the upper edge of trunk.
�
Remove the luggage box (
�page 351).
1Vehicle tool kit and jack
2Electric air pump
3TIREFIT kit
Spare wheel
The spare wheel is located under the trunk
floor.�
Lift the trunk floor and engage the han-
dle in the upper edge of trunk.
�
Remove the luggage box (
�page 351).
1Vehicle tool kit
Wheel bolt wrench
Jack
2Spare wheel
iCheck expiration dates and contents
for completeness at least once a year
and replace missing / expired items.
Page 351 of 442

351 Practical hints
Where will I find ...?
Removing the spare wheel�
Turn luggage bowl counterclockwise.
�
Remove spare wheel2.
Storing the spare wheel
�
Place spare wheel2 in wheel well.
�
Turn luggage bowl clockwise to its stop
to secure the spare wheel.Minispare wheel
In the case of a flat tire, you may tempo-
rarily use the Minispare wheel when ob-
serving the following restrictions:
�
Do not exceed a vehicle speed of
50 mph (80 km / h).
�
Drive to the nearest tire repair facility
to have the flat tire repaired or re-
placed as appropriate.
�
Do not operate vehicle with more than
one spare wheel mounted.More information can be found in the
“Technical data” section (
�page 396).
Luggage box
Remove luggage box
1Fastening clip
2Luggage box�
Turn fastening clips1 to the left up-
wards from fastening bolts.
�
Lift luggage box in the area of the fas-
tening bolts and remove it from trunk.
!Always lower trunk floor before closing
trunk lid.
Warning!
G
The dimensions of the Minispare wheel are
different from those of the road wheels. As
a result, the vehicle handling characteristics
change when driving with a Minispare wheel
mounted.
The Minispare wheel should only be used
temporarily, and replaced with a regular
road wheel as quickly as possible.
Page 352 of 442
352 Practical hintsWhere will I find ...?Install luggage box�
Insert luggage box into trunk so that
fastening clips are in line with fastening
bolts.
�
Push front edge of luggage box in direc-
tion of arrow under cover of trunk sill.
�
Press fastening clips onto fastening
bolts until they lock into place.
Vehicle tool kit
The vehicle tool kit is stored in the com-
partment underneath the trunk floor
(�page 350).
The vehicle tool kit includes:
�
One towing eye bolt
�
One wheel wrench
�
One alignment bolt
�
One fuse extractor
�
Spare fuses
Page 353 of 442
353 Practical hints
Unlocking / locking in an emergency
�Unlocking / locking in an emergency
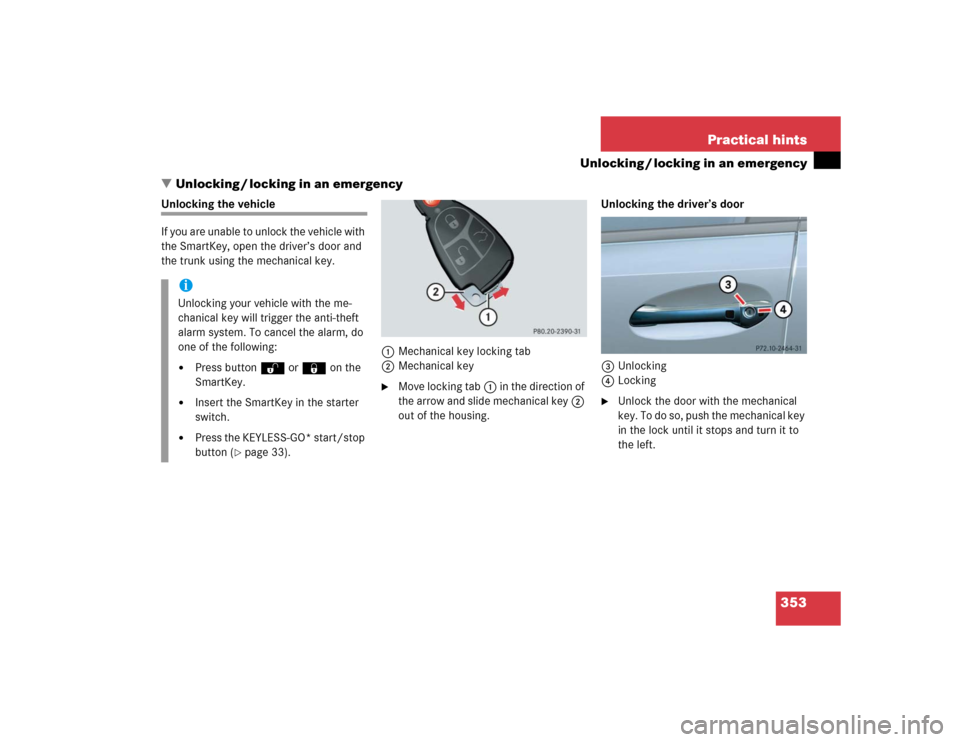
Unlocking the vehicle
If you are unable to unlock the vehicle with
the SmartKey, open the driver’s door and
the trunk using the mechanical key.
1Mechanical key locking tab
2Mechanical key
�
Move locking tab1 in the direction of
the arrow and slide mechanical key2
out of the housing.Unlocking the driver’s door
3Unlocking
4Locking
�
Unlock the door with the mechanical
key. To do so, push the mechanical key
in the lock until it stops and turn it to
the left.
iUnlocking your vehicle with the me-
chanical key will trigger the anti-theft
alarm system. To cancel the alarm, do
one of the following:�
Press button Œ or ‹ on the
SmartKey.
�
Insert the SmartKey in the starter
switch.
�
Press the KEYLESS-GO* start/stop
button (
�page 33).
Page 354 of 442
 is required to open the trunk lid.
If you are unable to unlock the trunk with")
354 Practical hintsUnlocking / locking in an emergencyUnlocking the trunk
A minimum height clearance of 5.90 ft
(1.80 m) is required to open the trunk lid.
If you are unable to unlock the trunk with
the SmartKey or KEYLESS-GO*, open the
trunk with the mechanical key.
The handle is located above the rear li-
cense plate recess.
1Unlocking in an emergency
2Handle�
Insert the mechanical key into the
trunk lid lock.
�
Turn the mechanical key counterclock-
wise to position1 and hold it in this
position.
�
Pull trunk lid handle2 and lift the
trunk lid.
Locking the vehicle
If you are unable to lock the vehicle with
the SmartKey, lock it with the mechanical
key as follows:�
Close the passenger doors and the
trunk.
�
Press the central locking switch in the
cockpit (
�page 107).
�
Check to see whether the locking
knobs on the passenger doors are still
visible. If necessary, push them down
manually.
�
Slide mechanical key2 out of the
SmartKey.
�
Lock the driver’s door with the me-
chanical key (
�page 354).
�
Check if the trunk is locked. If neces-
sary lock the trunk with the mechanical
key (if appilcable) (
�page 105).
!Always make sure there is sufficient
overhead clearance.iUnlocking your vehicle with the me-
chanical key will trigger the anti-theft
alarm system. To cancel the alarm, do
one of the following:�
Press buttonŒ or‹ on the
SmartKey.
�
Insert the SmartKey in the starter
switch.
Vehicles with KEYLESS-GO*:
�
Grasp the outside door handle.
�
Press the start /stop button.
Page 355 of 442

355 Practical hints
Unlocking / locking in an emergency
Changing batteries in the SmartKey/ SmartKey with KEYLESS-GO*
If the batteries in the SmartKey are dis-
charged, the vehicle can no longer be
locked or unlocked. It is recommended to
have the batteries replaced at an autho-
rized Mercedes-Benz Center.
Batteries contain materials that can harm
the environment if disposed of improperly.
Recycling of batteries is the preferred
method of disposal. Many states require
sellers of batteries to accept old batteries
for recycling.SmartKey
1Mechanical key
2Battery compartment
Replacement batteries: Lithium, type
CR 2025 or equivalent.
�
Remove mechanical key1
(�page 353).
�
Insert the mechanical key in side open-
ing and push gray slide.
The battery compartment is unlatched.
�
Pull the battery compartment out of the
SmartKey housing in direction of ar-
row.
�
Remove the batteries.
3Battery
4Contact spring
Warning!
G
Keep the batteries out of reach of children.
If a battery is swallowed, seek medical help
immediately.
iWhen changing batteries, always re-
place both batteries.
The required replacement batteries are
available at any Mercedes-Benz
Center.