Page 139 of 442
139 Controls in detail
Control system
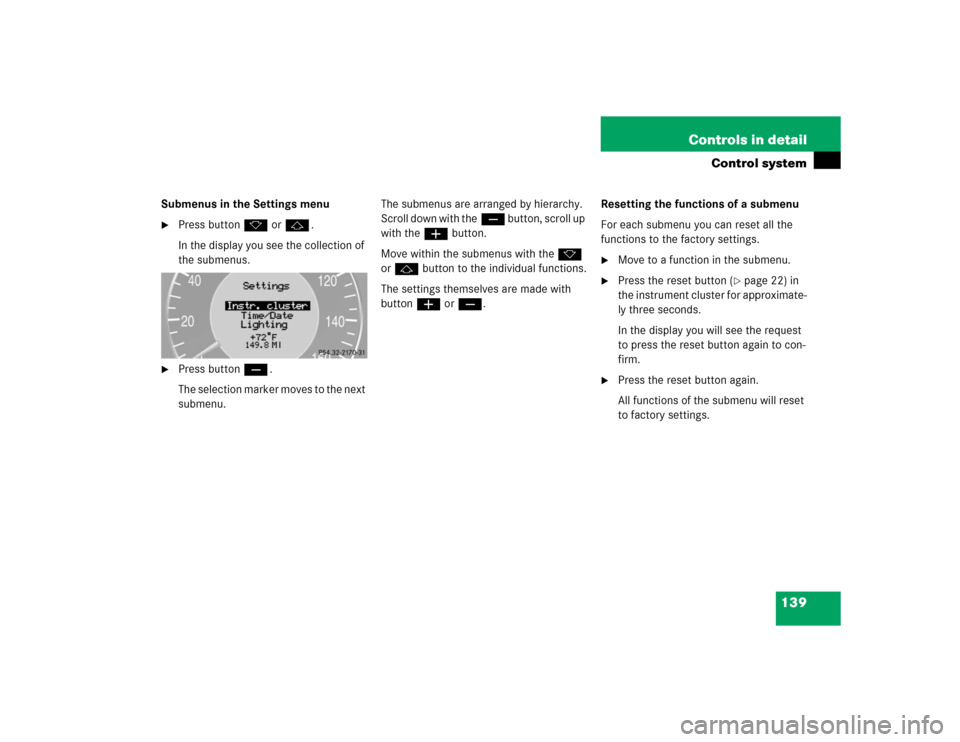
Submenus in the Settings menu�
Press buttonk orj.
In the display you see the collection of
the submenus.
�
Press buttonç.
The selection marker moves to the next
submenu.The submenus are arranged by hierarchy.
Scroll down with theç button, scroll up
with theæ button.
Move within the submenus with thek
orj button to the individual functions.
The settings themselves are made with
buttonæ orç.Resetting the functions of a submenu
For each submenu you can reset all the
functions to the factory settings.
�
Move to a function in the submenu.
�
Press the reset button (
�page 22) in
the instrument cluster for approximate-
ly three seconds.
In the display you will see the request
to press the reset button again to con-
firm.
�
Press the reset button again.
All functions of the submenu will reset
to factory settings.
Page 141 of 442

141 Controls in detail
Control system
Instrument cluster submenu
Access the
Instr. cluster
submenu via
the
Settings
menu. Use the
Instr. clus-
ter
submenu to change the instrument
cluster display settings. The following
functions are available:Selecting temperature display mode
�
Move the selection marker with
theæ orç button to the
Instr.
cluster
submenu.
�
Press buttonj ork repeatedly
until you see this message in the dis-
play:
Temp. indicator
.
The selection marker is on the current
setting.
�
Pressæ orç to set the temper-
ature unit to degrees Celsius (°C) or
degrees Fahrenheit (°F).Selecting speedometer display mode
�
Move the selection marker with
theæ orç button to the
Instr.
cluster
submenu.
�
Press buttonj ork repeatedly
until you see this message in the dis-
play:
Display unit Speed-/odometer
.
The selection marker is on the current
setting.
�
Press æ or ç to set speedome-
ter unit to
km or
miles
.
Function
Page
Select temperature display
mode
141
Select speedometer display
mode
141
Select language
142
Select display (speed display or
outside temperature) for status
display
142
Select display (speed display or
outside temperature) for basic
display
143
Tire pressure display*
143
Page 143 of 442
 for basic display�
Move the selection marker with
theæ orç button to the
Instr.
cluster
submenu.")
143 Controls in detail
Control system
Selecting display (speed display or out-
side temperature) for basic display�
Move the selection marker with
theæ orç button to the
Instr.
cluster
submenu.
�
Press buttonj ork repeatedly
until you see this message in the dis-
play:
Basic display
.
The selection marker is on the current
setting.
�
Pressæ orç to select the dis-
play permanently shown in the multi-
function display.Tire pressure display*
Use this function to set the unit for the tire
pressure display.
�
Move the selection marker with the
æ or ç button to the
Instr,
cluster
submenu.
�
Press button j or k repeatedly
until you see this message in the dis-
play:
Display unit Tire pressure
.
The selection marker is on the current
setting.
�
Press æ or ç to select the de-
sired tire pressure unit.Time / Date submenu
Access the
Time/Date
submenu via the
Settings
menu. Use the
Time/Date
sub-
menu to change the time and date display
settings. The following functions are avail-
able:
Function
Page
Synchronizing the time
144
Set time (hours)
144
Set time (minutes)
144
Set date (month)
145
Set date (day)
145
Set date (year)
145
iInformation on setting the time, refer to
separate COMAND instructions.
Page 146 of 442

146 Controls in detailControl systemLighting submenu
Access the
Lighting
submenu via the
Set-
tings
menu. Use the
Lighting
submenu
to change the lamp and lighting settings on
your vehicle. The following functions are
available:Setting daytime running lamp mode
(USA only)
�
Move the selection marker with
theæ orç button to the Lighting
submenu.
�
Press buttonj ork repeatedly
until you see this message in the dis-
play:
Lamp circuit headlamp
.
The selection marker is on the current
setting.
�
Pressæ orç to select
manual
or
daytime running lamp (
constant
)
mode. This function is not available in
countries where daytime running
lamps are mandatory.With daytime running lamp mode se-
lected and the exterior lamp switch at
position 0, the following lamps will
come on automatically when the en-
gine is turned on:
�
Parking lamps and low beam head-
lamps
�
License plate lamps (in low ambient
light conditions)
Function
Page
Set daytime running lamp mode
(USA only)
146
Set locator lighting
147
Ambient light level
147
Exterior lamps delayed shut-off
148
Interior lighting delayed shut-off
149
iIf you turn the exterior lamp switch to
another position, the corresponding
lamp(s) will switch on.
For safety reasons, resetting the Lighting
submenu to factory settings
(
�page 138) while driving will not re-
set the daytime running lamp mode.
In the display you will then see the mes-
sage:
Lighting
Page 148 of 442

Use the
Headlamps delayed shut-off
function to set whether and for how long
you would li")
148 Controls in detailControl systemSetting night security illumination (Exte-
rior lamps delayed shut-off)
Use the
Headlamps delayed shut-off
function to set whether and for how long
you would like the exterior lamps to illumi-
nate during darkness after all doors are
closed. When the delayed shut-off feature
is activated and the exterior lamp switch is
in position
U
, the following lamps will
remain lit after you remove the SmartKey
from the starter switch:
�
Parking lamps
�
Tail lamps
�
License plate lamps
�
Front fog lamps
�
Move the selection marker with
theæ orç button to the
Light-
ing
submenu.
�
Press buttonj ork repeatedly
until you see this message in the dis-
play:
Headlamps delayed shut-off
.
The selection marker is on the current
setting.
�
Pressæ orç to select the de-
sired lamp-on period.
You can select:�
0 s
, the delayed shut-off feature is
deactivated.
�
15 s
, 30 s
, 45 s
or
60 s
, the delayed
shut-off feature is activated.
�
Turn the exterior lamp switch to posi-
tion U.You can temporarily deactivate the de-
layed shut-off feature:
�
Before leaving the vehicle, turn the
SmartKey in the starter switch to
position0.
�
Then turn the SmartKey in the starter
switch to position2 and back to0.
The delayed shut-off feature is deacti-
vated. It will reactivate as soon as you
reinsert the SmartKey in the starter
switch.
Vehicles with KEYLESS-GO*:
�
Press the KEYLESS-GO start / stop but-
ton on the gear selector lever
(�page 33).
iYou can reactivate this function within
ten minutes by opening a door.
If you do not open a door after remov-
ing the SmartKey, the lamps will auto-
matically switch off after 60 seconds.
Page 149 of 442

149 Controls in detail
Control system
Interior lighting delayed shut-off
Use this function to set whether and for
how long you would like the interior light-
ing to remain lit during darkness after the
SmartKey is removed from the starter
switch.�
Move the selection marker with
theæ orç button to the
Light-
ing
submenu.
�
Press buttonj ork repeatedly
until you see this message in the dis-
play:
Interior lamp delayed
shut-off
.
The selection marker is on the current
setting.
�
Pressæ orç to select the de-
sired lamp-on time period. You can se-
lect:�
0 s
, the delayed shut-off feature is
deactivated.
�
5 s,
10 s
, 15 s
or
20 s
, the delayed
shut-off feature is activated.Vehicle submenu
Access the
Vehicle
submenu via the
Set-
tings
menu. Use the
Vehicle
submenu to
make general vehicle settings. The follow-
ing functions are available:
Setting automatic locking
Use this function to activate or deactivate
the automatic central locking. With the au-
tomatic central locking system activated,
the vehicle is centrally locked at vehicle
speeds of approximately 9 mph
(15 km / h).
Function
Page
Set automatic locking
149
Limiting opening height of trunk
lid*
150
Page 150 of 442

150 Controls in detailControl system�
Move the selection marker with
theæ orç button to the
Vehi-
cle
submenu.
�
Press buttonj ork repeatedly
until you see this message in the dis-
play:
Automatic door lock
.
The selection marker is on the current
setting.
�
Pressæ orç to switch
Automat-
ic door lock
on or
off
.Limiting opening height of trunk lid*
Use this function to activate or deactivate
the limiting opening height of trunk lid.
�
Move the selection marker with
theæ orç button to the
Vehi-
cle
submenu.
�
Press buttonj ork repeatedly
until you see this message in the dis-
play:
Opening limiter trunk lid
.
The selection marker is on the current
setting.
�
Pressæ orç to switch
Opening
limiter Trunk lid On
or
Off
.Convenience submenu
Access the
Convenience
submenu via the
Settings
menu. Use the
Convenience
sub-
menu to change the settings for a number
of convenience features. The following
functions are available:
Activating easy-entry / exit feature*
Use this function to activate and deacti-
vate the easy-entry / exit feature. When
the feature is activated, the steering wheel
and driver’s seat will move back to facili-
tate exiting when you
�
remove the SmartKey from the starter
switch
�
open the driver’s door
However, the engine must be turned off.
Function
Page
Activate easy-entry / exit feature
150
Set SmartKey-dependency
152
Set parking position for exterior
rear view mirror
152
Page 151 of 442

151 Controls in detail
Control system
After entering the vehicle, the steering
wheel and seat will move into the position
stored in memory when�
the driver’s door is closed
�
you put the SmartKey in the starter
switch or press the KEYLESS-GO
start/stop button*
�
you press the appropriate stored posi-
tion button on the memory switch
(�page 117).
�
Move the selection marker with
theæ orç button to
the
Convenience
submenu.
�
Press buttonj ork repeatedly
until you see this message in the dis-
play:
Function Easy-entry feature
.
The selection marker is on the current
setting.
�
Pressæ orç to change the
easy-entry / exit setting.
The following settings are available for the
easy-entry / exit feature
Warning!
G
You must make sure that no one can be-
come trapped or injured by the moving
steering wheel and the driver’s seat when
the easy-entry / exit feature is in operation
and the driver’s door is being opened or the
SmartKey is removed from the starter
switch.
Do not leave children unattended in the ve-
hicle, or with access to an unlocked vehicle.
Children could open the driver’s door and
unintentionally activate the easy-entry / exit
feature, which could result in an accident
and / or personal injury.
iTo cancel seat / steering wheel move-
ment, do one of the following:�
Press seat adjustment switch
(�page 35).
�
Move the steering column stalk
(�page 37).
�
Press the memory button
(�page 117).
off
The
easy-entry / exit
feature is deactivat-
ed
Steering col.
Only the steering
column is moved.
Steering col. +
seat
Both the steering
column and the
seat are moved.