Page 102 of 442

1Trunk lid closing switch�
Make sure you have the SmartKey with
KEYLESS-GO with you.
�
Press")
102 Controls in detailLocking and unlockingClosing the trunk from the outside
(vehicles with KEYLESS-GO*)
1Trunk lid closing switch�
Make sure you have the SmartKey with
KEYLESS-GO with you.
�
Press trunk lid closing switch1 brief-
ly.
The trunk lid closes.If the trunk lid comes into contact with an
object while closing (e.g. luggage that has
been piled too high), the closing procedure
is stopped and the trunk re-opens slightly.
iTo prevent a possible inadvertent lock-
out, the trunk lid will open automatical-
ly if a SmartKey with KEYLESS-GO is
recognized inside the vehicle or in the
trunk.Warning!
G
Only drive with the trunk closed as, among
other dangers such as visibility blockage,
exhaust fumes may enter the vehicle
interior.
Warning!
G
Monitor the closing procedure carefully to
ensure that no one is in danger of being in-
jured. To prevent possible personal injury,
always keep hands and fingers away from
the trunk opening when closing the trunk.
Be especially careful when small children
are around. To stop the closing procedure,
press the remote trunk lid switch (on the
driver’s door), the trunk lid closing
switch1 or the Š button on the Smart-
Key with KEYLESS-GO.
When leaving the vehicle, always remove the
SmartKey from the starter switch, take the
SmartKey with KEYLESS-GO with you, and
lock your vehicle. Do not leave children un-
attended in the vehicle, or with access to an
unlocked vehicle. Unsupervised use of vehi-
cle equipment may cause an accident
and/or serious personal injury.
Page 103 of 442

1KEYLESS-GO* locking/closing switch
You can close the trunk lid")
103 Controls in detail
Locking and unlocking
Closing the trunk and locking the vehi-
cle from the outside (vehicles with KEY-
LESS-GO*)
1KEYLESS-GO* locking/closing switch
You can close the trunk lid and lock the ve-
hicle simultaneously.
�
Make sure you have the SmartKey with
KEYLESS-GO with you.
�
Press switch1 briefly.
The vehicle is locked and the trunk lid
closes automatically. The turn signals
flash three times to confirm locking.
If the trunk lid comes into contact with an
object while closing (e.g. luggage that has
been piled too high), the closing procedure
is stopped and the trunk re-opens slightly.iTo prevent a possible inadvertent lock-
out, the trunk lid will open automatical-
ly if a SmartKey with KEYLESS-GO is
recognized inside the vehicle or in the
trunk.
Warning!
G
Monitor the closing procedure carefully to
ensure that no one is in danger of being in-
jured. To prevent possible personal injury,
always keep hands and fingers away from
the trunk opening when closing the trunk.
Be especially careful when small children
are around. To stop the closing procedure,
press the remote trunk lid switch (on the
driver’s door), the trunk lid closing
switch1, the Š button on the SmartKey
with KEYLESS-GO or the remote trunk lid
opening switch (located on the driver’s
door).
When leaving the vehicle, always remove the
SmartKey from the starter switch, take the
SmartKey with KEYLESS-GO* with you, and
lock your vehicle. Do not leave children un-
attended in the vehicle, or with access to an
unlocked vehicle. Unsupervised use of vehi-
cle equipment may cause an accident
and/or serious personal injury.
Page 104 of 442

104 Controls in detailLocking and unlockingTrunk lid emergency release
The emergency release button is located
on the inside of the trunk lid.
1Emergency release button
�
Briefly press emergency release
button1.
The trunk unlocks and the trunk lid
opens.
Illumination of the emergency release but-
ton:
�
The button will flash for 30 minutes af-
ter opening the trunk.
�
The button will flash for 60 minutes af-
ter closing the trunk.
Warning!
G
Only drive with the trunk closed as, among
other dangers such as visibility blockage,
exhaust fumes may enter the vehicle
interior.
iThe emergency release button unlocks
and opens the trunk while the vehicle is
standing or driving.
The emergency release button does
not open the trunk lid, if the vehicle
battery is discharged or disconnected.
iIf the emergency release button is
pressend and the vehicle was centrally
locked from the outside using the
SmartKey, the exterior lamps will flash
and the alarm will sound as the trunk
lid opens.
To cancel the alarm, do one of the fol-
lowing:
With the SmartKey�
Insert the SmartKey in the starter
switch.
�
Press the Œ or ‹ button on
the SmartKey.
With KEYLESS-GO*
�
Grasp the outside door handle.
�
Press the KEYLESS-GO* start/stop
button.
Page 108 of 442
.
Easy-entry / exit feature*
With the easy-entry / exit feature activat-")
108 Controls in detailSeats
�SeatsInformation on seat adjustment can be
found in the “Getting started” section
(�page 35).
Easy-entry / exit feature*
With the easy-entry / exit feature activat-
ed, the steering wheel tilts upwards and
the driver’s seat moves to the rear.
This allows easier entry into and exit from
the vehicle when the driver’s door is
opened. However, the engine must be
turned off.
When the SmartKey is inserted in the start-
er switch or you have pressed the Key-
less-Go* start/stop button and the
driver’s door is closed, the steering wheel
and the driver’s seat return to their last set
positions.You can activate the following functions:
�
Steering column:
Only the steering column is adjusted.
�
Steering column and seat:
The steering column and the seat are
adjusted.
The easy-entry / exit feature can be
switched on or off in the convenience sub-
menu of the control system (
�page 150).
Warning!
G
You must ensure that no one can become
trapped or injured by the moving steering
wheel and driver’s seat when the
easy-entry / exit feature is activated, the
driver’s door is being opened and the engine
is turned off or the SmartKey removed from
the starter switch.
Do not leave children unattended in the ve-
hicle, or with access to an unlocked vehicle.
Children could open the driver’s door and
unintentionally activate the easy-entry / exit
feature*, which could result in an accident
and / or serious personal injury.
iTo cancel seat / steering wheel move-
ment, do one of the following:�
Press seat adjustment switch
(�page 28).
�
Move steering column stalk
(�page 37).
�
Press the memory switch
(�page 28).
Page 111 of 442

Multicontour s")
111 Controls in detailSeats
Removing and installing rear seat head
restraints
For removing and installing rear seat head
restraints, see “Expanding the cargo ar-
ea*” (
�page 239)
Multicontour seat*
The multicontour seat has a movable seat
cushion and inflatable air cushions built
into the backrest to provide additional lum-
bar and side support.
The seat cushion movement, backrest
cushion height and curvature can be con-
tinuously varied with switches on the right
side of the seat after turning the SmartKey
in the starter switch to position2 or press-
ing the KEYLESS-GO* start/stop button
twice.1Seat cushion depth
2Backrest bottom
3Backrest center
4Backrest side bolster adjustment
�
Make sure the ignition is switched on.
All lights in the instrument cluster
come on.Seat cushion depth
�
Adjust the seat cushion depth to the
length of your upper leg using
switch1.
Backrest contour
�
Adjust the contour of the backrest to
the desired position using æ or
ç.
�
Move the backrest support to the bot-
tom by using button2 or to the center
by using button3.
Backrest side bolsters
�
Adjust the side bolsters so that they
provide good lateral support using
switch4.
Page 117 of 442

117 Controls in detail
Memory function
The memory switch is located on the door.
MMemory button
1, 2, 3Stored positions�
Be sure the ignition is switched on or
the relevant door is open and the
SmartKey is inserted in the starter
switch.
Storing positions in memory�
Adjust the seats, steering wheel and
exterior rear view mirrors to the de-
sired position (
�page 34).
�
Press memory buttonM.
�
Release memory button and press
stored position button 1, 2 or 3 within
three seconds.
All the settings are stored at the select-
ed position.
Recalling positions from memory�
On memory button, press and hold
stored position button1, 2 or3 until
the seat, steering wheel and exterior
rear view mirrors have fully moved to
the stored positions.iReleasing the button immediately
stops movement to the stored posi-
tions.Warning!
G
Do not operate the power seats using the
memory button if the seat backrest is in an
excessively reclined position. Doing so
could cause damage to front or rear seats.
First move backrest to an upright position.
Page 119 of 442
119 Controls in detail
Lighting
�Lighting
For notes on how to switch on the head-
lamps and use the turn signals, see the
“Getting started” section (
�page 47).
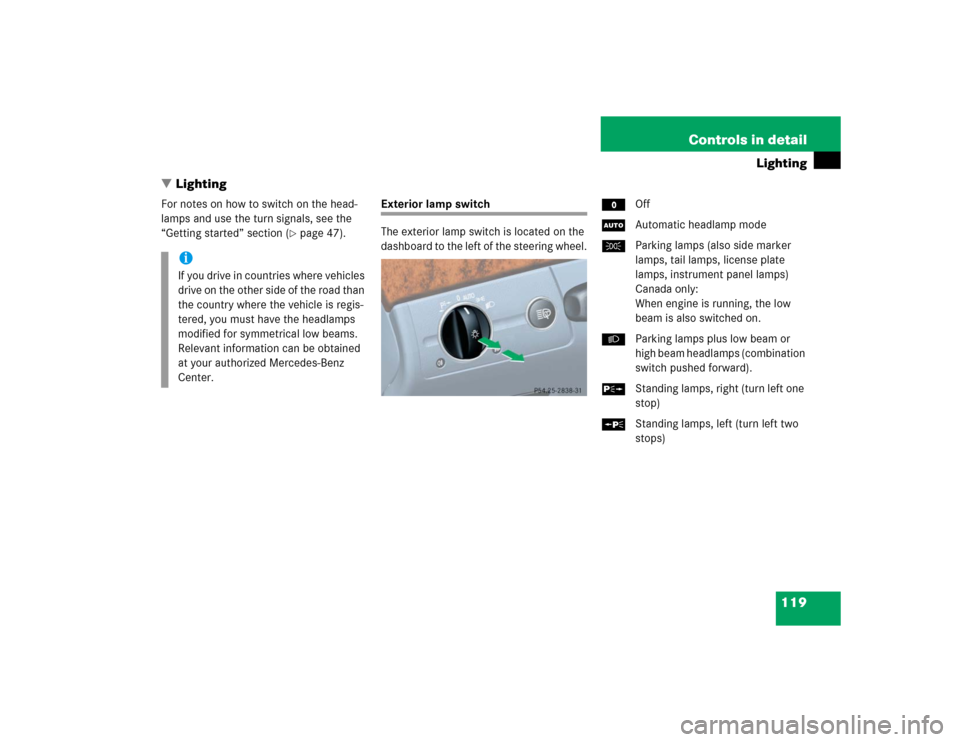
Exterior lamp switch
The exterior lamp switch is located on the
dashboard to the left of the steering wheel.MOff
UAutomatic headlamp mode
CParking lamps (also side marker
lamps, tail lamps, license plate
lamps, instrument panel lamps)
Canada only:
When engine is running, the low
beam is also switched on.
BParking lamps plus low beam or
high beam headlamps (combination
switch pushed forward).
ˆStanding lamps, right (turn left one
stop)
‚Standing lamps, left (turn left two
stops)
iIf you drive in countries where vehicles
drive on the other side of the road than
the country where the vehicle is regis-
tered, you must have the headlamps
modified for symmetrical low beams.
Relevant information can be obtained
at your authorized Mercedes-Benz
Center.
Page 129 of 442

129 Controls in detail
Control system
�Control system
The control system is activated as soon as
the SmartKey in the starter switch is
turned to position1 or as soon as the
KEYLESS-GO start/stop button* is in
position1. The control system enables you
to:�
call up information about your vehicle
�
change vehicle settings.
For example, you can use the control sys-
tem to find out when your vehicle is next
due for service, to set the language for
messages in the instrument cluster dis-
play, and much more.
The control system relays information to
the multifunction display.
Multifunction display
1Segment ring
2Standard display
3Trip odometer
iThe displays for the audio systems (ra-
dio, CD player) will appear in English,
regardless of the language selected.
Warning!
G
A driver’s attention to the road and traffic
conditions must always be his / her primary
focus when driving.
For your safety and the safety of others, se-
lecting features through the multifunction
steering wheel should only be done by the
driver when traffic and road conditions per-
mit it to be done safely.
Bear in mind that at a speed of just 30 mph
(approximately 50 km / h), your vehicle is
covering a distance of 44 feet (approximate-
ly 13.5 m) every second.