Page 171 of 442
171 Controls in detail
Good visibility
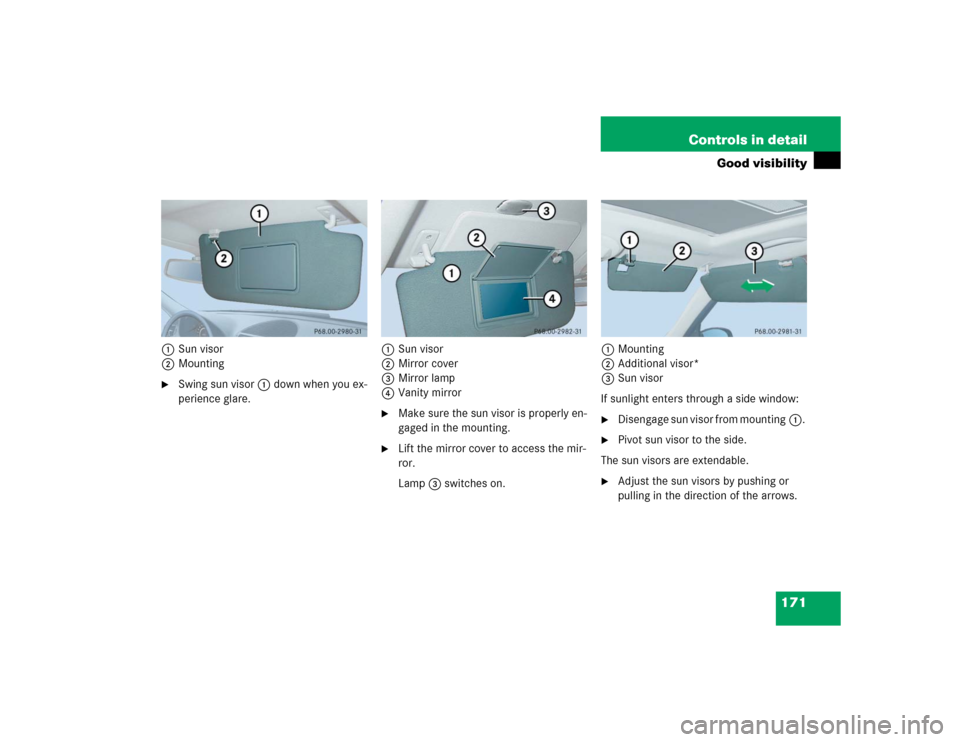
1Sun visor
2Mounting�
Swing sun visor1 down when you ex-
perience glare. 1Sun visor
2Mirror cover
3Mirror lamp
4Vanity mirror
�
Make sure the sun visor is properly en-
gaged in the mounting.
�
Lift the mirror cover to access the mir-
ror.
Lamp3 switches on.1Mounting
2Additional visor*
3Sun visor
If sunlight enters through a side window:
�
Disengage sun visor from mounting1.
�
Pivot sun visor to the side.
The sun visors are extendable.
�
Adjust the sun visors by pushing or
pulling in the direction of the arrows.
Page 172 of 442

172 Controls in detailGood visibilityRear window sunshade*
The switch is located in the center console.�
Turn the SmartKey to starter switch po-
sition 1 or 2. Vehicles with KEY-
LESS-GO*: press the start / stop
button once or twice.
�
Press the switch briefly at 1 to raise
the sunshade.
�
Press the switch briefly at 1 to lower
the sunshade.
Always raise the sunshade fully for its sup-
port against the window frame.
Roller sunblind* in the rear doors�
Pull the roller sunblind out using the
hooks.
�
Attach the hooks at the top.
iIf sunlight enters through a side win-
dow, disengage sun visor from
mounting1 and pivot to the side.
Mirror lamp3 will switch off.
Warning!
G
When operating the rear window sunshade,
be sure that there is no danger of anyone be-
ing harmed by the raising or lowering proce-
dure.
The raising or lowering procedure can be im-
mediately halted by briefly pressing
switch1. To reverse direction of move-
ment, press switch1 again.
Warning!
G
When leaving the vehicle, always remove the
SmartKey from starter switch, and lock your
vehicle. Do not leave children unattended in
the vehicle, or with access to an unlocked
vehicle. Unsupervised use of vehicle equip-
ment can cause an accident and / or serious
personal injury.
Page 173 of 442

173 Controls in detail
Good visibility
Rear window defroster
The rear window defroster uses a large
amount of power. To keep the battery
drain to a minimum, switch off the defrost-
er as soon as the rear window is clear. The
defroster is automatically deactivated af-
ter approximately 6 to 17 minutes of oper-
ation depending on the outside
temperature.
Activating�
Press buttonFon the climate con-
trol panel (
�page 173) or the automat-
ic climate control panel (
�page 176).
The indicator lamp on the button
comes on.Deactivating
�
Press buttonF again.
The indicator lamp on the button goes
out.
!Always guide the sunblind by hand. Do
not let it snap back, as the retractor
could be damaged.
Warning!
G
Any accumulation of snow and ice should be
removed from the rear window before driv-
ing. Visibility could otherwise be impaired,
endangering you and others.!If the rear window defroster switches
off too soon and the indicator lamp
starts flashing, this means that too
many electrical consumers are operat-
ing simultaneously and there is insuffi-
cient voltage in the battery. The system
responds automatically by deactivating
the rear window defroster.
As soon as the battery has sufficient
voltage, the rear window defroster au-
tomatically turns itself back on.
Page 176 of 442
176 Controls in detailClimate control
Item
1
Left-side temperature control
2
Windshield defroster
3
Increase air volume
4
Air distribution
5
Rear window defroster
6
Right-side temperature control
Item
7
Residual heat / ventilation
8
AC cooling on / off (AC
OFF
)
9
Air distribution display
a
Climate control on / off
b
Air volume display
c
Decrease air volume
Item
d
Air recirculation
e
Air distribution and air volume
(automatic, manual)
Page 177 of 442

177 Controls in detail
Climate control
The climate control is operational whenev-
er the engine is running. You can operate
the climate control system in either the au-
tomatic or manual mode. The system cools
or heats the interior depending on the se-
lected interior temperature and the cur-
rent outside temperature.Nearly all dust particles, pollutants and
odors are filtered out before outside air en-
ters the passenger compartment through
the air distribution system.
The air conditioning will not engage (no
cooling) if the AC
OFF
mode is selected
(
�page 182).
Warning!
G
When operating the automatic climate con-
trol, the air that enters the passenger com-
partment through the air vents in the
footwell can be very hot or very cold (de-
pending on the set temperature). This may
cause burns or frostbite to unprotected skin
in the immediate area of the air vents. Al-
ways keep sufficient distance between un-
protected parts of the body and the footwell
air vents. If necessary change the air flow
using the air distribution controls
(�page 176) to direct the air away from the
footwell air vents.
Warning!
G
Follow the recommended settings for heat-
ing and cooling given on the following pag-
es. Otherwise the windows could fog up,
impairing visibility and endangering you and
others.
iSevere conditions (e.g. strong air pollu-
tion) may require replacement of the fil-
ter before its scheduled interval. A
clogged filter will reduce the air volume
to the interior.
If the vehicle interior is hot, ventilate
the interior before driving off.
Keep the air intake grille in front of the
windshield free of snow and debris.
Do not obstruct air flow by placing ob-
jects on the air flow-through exhaust
slots below the rear window.
Page 178 of 442

178 Controls in detailClimate controlSetting the temperature
Use temperature controls1 and6 to
separately adjust the air temperature on
each side of the passenger compartment.
You should raise or lower the temperature
setting in small increments, preferably
starting at 72°F (22°C).
Increasing�
Turn the temperature control1 or6
slightly to the right.
The climate control system will corre-
spondingly adjust the interior air tem-
perature.Decreasing
�
Turn the temperature control1 or6
slightly to the left.
The climate control system will corre-
spondingly adjust the interior air tem-
perature.
Adjusting air distribution
Adjusting manually
Use air distribution control4
(�page 176) to adjust the air distribution.
�
Press the Ubutton.
The indicator lamp on the Ubutton
goes out.
�
Press air distribution rocker switch4
(�page 176) until the display shows
the desired setting.
The current air distribution appears in
the air distribution display9.
Adjusting automatically
�
Press the Ubutton.
The indicator lamp on the button
comes on. The air distribution and vol-
ume is adjusted automatically.
Symbol
Function
a
Directs air through the center,
side and rear passenger com-
partment air vents
Z
Directs air to the windows
X
Directs air into the entire
vehicle interior
Y
Directs air to the footwells
Page 180 of 442
180 Controls in detailClimate control�
Close center air vents.
�
Open left and right side air vents and
adjust side air vents upwards.
Deactivating
�
Press buttonP.
The indicator lamp on the button goes
out. Defrosting is turned off.
Air recirculation mode
Switch to air recirculation mode to prevent
unpleasant odors from entering the vehicle
from the outside. This setting cuts off the
intake of outside air and recirculates the
air in the passenger compartment.Activating
�
Press buttonO.
The indicator lamp on the button
comes on.
Warning!
G
When the outside temperature is below
41°F (5°C), only switch to air recirculation
mode for short periods to prevent window
fogging.
iThe air recirculation mode is activated
automatically at high outside tempera-
tures.
If you have turned off the air condition-
ing (
�page 182) or the outside
temperature is below 41°F (5°C), the
air recirculation mode will not switch
on automatically.
��
Page 181 of 442

181 Controls in detail
Climate control
Deactivating�
Press buttonO.
The indicator lamp on the button goes
out.
The air recirculation mode is deactivated
automatically:
�
after five minutes if the outside temper-
ature is below approximately 41°F
(5°C)
�
after five minutes if the air conditioning
is turned off
�
after 30 minutes if the outside temper-
ature is above approximately 41°F
(5°C)At outside temperatures above 79°F
(26°C), the system will not automatically
switch back to outside air. A quantity of
outside air is added after approximately
30 minutes.
Deactivating the climate control sys-
tem
Deactivating�
Press button M (
�page 176).
Reactivating
�
Press button M again(
�page 176).
or
�
Press any button on the climate control
panel (
�page 176).
Warning!
G
Never operate the windows and
sliding / pop-up roof* or panorama
sliding / pop-up roof* if there is the possibil-
ity of anyone being harmed by the opening
or closing procedure.
In case the procedure causes potential dan-
ger:
Vehicles with sliding/pop-up roof: The pro-
cedure for the windows can be immediately
halted by pressing or pulling the respective
window switch. The procedure for the slid-
ing/pop-up roof can be immediately halted
by moving the switch for the sliding/pop-up
roof in any direction.
The closing of the side windows and the slid-
ing/pop-up roof can be reversed by again
pressing and holding theO button.
Vehicles with panorama sliding/pop-up
roof: The procedure for the windows and
panorama sliding/pop-up roof can be imme-
diately halted by releasing theO button.
iIf you keep buttonO pressed, the
side windows and sliding / pop-up
roof* or panorama sliding / pop-up
roof* will return to their previous posi-
tion.