Page 100 of 442

100 Controls in detailLocking and unlocking�
Pull remote trunk lid switch1 until the
trunk begins to open.
The trunk lid opens automatically. The
indicator lamp in the switch comes on
and remains lit until the trunk is closed.The trunk can also be opened using the
SmartKey (
�page 90) or from its inside in
an emergency, see “Trunk lid emergency
release” (
�page 104).
Limiting opening height of trunk lid
The trunk lid opening height can be limited
when transporting goods on a roof rack
(e.g. presence of an MB sport luggage con-
tainer). When activated, the trunk lid opens
to approximately the height of the roof
edge.
You can activate the limiting opening
height of trunk lid using the control system
(
�page 150). Closing from the inside
�
Press the remote trunk lid switch
(�page 99) until the indicator lamp in
the switch goes out and the trunk lid is
closed.
To interrupt the closing procedure:
�
Release the remote trunk lid switch.
If the trunk lid comes into contact with an
object while closing (e.g. luggage that has
been piled too high), the closing procedure
is stopped and the trunk re-opens slightly.
!The trunk lid swings open upwards au-
tomatically. Always make sure there is
sufficient overhead clearance. To stop
the opening procedure, press or pull
the remote trunk lid switch.iIf the trunk lid does not open, it is still
locked separately (if applicable)
(�page 105).
If the vehicle was previously centrally
locked, the trunk lid will lock automati-
cally when closed (
�page 99). The
turn signals will flash three times to
confirm locking.
Warning!
G
Maintain sight of trunk area while operating
the door mounted switch. Monitor the clos-
ing procedure carefully to ensure that no
one is in danger of being injured.
To interrupt the closing procedure, release
the door mounted remote trunk lid switch.
Page 101 of 442

1Trunk lid closing switch�
Press trunk lid closing switch1 brief-
ly.
The trunk lid clos")
101 Controls in detail
Locking and unlocking
Closing the trunk from the outside
(vehicles without KEYLESS-GO*)
1Trunk lid closing switch�
Press trunk lid closing switch1 brief-
ly.
The trunk lid closes.When closing, if the trunk lid comes into
contact with an object (e.g. luggage that
has been piled too high), the closing proce-
dure is stopped and the trunk re-opens
slightly.
iDo not place the SmartKey in the open
trunk. You may lock yourself out.Warning!
G
Only drive with the trunk closed as, among
other dangers such as visibility blockage,
exhaust fumes may enter the vehicle
interior.
Warning!
G
Monitor the closing procedure carefully to
ensure that no one is in danger of being in-
jured. To prevent possible personal injury,
always keep hands and fingers away from
the trunk opening when closing the trunk.
Be especially careful when small children
are around. To stop the closing procedure,
press the remote trunk lid switch (on the
driver’s door), the trunk lid closing
switch1 or the Š button on the Smart-
Key.
When leaving the vehicle, always remove the
SmartKey from the starter switch, take the
SmartKey you, and lock your vehicle. Do not
leave children unattended in the vehicle, or
with access to an unlocked vehicle. Unsu-
pervised use of vehicle equipment may
cause an accident and/or serious personal
injury.
Page 102 of 442

1Trunk lid closing switch�
Make sure you have the SmartKey with
KEYLESS-GO with you.
�
Press")
102 Controls in detailLocking and unlockingClosing the trunk from the outside
(vehicles with KEYLESS-GO*)
1Trunk lid closing switch�
Make sure you have the SmartKey with
KEYLESS-GO with you.
�
Press trunk lid closing switch1 brief-
ly.
The trunk lid closes.If the trunk lid comes into contact with an
object while closing (e.g. luggage that has
been piled too high), the closing procedure
is stopped and the trunk re-opens slightly.
iTo prevent a possible inadvertent lock-
out, the trunk lid will open automatical-
ly if a SmartKey with KEYLESS-GO is
recognized inside the vehicle or in the
trunk.Warning!
G
Only drive with the trunk closed as, among
other dangers such as visibility blockage,
exhaust fumes may enter the vehicle
interior.
Warning!
G
Monitor the closing procedure carefully to
ensure that no one is in danger of being in-
jured. To prevent possible personal injury,
always keep hands and fingers away from
the trunk opening when closing the trunk.
Be especially careful when small children
are around. To stop the closing procedure,
press the remote trunk lid switch (on the
driver’s door), the trunk lid closing
switch1 or the Š button on the Smart-
Key with KEYLESS-GO.
When leaving the vehicle, always remove the
SmartKey from the starter switch, take the
SmartKey with KEYLESS-GO with you, and
lock your vehicle. Do not leave children un-
attended in the vehicle, or with access to an
unlocked vehicle. Unsupervised use of vehi-
cle equipment may cause an accident
and/or serious personal injury.
Page 103 of 442

1KEYLESS-GO* locking/closing switch
You can close the trunk lid")
103 Controls in detail
Locking and unlocking
Closing the trunk and locking the vehi-
cle from the outside (vehicles with KEY-
LESS-GO*)
1KEYLESS-GO* locking/closing switch
You can close the trunk lid and lock the ve-
hicle simultaneously.
�
Make sure you have the SmartKey with
KEYLESS-GO with you.
�
Press switch1 briefly.
The vehicle is locked and the trunk lid
closes automatically. The turn signals
flash three times to confirm locking.
If the trunk lid comes into contact with an
object while closing (e.g. luggage that has
been piled too high), the closing procedure
is stopped and the trunk re-opens slightly.iTo prevent a possible inadvertent lock-
out, the trunk lid will open automatical-
ly if a SmartKey with KEYLESS-GO is
recognized inside the vehicle or in the
trunk.
Warning!
G
Monitor the closing procedure carefully to
ensure that no one is in danger of being in-
jured. To prevent possible personal injury,
always keep hands and fingers away from
the trunk opening when closing the trunk.
Be especially careful when small children
are around. To stop the closing procedure,
press the remote trunk lid switch (on the
driver’s door), the trunk lid closing
switch1, the Š button on the SmartKey
with KEYLESS-GO or the remote trunk lid
opening switch (located on the driver’s
door).
When leaving the vehicle, always remove the
SmartKey from the starter switch, take the
SmartKey with KEYLESS-GO* with you, and
lock your vehicle. Do not leave children un-
attended in the vehicle, or with access to an
unlocked vehicle. Unsupervised use of vehi-
cle equipment may cause an accident
and/or serious personal injury.
Page 110 of 442
110 Controls in detailSeatsRear seat head restraints
Folding head restraints back with
switch in the center console
The rear seat head restraints can be folded
backward for increased visibility.
1Head restraint release switch
�
Make sure the ignition is switched on.
All the lights in the instrument cluster
come on.
�
Press the symbol-side on rocker
switch1to release the head re-
straints.
The head restraints will fold backward.Placing head restraints upright
�
Pull the head restraint forward until it
locks into position.
!The rear seat head restraints cannot be
adjusted.
Warning!
G
For safety reasons, always drive with the
rear head restraints in the upright position
when the rear seats are occupied.
Keep the area around head restraints clear
of articles (e.g. clothing) to not obstruct the
folding operation of the head restraints.
!Make sure the head restraints engage
when placing them upright. Otherwise
their protective function cannot be as-
sured.
Page 120 of 442
.
Automatic headlamp mode
The parki")
120 Controls in detailLighting
Manual headlamp mode
The low beam headlamps and parking
lamps can be switched on and off with the
exterior lamp switch (
�page 119).
Automatic headlamp mode
The parking lamps, low beam headlamps
and license plate lamps switch on and off
automatically depending on the brightness
of the ambient light.
�
Turn the exterior lamp switch to U.
iIf you remove the SmartKey and open
the driver’s door while the parking
lamps or low beam headlamps are
switched on, then �
a warning sounds
�
$ appears in the multifunction
display
�
the message
Switch off lights!
appears in the multifunction display
iWith the daytime running lamp mode
activated and the engine running, the
low beam headlamps cannot be
switched off manually.
Warning!
G
If the exterior lamp switch is set toU,�
the headlamps may switch off unexpect-
edly when the system senses bright am-
bient light, for example light from
oncoming traffic.
�
the headlamps will not be automatically
switched on under foggy conditions.
To minimize risk to you and to others, acti-
vate headlamps by turning exterior lamp
switch to B when driving or when traffic
and / or ambient lighting conditions require
you to do so.
In low ambient lighting conditions, only
switch from position U to B with the
vehicle at a standstill. Switching from U
to B will briefly switch off the head-
lamps. Doing so while driving in low ambient
lighting conditions may result in an acci-
dent.
The automatic headlamp feature is only an
aid to the driver. The driver is responsible for
the operation of the vehicle's lights at all
times.
Page 122 of 442

122 Controls in detailLightingSwitching on fog lamps
Switching on front fog lamps
�
Make sure the low beam headlamps
are switched on.
�
Pull out exterior lamp switch to first
stop.
The green indicator lamp‡ in the
lamp switch comes on.Switching on rear fog lamps
�
Make sure the low beam headlamps
are switched on.
�
Pull out exterior lamp switch to second
stop.
The yellow indicator lamp† in the
lamp switch comes on.
Warning!
G
In low ambient lighting or foggy conditions,
only switch from position U to B with
the vehicle at a standstill. Switching from
U to B will briefly switch off the head-
lamps. Doing so while driving in low ambient
lighting conditions may result in an acci-
dent.iFog lamps will operate with the parking
lamps and / or the low beam head-
lamps on. Fog lamps should only be
used in conjunction with low beam
headlamps. Consult your State or Prov-
ince Motor Vehicle Regulations regard-
ing allowable lamp operation.
iThe front fog lamps and rear fog lamp
cannot be switched on manually with
exterior lamp switch in positionU.
To activate the fog lamps, turn exterior
lamp switch to positionB and pull
the exterior lamp switch to first or sec-
ond stop (
�page 119).
Page 123 of 442
123 Controls in detail
Lighting
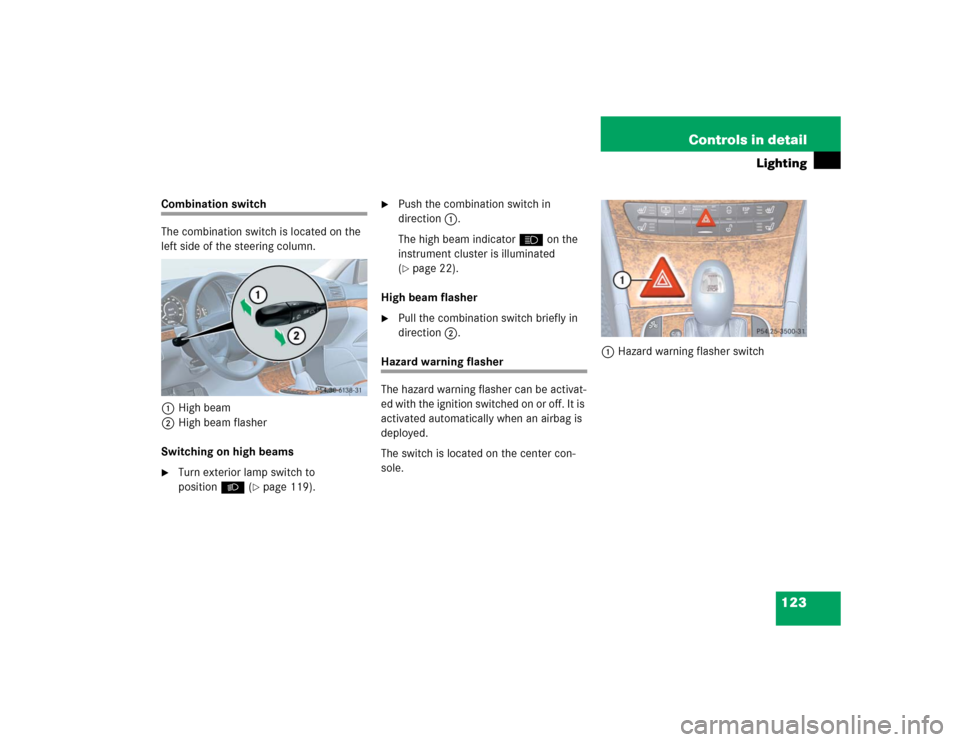
Combination switch
The combination switch is located on the
left side of the steering column.
1High beam
2High beam flasher
Switching on high beams�
Turn exterior lamp switch to
positionB (
�page 119).
�
Push the combination switch in
direction1.
The high beam indicatorA on the
instrument cluster is illuminated
(�page 22).
High beam flasher
�
Pull the combination switch briefly in
direction2.
Hazard warning flasher
The hazard warning flasher can be activat-
ed with the ignition switched on or off. It is
activated automatically when an airbag is
deployed.
The switch is located on the center con-
sole.1Hazard warning flasher switch