Page 123 of 442
123 Controls in detail
Lighting
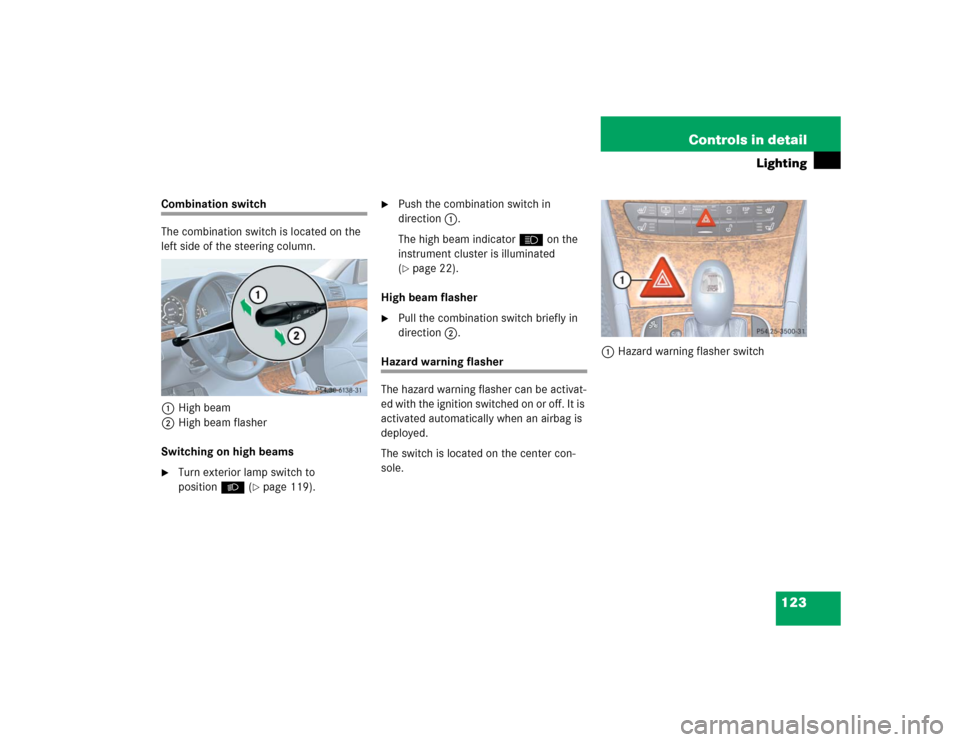
Combination switch
The combination switch is located on the
left side of the steering column.
1High beam
2High beam flasher
Switching on high beams�
Turn exterior lamp switch to
positionB (
�page 119).
�
Push the combination switch in
direction1.
The high beam indicatorA on the
instrument cluster is illuminated
(�page 22).
High beam flasher
�
Pull the combination switch briefly in
direction2.
Hazard warning flasher
The hazard warning flasher can be activat-
ed with the ignition switched on or off. It is
activated automatically when an airbag is
deployed.
The switch is located on the center con-
sole.1Hazard warning flasher switch
Page 146 of 442

146 Controls in detailControl systemLighting submenu
Access the
Lighting
submenu via the
Set-
tings
menu. Use the
Lighting
submenu
to change the lamp and lighting settings on
your vehicle. The following functions are
available:Setting daytime running lamp mode
(USA only)
�
Move the selection marker with
theæ orç button to the Lighting
submenu.
�
Press buttonj ork repeatedly
until you see this message in the dis-
play:
Lamp circuit headlamp
.
The selection marker is on the current
setting.
�
Pressæ orç to select
manual
or
daytime running lamp (
constant
)
mode. This function is not available in
countries where daytime running
lamps are mandatory.With daytime running lamp mode se-
lected and the exterior lamp switch at
position 0, the following lamps will
come on automatically when the en-
gine is turned on:
�
Parking lamps and low beam head-
lamps
�
License plate lamps (in low ambient
light conditions)
Function
Page
Set daytime running lamp mode
(USA only)
146
Set locator lighting
147
Ambient light level
147
Exterior lamps delayed shut-off
148
Interior lighting delayed shut-off
149
iIf you turn the exterior lamp switch to
another position, the corresponding
lamp(s) will switch on.
For safety reasons, resetting the Lighting
submenu to factory settings
(
�page 138) while driving will not re-
set the daytime running lamp mode.
In the display you will then see the mes-
sage:
Lighting
Page 338 of 442

338 Practical hintsWhat to do if …Display symbol
Display messages
Possible cause
Possible solution
.
High beam,
left
The left high beam lamp is malfunction-
ing.
�
Replace the bulb as soon as possible.
High beam,
right
The right high beam lamp is malfunction-
ing.
�
Replace the bulb as soon as possible.
License plate lamp,
left
The left license plate lamp is malfunction-
ing.
�
Replace the bulb as soon as possible.
License plate lamp,
right
The right license plate lamp is malfunc-
tioning.
�
Replace the bulb as soon as possible.
Lamp sensor
Visit workshop!
The lamp sensor is malfunctioning. The
headlamps switch on automatically.
�
In the control system, set lamp opera-
tion to manual mode (
�page 146).
�
Switch on headlamps using the exteri-
or lamp switch.
Low beam, left
The left low beam lamp is malfunctioning.
�
Visit an authorized Mercedes-Benz
Center as soon as possible.
Low beam, right
The right low beam lamp is malfunction-
ing.
�
Visit an authorized Mercedes-Benz
Center as soon as possible.
Page 359 of 442

359 Practical hints
Replacing bulbs
�Replacing bulbs
Safe vehicle operation depends on proper
exterior lighting and signaling. It is there-
fore essential that all bulbs and lamp as-
semblies are in good working order at all
times.
Correct headlamp adjustment is extremely
important. Have headlamps checked and
readjusted at regular intervals and when a
bulb has been replaced. See your autho-
rized Mercedes-Benz Center for headlamp
adjustment.
Bulbs Front lamps
iBackup bulbs will be brought into use
when the following lamps malfunction:�
Standing lamps
�
Tail lamps
Lamp
Type
1
Additional turn signal
lamps
LED
2
Turn signal lamp
1156 NA
3
Side marker lamp
W 5 W
4
Halogen headlamps:
Low beam
Bi-Xenon* headlamps:
Low and high beam
1
1Vehicles with Bi-Xenon headlamps* do not replace
the Bi-Xenon bulbs yourself.
H7 (55 W)
D2S-35 W
5
Halogen headlamps:
High beam/high beam
flasher
Bi-Xenon* headlamps:
High beam flasher
H7 (55 W)
H7 (55 W)
Parking and standing
lamps
W 5 W
6
Fog lamp
H1 (55 W)
Page 361 of 442
361 Practical hints
Replacing bulbs
Replacing bulbs for front lamps
1Bulb socket for turn signal lamp
2High beam halogen bulb
3Bulb socket for parking and standing
lamp
4Cover for Bi-Xenon* (low beam and
high beam) or halogen (low beam)
headlampBi-Xenon* headlamps Low beam halogen bulb
�
Switch off the lights.
�
Open the hood (
�page 281).
�
Turn the locking mechanism counter-
clockwise and remove headlamp
cover4.
�
Pull electrical connector off.
�
Release the retaining springs and take
out the bulb.
�
Insert the new bulb in the socket so
that the base is in the recess on the
lower left.
�
Attach the retaining springs.
�
Insert connector into the bulb.
�
Align headlamp cover and click into
place.
Warning!
G
Do not remove the cover4 for the Bi-Xe-
non headlamp. Because of high voltage in
Xenon lamps, it is dangerous to replace the
bulb or repair the lamp and its components.
We recommend that you have such work
done by a qualified technician.
Page 362 of 442
.
�
Press the clamp and remove headlamp
cover.
�
Pull electrical connector off.
�
Turn th")
362 Practical hintsReplacing bulbsHigh beam halogen bulb �
Switch off the lights.
�
Open the hood (
�page 281).
�
Press the clamp and remove headlamp
cover.
�
Pull electrical connector off.
�
Turn the locking mechanism counter-
clockwise and take out the high beam
bulb2.
�
Insert the new bulb in the socket so
that the base is in the recess on the
lower left.
�
Attach the retaining springs.
�
Insert connector into the bulb.
�
Align headlamp cover and click into
place.Front turn signal lamp bulb
�
Switch off the lights.
�
Open the hood (
�page 281).
�
Twist bulb socket 1 counterclockwise
and pull out.
�
Push bulb into socket, turn counter-
clockwise and remove.
�
Insert new bulb in socket, push in and
twist clockwise.
�
Reinsert bulb socket in lamp and twist
clockwise.Parking and standing lamp bulb
�
Switch off the lights.
�
Open the hood (
�page 281).
�
Press the clamp and remove headlamp
cover.
�
Pull out the bulb socket3 with the
bulb.
�
Pull the bulb out of the bulb socket.
�
Insert a new bulb in the socket.
�
Reinstall the bulb socket.
�
Align headlamp cover and click into
place.
Page 411 of 442

Prevents the wheels from locking up
during braking so that the vehicle can
continue to be steered.
ADS
(A
daptive D
amping S
ystem)
Automatically a")
411 Technical terms
ABS
(A
ntilock B
rake S
ystem)
Prevents the wheels from locking up
during braking so that the vehicle can
continue to be steered.
ADS
(A
daptive D
amping S
ystem)
Automatically adapts the optimum sus-
pension damping to prevailing driving
conditions.
Airmatic DC
(A
irmatic D
ual C
ontrol)
Automatically selects the optimum sus-
pension tuning and ride height for your
vehicle. Airmatic consists of two com-
ponents:
�
Adaptive Damping System
�
Vehicle level control
Alignment bolt
Metal pin with thread. The centering
pin is an aid used when changing a tire
to align the wheel with the wheel hub.BabySmart
TM airbag deactivation
system
This system detects if a special system
compatible child restraint seat is in-
stalled on the front passenger seat. The
system will automatically deactivate
the passenger front airbag when such a
seat is properly installed
(PASSENGER AIRBAG OFF indicator
lamp located in the center console
comes on). See your authorized
Mercedes-Benz Center for availability.
BabySmartTM compatible child seats
Special restraint system for children.
The sensor system for the passenger
seat prevents deployment of the pas-
senger front airbag if a BabySmart
TM
compatible child seat is installed.
BAS
(B
rake A
ssist S
ystem)
System for potentially reducing braking
distances in emergency braking situa-
tions. The system is activated when it
senses an emergency based on how
fast the brake is applied.Bi-Xenon headlamps*
Headlamps which use an electric arc as
a light source and produce a more in-
tense light than filament headlamps.
Bi-Xenon headlamps produce low
beam and high beam.
CAC
(C
ustomer A
ssistance C
enter)
Mercedes-Benz customer service cen-
ter which can help you with any ques-
tions about your vehicle and provide
assistance in the event of a break-
down.
CAN system
(C
ontroller A
rea N
etwork)
Data bus network serving to control ve-
hicle functions such as door locking or
windshield wiping.
Cockpit
All instruments, switches, buttons and
indicator/warning lamps in the passen-
ger compartment needed for vehicle
operation and monitoring.
Page 417 of 442

417 Index
A
ABS 74, 411
ABS control 75
Malfunction indicator lamp 310
Messages in display 319
Warning lamp 310
Accelerator position, automatic
transmission 164
Accident
In case of 50
Activating
Air conditioning (cooling) 182, 194
Air recirculation mode 180, 191
Anti-theft alarm system 84
Automatic climate control 186
Central locking (control system) 149
Charcoal filter 192
Climate control 176
Defrosting 179
Distance warning function* 223
Distronic* 219
Easy-entry/exit feature* 150
ESP 79
Exterior headlamps 47
Exterior lamps 120Front fog lamps 122
Hazard warning flasher 124
Headlamps 47
High beams 123
Ignition 31
Ignition with KEYLESS-GO* 33
Immobilizer 53, 83
Rear fog lamp 121, 122
Rear window defroster 173
Residual heat 182, 194
Seat heater* 113
Tow-away alarm 85
Windshield wipers 48
Adding
Engine oil 284
Additional turn signal 359
Adjustable air vents, rear passenger
compartment 195
Adjusting 34
Air distribution 178, 189
Air volume 178, 179, 190
Backrest tilt 36
Exterior rear view mirror 38
Head restraint height 36
Head restraint tilt 36Instrument cluster illumination 126
Interior rear view mirror 38
Mirrors 38
Multicontour seat* 111
Seat cushion depth 111
Seat cushion tilt 36
Seat fore and aft adjustment 35
Seat height 36
Seats 34
Steering column height 37
Steering wheel 37
Adjusting steering column in or out 37
Adjusting steering column up or down 37
Adjusting the dynamic seat 153
Air conditioning (cooling)
Turning off 182, 194
Turning on 182, 194
Air distribution
Adjusting 178, 189
Air pressure see Tire inflation
pressure 290
Air recirculation mode 180, 191
Activating 180, 191
Deactivating 181, 192