Page 300 of 442

300 OperationMaintenanceSetting the date for special works
You can enter appointments for exhaust
gas analysis and general inspection over
FSS PLUS.�
Switch ignition on.
The standard display of the control sys-
tem appears (
�page 129).
�
Press buttonk orj on the mul-
tifunction steering wheel until the
FSS PLUS indicator appears in the mul-
tifunction display.
�
Press the reset button (
�page 22) for
about five seconds.
The
SERVICE MENU
appears in the multi-
function display.
�
Select the
SPECIAL WORK
menu with the
+ or - button.
�
Press the ÿ button.
The service indicator now displays the SPECIAL WORK
menu.
�
Select the
EXH.-GAS ANALYSIS
or
GEN-
ERAL INSPECTION
menu with the +
or - button.
�
Press the ÿ button.
The service indicator now displays the NEXT DUE DATE
menu.
�
Select the
MONTH a
nd
YEAR
with the
+ or - button.
�
Press buttonk orj on the mul-
tifunction steering wheel to set the
month and year.
�
Select CONFIRM DEADLINE with the
+ or - button.
�
Press the ÿ button.
The new date is set.
Page 301 of 442

301 Operation
Maintenance
�
Press theè button on the multi-
function steering wheel until the stan-
dard display appears in the
multifunction display.
FSS PLUS now recalculates the values.
You cannot call up the service display or
the service menu during this time.
Calling up the service data information
FSS PLUS shows the service type (letters
A-H) in the multifunction display approxi-
mately one month before the service ap-
pointment is due in miles (distance
criterion) or in days (time criterion).
This service type is based on the service
items to be carried out. The service items
are described in the Service Booklet.
The service items to be carried out under
the corresponding service type can be dis-
played in the multifunction display.Calling up the service item menu
�
Switch ignition on.
The standard display of the control sys-
tem appears (
�page 134).
�
Press buttonk orj on the mul-
tifunction steering wheel until the
FSS PLUS indicator appears in the mul-
tifunction display.
�
Press the reset button (
�page 22) for
about five seconds.
The
SERVICE MENU
appears in the multi-
function display (�page 134).
�
Select the
ITEMS
menu with the +
or - button.
�
Press the ÿ button.The service indicator now displays the
ITEMS
menu.
�
Press button è on the multifunction
steering wheel until the standard
display appears in the multifunction
display.iThe service items to be carried out are
shown in this menu.
Please refer to the Service Booklet for
a description of each service item.
Page 318 of 442

318 Practical hintsWhat to do if …Messages in the display
The control system shows warning and
malfunction messages in the multifunction
display.
Certain warning and malfunction messag-
es are accompanied by an audible signal.
Address these messages accordingly and
follow the additional instructions given in
this Operator’s Manual.
Selecting the malfunction memory menu in
the control system (
�page 129) displays
both cleared and uncleared messages.
High-priority messages appear in the mul-
tifunction display in red color.
Certain messages of high priority cannot
be cleared from the multifunction display
using the reset button.Other messages of high priority and mes-
sages of less immediate priority can be
cleared from the multifunction display us-
ing the reset button (
�page 22) and are
then stored in the malfunction message
memory (
�page 137).
On the pages that follow, you will find a
compilation of the most important warning
and malfunction messages that may ap-
pe ar i n the di spl ay . High pr iori ty m es sa ge s
appear on a red background.
Warning!
G
All categories of messages contain impor-
tant information which should be taken note
of and, where a malfunction is indicated, ad-
dressed as soon as possible at an autho-
rized Mercedes-Benz Center.
Failure to repair condition noted may cause
damage not covered by the Mercedes-Benz
Limited Warranty, or result in property dam-
age or personal injury.
Warning!
G
No messages will be displayed if either the
instrument cluster or the multifunction dis-
play is inoperative.
Contact your nearest authorized
Mercedes-Benz Center.iTurning the SmartKey in the starter
switch to position2, or pressing the
KEYLESS-GO* start / stop button twice
to position2 causes all lamps as well
as the multifunction display to come
on. Ensure that they are all in working
order before starting your journey.
Page 323 of 442

323 Practical hints
What to do if …
Display
Display message
Possible cause
Possible solution
ESP
not available!
See Operator’s Manual
The ESP is deactivated because of a
malfunction or interrupted power
supply.
The SBC brake system is still func-
tioning normally.
�
Synchronize the ESP. With the vehicle sta-
tionary, turn the steering wheel completely
to the left and then to the right to synchro-
nize the ESP.
If the ESP message does not go out:
�
Continue driving with added caution.
�
Visit an authorized Mercedes-Benz Center
as soon as possible.
Failure to follow these instructions increases
the risk of accident.
P
Gear selector lever in P
You have turned off the engine with
the KEYLESS-GO* start / stop but-
ton* and opened the driver’s door.
�
Place the gear selector lever in positionP.
P/N
Shift to N or P
You have attempted to start the en-
gine with the KEYLESS-GO*
start/stop button while the gear se-
lector lever was in positionR orD.
�
Place the gear selector lever in positionP or
N.
Page 341 of 442
341 Practical hints
What to do if …
Display symbol
Display messages
Possible cause
Possible solution
H
Tire pres. monitor
not activated!
The tire inflation pressure monitor* is un-
able to monitor the tire pressure due to�
the presence of several wheel sensors
in the vehicle.
�
excessive wheel sensor tempera-
tures.
�
a nearby radio interference source.
�
unrecognized wheel sensors mount-
ed.
�
Check the tire pressure at the next
service station.
Tire pres. monitor
Pres. display after
driving a few mins. Re-
activate using R button
The tire pressure is being checked.
Warning!
G
Do not drive with a flat tire. A flat tire affects
the ability to steer or brake the vehicle.
You may lose control of the vehicle. Contin-
ued driving with a flat tire will cause exces-
sive heat build-up and possibly a fire.
Page 346 of 442

346 Practical hintsWhat to do if …Display symbol
Display messages
Possible cause
Possible solution
L
Tele Aid defective
Visit workshop!
One or more main functions of the Tele
Aid system are malfunctioning.
�
Have the Tele Aid system checked by
an authorized Mercedes-Benz Center.
Tele Aid battery
Visit workshop!
The emergency power battery for the Tele
Aid system is malfunctioning. If the vehi-
cle battery is also dead, Tele Aid will not
be operational.
�
Have the Tele Aid system checked by
an authorized Mercedes-Benz Center.
1
Restraint system
malfunction
Visit workshop!
The system is malfunctioning.
�
Drive with added caution to the near-
est authorized Mercedes-Benz Cen-
ter.
t
Function
Not available!
This display appears if button t or
s on the multifunction steering wheel
is pressed and the vehicle is not equipped
with a telephone.
Warning!
G
In the event a malfunction of the SRS is indi-
cated as outlined above, the SRS may not be
operational.
For your safety, we strongly recommend
that you visit an authorized Mercedes-Benz
Center immediately to have the system
checked; otherwise the SRS may not be ac-
tivated when needed in an accident, which
could result in serious or fatal injury, or it
might deploy unexpectedly and unnecessar-
ily which could also result in injury.
Page 353 of 442
353 Practical hints
Unlocking / locking in an emergency
�Unlocking / locking in an emergency
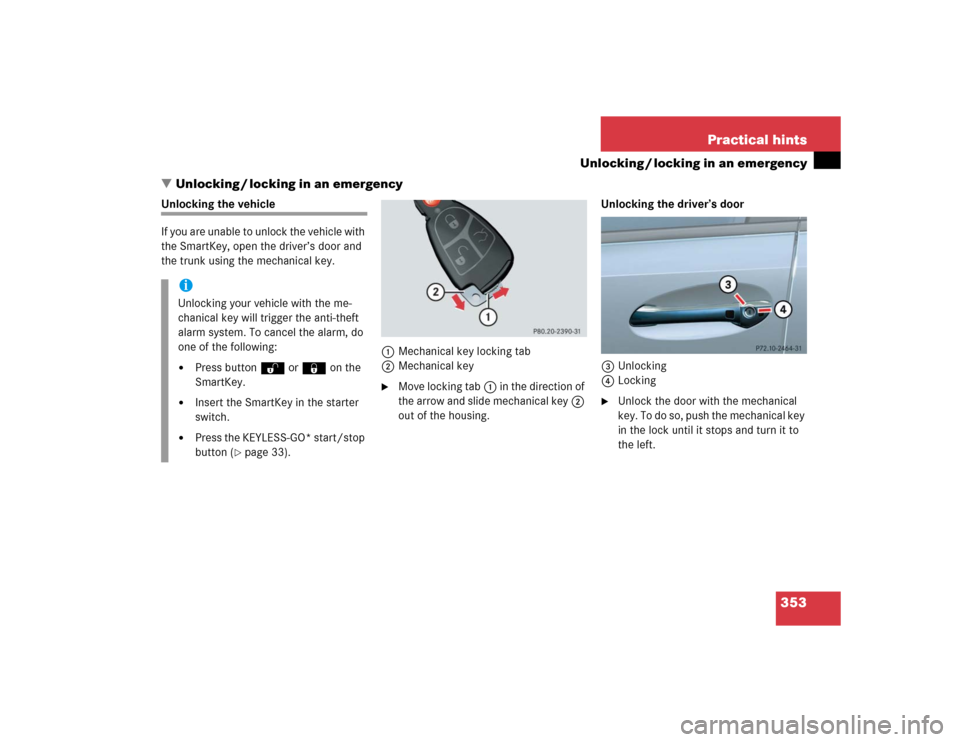
Unlocking the vehicle
If you are unable to unlock the vehicle with
the SmartKey, open the driver’s door and
the trunk using the mechanical key.
1Mechanical key locking tab
2Mechanical key
�
Move locking tab1 in the direction of
the arrow and slide mechanical key2
out of the housing.Unlocking the driver’s door
3Unlocking
4Locking
�
Unlock the door with the mechanical
key. To do so, push the mechanical key
in the lock until it stops and turn it to
the left.
iUnlocking your vehicle with the me-
chanical key will trigger the anti-theft
alarm system. To cancel the alarm, do
one of the following:�
Press button Œ or ‹ on the
SmartKey.
�
Insert the SmartKey in the starter
switch.
�
Press the KEYLESS-GO* start/stop
button (
�page 33).
Page 354 of 442
 is required to open the trunk lid.
If you are unable to unlock the trunk with")
354 Practical hintsUnlocking / locking in an emergencyUnlocking the trunk
A minimum height clearance of 5.90 ft
(1.80 m) is required to open the trunk lid.
If you are unable to unlock the trunk with
the SmartKey or KEYLESS-GO*, open the
trunk with the mechanical key.
The handle is located above the rear li-
cense plate recess.
1Unlocking in an emergency
2Handle�
Insert the mechanical key into the
trunk lid lock.
�
Turn the mechanical key counterclock-
wise to position1 and hold it in this
position.
�
Pull trunk lid handle2 and lift the
trunk lid.
Locking the vehicle
If you are unable to lock the vehicle with
the SmartKey, lock it with the mechanical
key as follows:�
Close the passenger doors and the
trunk.
�
Press the central locking switch in the
cockpit (
�page 107).
�
Check to see whether the locking
knobs on the passenger doors are still
visible. If necessary, push them down
manually.
�
Slide mechanical key2 out of the
SmartKey.
�
Lock the driver’s door with the me-
chanical key (
�page 354).
�
Check if the trunk is locked. If neces-
sary lock the trunk with the mechanical
key (if appilcable) (
�page 105).
!Always make sure there is sufficient
overhead clearance.iUnlocking your vehicle with the me-
chanical key will trigger the anti-theft
alarm system. To cancel the alarm, do
one of the following:�
Press buttonŒ or‹ on the
SmartKey.
�
Insert the SmartKey in the starter
switch.
Vehicles with KEYLESS-GO*:
�
Grasp the outside door handle.
�
Press the start /stop button.