Page 363 of 442

363 Practical hints
Replacing bulbs
Side marker lamp bulb�
Switch off the lights.
�
Carefully slide lamp towards front.
�
Remove rear end first.
�
Twist bulb socket counterclockwise
and pull out.
�
Pull bulb out of the bulb socket.
�
Insert new bulb in socket.
�
Reinstall bulb socket, push in and twist
clockwise.
�
To reinstall lamp, set rear end in
bumper and let front end snap into
place.
Replacing bulbs for rear lamps
Tail lamp assemblies
The tail lamps are equipped with HiP bulbs.License plate lamp
1Screw
�
Switch off the lights.
�
Loosen both screws1 and remove
lamp.
�
Replace the tubular lamp and reinstall
lamp.
�
Retighten the screws.
!To prevent scratches, we recommend
that you have the sidemarker bulb re-
placed by an authorized
Mercedes-Benz Center.Warning!
G
The bulbs in the tail lamps cannot be re-
placed individually. The tail lamp bulbs are
under pressure and could explode during an
attempt to replace them.
If the tail lamps are malfunctioning, have
them exchanged at an authorized
Mercedes-Benz Center.
Page 368 of 442

368 Practical hintsFlat tire�
Unscrew the valve cap from tire
valve7.
�
Screw filler hosea onto tire valve7.
�
Insert electrical plug4 into vehicle
cigarette lighter socket.
�
Turn SmartKey in starter switch to
position1 (
�page 31).
or
�
Press the KEYLESS-GO* start / stop
button (
�page 33) on the selector le-
ver once. Do not depress brake pedal.
�
Press I on electric air pump switch8.
The electric air pump should now
switch on and inflate the tire.After five minutes, the pressure gauge
must display at least 26 psi (1.8 bar). The
air hose can become hot during inflation.
Please exercise appropriate caution.
�
If this tire pressure is not attained, turn
off the electric air pump, detach the fill-
er hose from the tire valve, and drive
vehicle back and forth very slowly ap-
proximately 30 ft (10 m).
This serves to better distribute the
TIREFIT sealant material inside the tire.
�
Unscrew the air pump’s air hose5
from flange6 of the TIREFIT contain-
er.
�
Screw air hose5 onto tire valve7.
Inflate the tire again.
�
After attaining a tire pressure of 26 psi
(1.8 bar), press 0 on electric air pump
switch8.
The electric air pump should now be
switched off.
iIf sealant has leaked out, let it dry. You
can then peel it off.
!Do not operate the electric air pump
longer than eight minutes without in-
terruption. Otherwise it may overheat.
You may operate the air pump again af-
ter it has cooled off.
Warning!
G
If a tire pressure of 26 psi (1.8 bar) is not at-
tained, tire is too severely damaged for
TIREFIT to provide a reliable tire repair.
In this case, TIREFIT cannot properly seal
the tire.
Do not drive the vehicle.
Contact the nearest Mercedes-Benz Center
or call Roadside Assistance.
Page 372 of 442
 as seen from the
side, even if the vehicle is parked on")
372 Practical hintsFlat tireMake sure the foot of the jack is directly
under the take-up bracket so that it is al-
ways vertical (plumb-line) as seen from the
side, even if the vehicle is parked on an in-
cline�
Turn crank3 until the tire is a maxi-
mum of 1.2 in (3 cm) off the ground.
Never start engine while vehicle is
raised.Removing the wheel
1Alignment bolt
�
Unscrew the upper-most wheel bolt
and remove.
�
Replace this wheel bolt with alignment
bolt1 supplied in the tool kit.
�
Remove the remaining bolts.
�
Remove the wheel.
Warning!
G
Position the jack only on the jack take-up
brackets designed for this purpose.
If the jack is not properly positioned, the ve-
hicle may slip off of the jack.Warning!
G
The jack is intended only for lifting the vehi-
cle briefly for wheel changes. It is not suited
for performing maintenance work under the
vehicle. Never lie down under the raised ve-
hicle. Do not start the engine when the vehi-
cle is raised.
!Do not place wheel bolts in sand or dirt.
This could result in damage to the bolt
and wheel hub threads.
Page 373 of 442

373 Practical hints
Flat tire
Mounting the Minispare wheel�
Clean contact surfaces of wheel and
wheel hub.
�
Guide the spare wheel onto the align-
ment bolt and push it on.
�
Insert wheel bolts and tighten them
slightly.
�
Unscrew the alignment bolt, install last
wheel bolt and tighten slightly.
!To avoid paint damage, place wheel flat
against hub and hold it there while in-
stalling first wheel bolt.
Warning!
G
Always replace wheel bolts that are dam-
aged or rusted.
Never apply oil or grease to wheel bolts.
Damaged wheel hub threads should be re-
paired immediately. Do not continue to drive
under these circumstances! Contact an au-
thorized Mercedes-Benz Center or call
Roadside Assistance.
Incorrect wheel bolts or improperly tight-
ened wheel bolts can cause the wheel to
come off. This could cause an accident. Be
sure to use the correct wheel bolts.
Warning!
G
Use only genuine equipment
Mercedes-Benz wheel bolts. They are identi-
fied by the Mercedes star. Other wheel bolts
may come loose.
Do not tighten the wheel bolts when the ve-
hicle is raised. Otherwise the vehicle could
tip over.
Page 376 of 442

376 Practical hintsBatteries
Disconnecting the battery�
Depress parking brake firmly or move
gear selector lever to positionP.
�
Turn off all electrical consumers.
�
Remove SmartKey from starter switch.
Vehicles with KEYLESS-GO*:�
Press the start / stop button until
the engine shuts off.
�
Open the driver’s door.
�
Open the trunk.
!Never loosen or detach battery termi-
nal clamps while the engine is running
or the SmartKey is in the starter switch.
Otherwise the alternator and other
electronic components could be se-
verely damaged.
Have the battery checked regularly by
an authorized Mercedes-Benz Center.
Refer to Service Booklet for mainte-
nance intervals or contact your autho-
rized Mercedes-Benz Center for further
information.Warning!
G
Do not place metal objects on the battery as
this could result in a short circuit.
Use leak-proof battery only to avoid the risk
of acid burns in the event of an accident.
Warning!
G
The SBC brake system requires electrical
power to operate.
A malfunction in the vehicle’s power supply
or electrical system may impair brake sys-
tem operation and switch it into its emer-
gency operation mode. The same applies if
battery is disconnected. To brake, the driver
must then apply significantly greater brake
pedal pressure and depress the pedal much
further to obtain the expected braking ef-
fect. If necessary, apply full pressure to the
brake pedal. Brakes may only be applied to
the front wheels. Stopping distance is in-
creased! Adjust your driving style according-
ly. For more information, refer to “SBC brake
system” (
�page 79).
Warning!
G
With a disconnected battery�
you will no longer be able to turn the
SmartKey in the starter switch and
pressing the KEYLESS-GO* start/stop
button on the gear selector lever will
have no effect
�
the gear selector lever will remain
locked in positionP
Page 377 of 442
.
�
Disconnect battery negative lead1.
�
Remove cover2 from the positive ter-
minal.
�
Disconnect the battery positive lead.
Removing")
377 Practical hints
Batteries
�
Remove the luggage box (
�page 351).
�
Disconnect battery negative lead1.
�
Remove cover2 from the positive ter-
minal.
�
Disconnect the battery positive lead.
Removing the battery�
Remove the screw-nuts securing the
battery.
�
Remove the battery bracket.
�
Take out the battery.
Charging and reinstalling the battery
�
Charge battery in accordance with the
instructions of the battery charger
manufacturer.
�
Reinstall the charged battery. Follow
the previously described steps in re-
verse order.
Reconnecting the battery�
Turn off all electrical consumers.
�
Connect the positive lead and fasten its
cover.
�
Connect the negative lead.
�
Install the luggage box (
�page 351).Batteries contain materials that can harm
the environment if disposed of improperly.
Large 12 volt storage batteries contain
lead. Recycling of batteries is the preferred
method of disposal. Many states require
sellers of batteries to accept old batteries
for recycling.
Warning!
G
Never charge a battery while still installed in
the vehicle. Gases may escape during charg-
ing and cause explosions that may result in
paint damage, corrosion or personal injury.
!Never invert the terminal connections!!The battery, its filler caps and the vent
tube must always be securely installed
when the vehicle is in operation.
iThe following procedures must be car-
ried out following any interruption of
battery power (e.g. due to reconnec-
tion):�
Set the clock (
�page 143)
(see COMAND operator’s manual).
�
Resynchronize the side windows
(�page 200).
�
Resynchronize the sliding / pop-up
roof* (
�page 204) or the panora-
ma sliding / pop-up roof*
(
�page 209).
Page 379 of 442
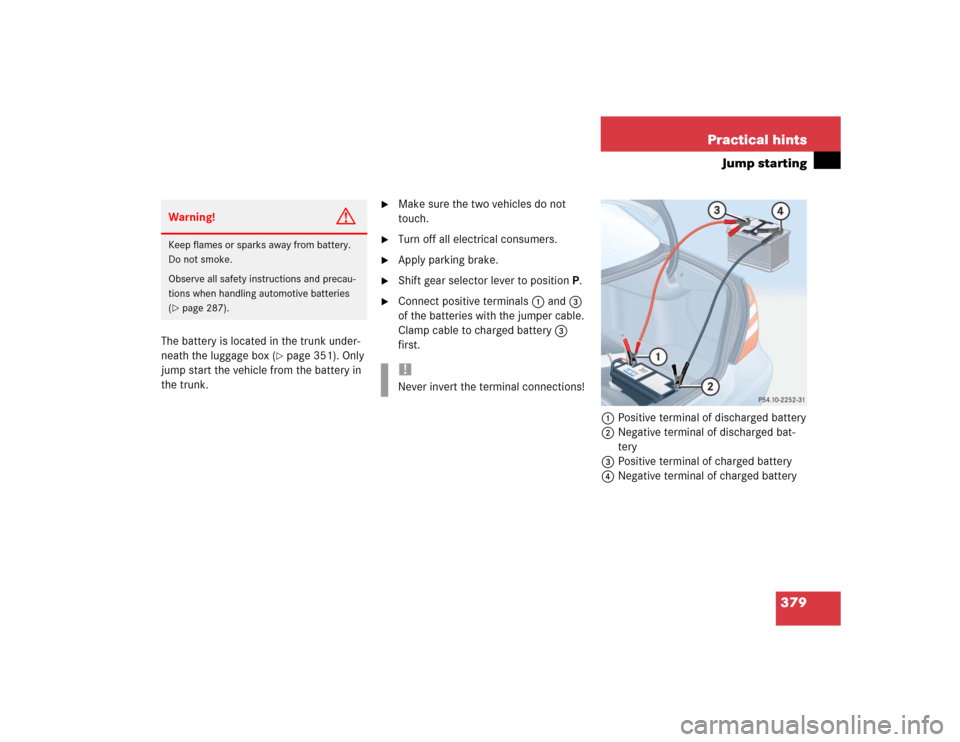
379 Practical hints
Jump starting
The battery is located in the trunk under-
neath the luggage box (
�page 351). Only
jump start the vehicle from the battery in
the trunk.
�
Make sure the two vehicles do not
touch.
�
Turn off all electrical consumers.
�
Apply parking brake.
�
Shift gear selector lever to positionP.
�
Connect positive terminals1 and3
of the batteries with the jumper cable.
Clamp cable to charged battery3
first.
1Positive terminal of discharged battery
2Negative terminal of discharged bat-
tery
3Positive terminal of charged battery
4Negative terminal of charged battery
Warning!
G
Keep flames or sparks away from battery.
Do not smoke.
Observe all safety instructions and precau-
tions when handling automotive batteries
(�page 287).
!Never invert the terminal connections!
Page 380 of 442
380 Practical hintsJump starting�
Start engine of the vehicle with the
charged battery and run at idle speed.
�
Connect negative terminals4 and2
of the batteries with the jumper cable.
Clamp cable to charged battery4
first.
�
Start the engine of the disabled vehi-
cle.Now you can again turn on the electrical
consumers. Do not turn on the lights under
any circumstances.
�
Remove the jumper cables first from
negative terminals2 and4 and then
from positive terminals1 and3.
Now you can turn on the lights.
�
Have the battery checked at the near-
est authorized Mercedes-Benz Center.
iThe message
Malfunction - electric
consumers switched off
may appear
in the instrument cluster. It will disap-
pear as soon as the battery is suffi-
ciently charged.
!Do not tow-start the vehicle.