Page 331 of 442
331 Practical hints
What to do if …
Display symbol
Display messages
Possible cause
Possible solution
Ï
Coolant
Stop, engine off!
The poly-V-belt could be broken.
�
Stop immediately and check the
poly-V-belt.
If it is broken:
�
Do not continue to drive. Otherwise
the engine will overheat due to an in-
operative water pump which may re-
sult in damage to the engine. Notify
an authorized Mercedes-Benz Center.
If it is intact:
�
Do not continue to drive the vehicle
with this message displayed. Doing so
could result in serious engine damage
that is not covered by the
Mercedes-Benz Warranty.
Coolant
Visit workshop!
The cooling fan for the coolant is malfunc-
tioning.
�
Observe the coolant temperature dis-
play.
�
Have the fan replaced as soon as pos-
sible.
Page 333 of 442
333 Practical hints
What to do if …
Display symbol
Display messages
Possible cause
Possible solution
:
USA only:Add 1 Qt. engine oil
at next refuelingCanada only:Add 1 Liter engine oil
at next refueling
The engine oil level is too low.
�
Add engine oil (
�page 284) and
check the engine oil level
(
�page 283).
Engine oil level
Stop, engine off!
There is no oil in the engine. There is a
danger of engine damage.
�
Carefully bring the vehicle to a halt as
soon as possible.
�
Turn off the engine.
�
Add engine oil (
�page 284) and
check the engine oil level
(
�page 283).
Engine oil level
Reduce oil level!
You have added too much engine oil.
There is a risk of damaging the engine or
the catalytic converter.
�
Have oil siphoned or drained off. Ob-
serve all legal requirements with re-
spect to its disposal.
Page 336 of 442
336 Practical hintsWhat to do if …Display symbol
Display messages
Possible cause
Possible solution
F
Key detected
in vehicle!
A SmartKey with KEYLESS-GO* left in the
vehicle was recognized while locking the
vehicle from the outside.
�
Take the SmartKey out of the vehicle.
Keyless go
Check system
The KEYLESS-GO* system is malfunction-
ing.
�
Visit an authorized Mercedes-Benz
Center as soon as possible.
Key
Do not forget key
This display appears (for a maximum of
60 seconds) if the driver’s door is opened
with the engine shut off and no SmartKey
in the starter switch.
This message is only a reminder.
�
Insert SmartKey in the starter switch.
�
Take the SmartKey with KEY-
LESS-GO* with you when leaving the
vehicle.
Remove key
!
You have forgotten to remove the Smart-
Key.
�
Remove the SmartKey from the start-
er switch.
Replace key
There is no additional code available for
SmartKey or SmartKey with
KEYLESS-GO*.
�
Visit an authorized Mercedes-Benz
Center as soon as possible.
Page 339 of 442

339 Practical hints
What to do if …
Display symbol
Display messages
Possible cause
Possible solution
.
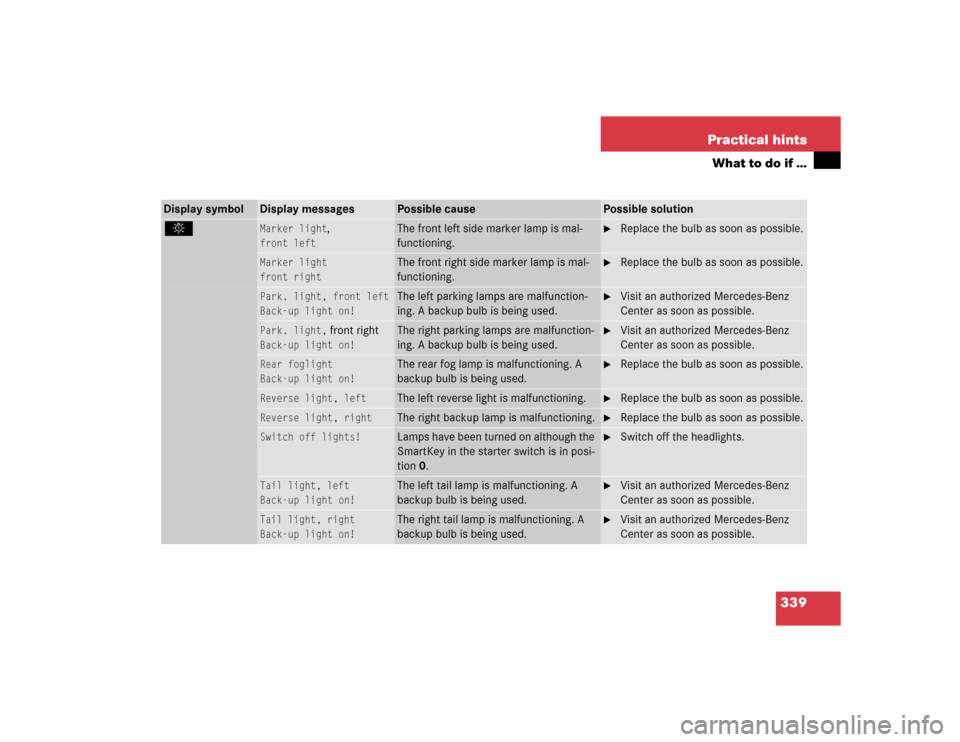
Marker light
,
front left
The front left side marker lamp is mal-
functioning.
�
Replace the bulb as soon as possible.
Marker light
front right
The front right side marker lamp is mal-
functioning.
�
Replace the bulb as soon as possible.
Park. light, front left
Back-up light on!
The left parking lamps are malfunction-
ing. A backup bulb is being used.
�
Visit an authorized Mercedes-Benz
Center as soon as possible.
Park. light,
front right
Back-up light on!
The right parking lamps are malfunction-
ing. A backup bulb is being used.
�
Visit an authorized Mercedes-Benz
Center as soon as possible.
Rear foglight
Back-up light on!
The rear fog lamp is malfunctioning. A
backup bulb is being used.
�
Replace the bulb as soon as possible.
Reverse light, left
The left reverse light is malfunctioning.
�
Replace the bulb as soon as possible.
Reverse light, right
The right backup lamp is malfunctioning.
�
Replace the bulb as soon as possible.
Switch off lights!
Lamps have been turned on although the
SmartKey in the starter switch is in posi-
tion 0.
�
Switch off the headlights.
Tail light, left
Back-up light on!
The left tail lamp is malfunctioning. A
backup bulb is being used.
�
Visit an authorized Mercedes-Benz
Center as soon as possible.
Tail light, right
Back-up light on!
The right tail lamp is malfunctioning. A
backup bulb is being used.
�
Visit an authorized Mercedes-Benz
Center as soon as possible.
Page 349 of 442

349 Practical hints
What to do if …
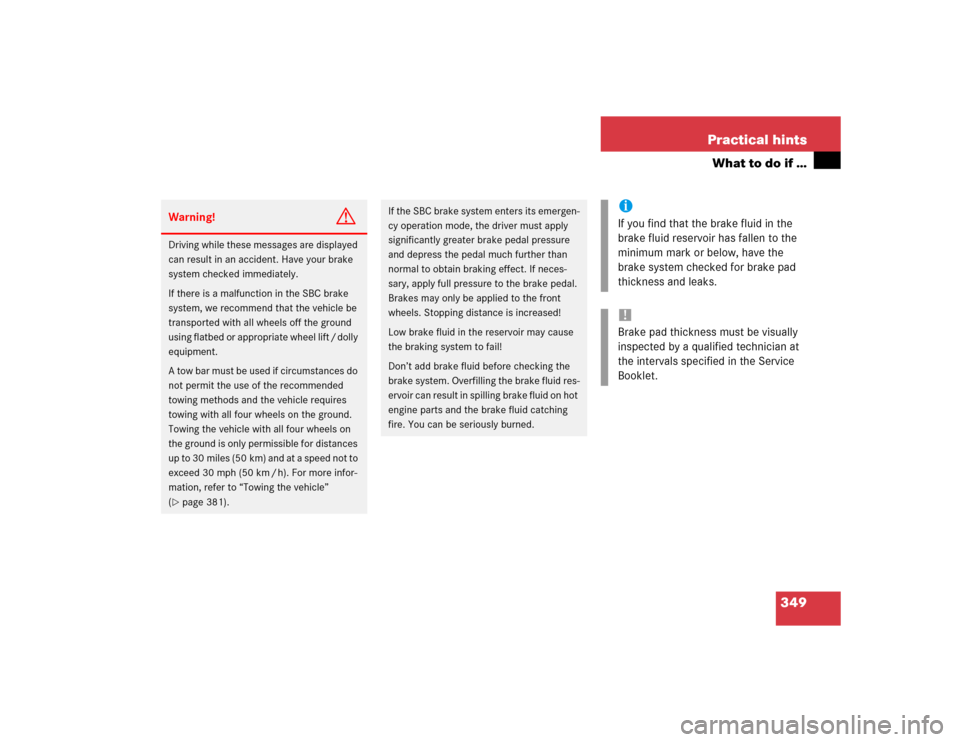
Warning!
G
Driving while these messages are displayed
can result in an accident. Have your brake
system checked immediately.
If there is a malfunction in the SBC brake
system, we recommend that the vehicle be
transported with all wheels off the ground
using flatbed or appropriate wheel lift / dolly
equipment.
A tow bar must be used if circumstances do
not permit the use of the recommended
towing methods and the vehicle requires
towing with all four wheels on the ground.
Towing the vehicle with all four wheels on
the ground is only permissible for distances
u p t o 3 0 m i l e s ( 5 0 k m ) a n d a t a s p e e d n o t t o
exceed 30 mph (50 km / h). For more infor-
mation, refer to “Towing the vehicle”
(�page 381).
If the SBC brake system enters its emergen-
cy operation mode, the driver must apply
significantly greater brake pedal pressure
and depress the pedal much further than
normal to obtain braking effect. If neces-
sary, apply full pressure to the brake pedal.
Brakes may only be applied to the front
wheels. Stopping distance is increased!
Low brake fluid in the reservoir may cause
the braking system to fail!
Don’t add brake fluid before checking the
brake system. Overfilling the brake fluid res-
ervoir can result in spilling brake fluid on hot
engine parts and the brake fluid catching
fire. You can be seriously burned.
iIf you find that the brake fluid in the
brake fluid reservoir has fallen to the
minimum mark or below, have the
brake system checked for brake pad
thickness and leaks.!Brake pad thickness must be visually
inspected by a qualified technician at
the intervals specified in the Service
Booklet.
Page 360 of 442

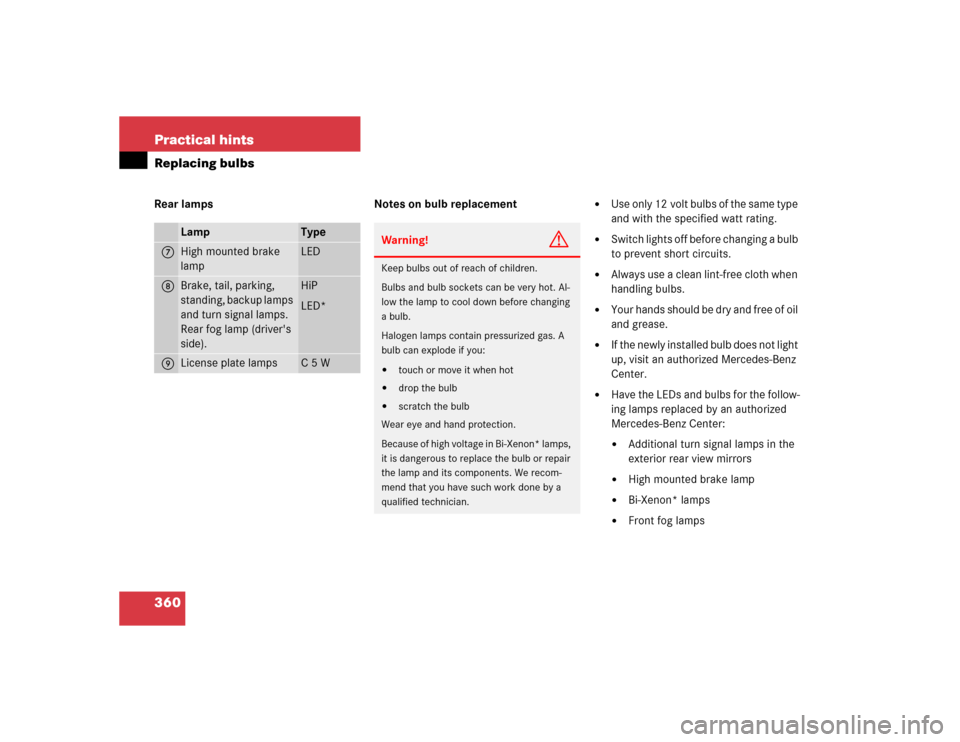
360 Practical hintsReplacing bulbsRear lamps Notes on bulb replacement
�
Use only 12 volt bulbs of the same type
and with the specified watt rating.
�
Switch lights off before changing a bulb
to prevent short circuits.
�
Always use a clean lint-free cloth when
handling bulbs.
�
Your hands should be dry and free of oil
and grease.
�
If the newly installed bulb does not light
up, visit an authorized Mercedes-Benz
Center.
�
Have the LEDs and bulbs for the follow-
ing lamps replaced by an authorized
Mercedes-Benz Center:�
Additional turn signal lamps in the
exterior rear view mirrors
�
High mounted brake lamp
�
Bi-Xenon* lamps
�
Front fog lamps
Lamp
Type
7
High mounted brake
lamp
LED
8
Brake, tail, parking,
standing, backup lamps
and turn signal lamps.
Rear fog lamp (driver's
side).
HiP
LED*
9
License plate lamps
C 5 W
Warning!
G
Keep bulbs out of reach of children.
Bulbs and bulb sockets can be very hot. Al-
low the lamp to cool down before changing
a bulb.
Halogen lamps contain pressurized gas. A
bulb can explode if you:�
touch or move it when hot
�
drop the bulb
�
scratch the bulb
Wear eye and hand protection.
Because of high voltage in Bi-Xenon* lamps,
it is dangerous to replace the bulb or repair
the lamp and its components. We recom-
mend that you have such work done by a
qualified technician.
Page 361 of 442
361 Practical hints
Replacing bulbs
Replacing bulbs for front lamps
1Bulb socket for turn signal lamp
2High beam halogen bulb
3Bulb socket for parking and standing
lamp
4Cover for Bi-Xenon* (low beam and
high beam) or halogen (low beam)
headlampBi-Xenon* headlamps Low beam halogen bulb
�
Switch off the lights.
�
Open the hood (
�page 281).
�
Turn the locking mechanism counter-
clockwise and remove headlamp
cover4.
�
Pull electrical connector off.
�
Release the retaining springs and take
out the bulb.
�
Insert the new bulb in the socket so
that the base is in the recess on the
lower left.
�
Attach the retaining springs.
�
Insert connector into the bulb.
�
Align headlamp cover and click into
place.
Warning!
G
Do not remove the cover4 for the Bi-Xe-
non headlamp. Because of high voltage in
Xenon lamps, it is dangerous to replace the
bulb or repair the lamp and its components.
We recommend that you have such work
done by a qualified technician.
Page 362 of 442

362 Practical hintsReplacing bulbsHigh beam halogen bulb �
Switch off the lights.
�
Open the hood (
�page 281).
�
Press the clamp and remove headlamp
cover.
�
Pull electrical connector off.
�
Turn the locking mechanism counter-
clockwise and take out the high beam
bulb2.
�
Insert the new bulb in the socket so
that the base is in the recess on the
lower left.
�
Attach the retaining springs.
�
Insert connector into the bulb.
�
Align headlamp cover and click into
place.Front turn signal lamp bulb
�
Switch off the lights.
�
Open the hood (
�page 281).
�
Twist bulb socket 1 counterclockwise
and pull out.
�
Push bulb into socket, turn counter-
clockwise and remove.
�
Insert new bulb in socket, push in and
twist clockwise.
�
Reinsert bulb socket in lamp and twist
clockwise.Parking and standing lamp bulb
�
Switch off the lights.
�
Open the hood (
�page 281).
�
Press the clamp and remove headlamp
cover.
�
Pull out the bulb socket3 with the
bulb.
�
Pull the bulb out of the bulb socket.
�
Insert a new bulb in the socket.
�
Reinstall the bulb socket.
�
Align headlamp cover and click into
place.