Page 350 of 440
350 Practical hintsReplacing bulbs
�Replacing bulbsSafe vehicle operation depends on proper
exterior lighting and signaling. It is there-
fore essential that all bulbs and lamp as-
semblies are in good working order at all
times.
Correct headlamp adjustment is extremely
important. Have headlamps checked and
readjusted at regular intervals and when a
bulb has been replaced. See your autho-
rized Mercedes-Benz Center for headlamp
adjustment.
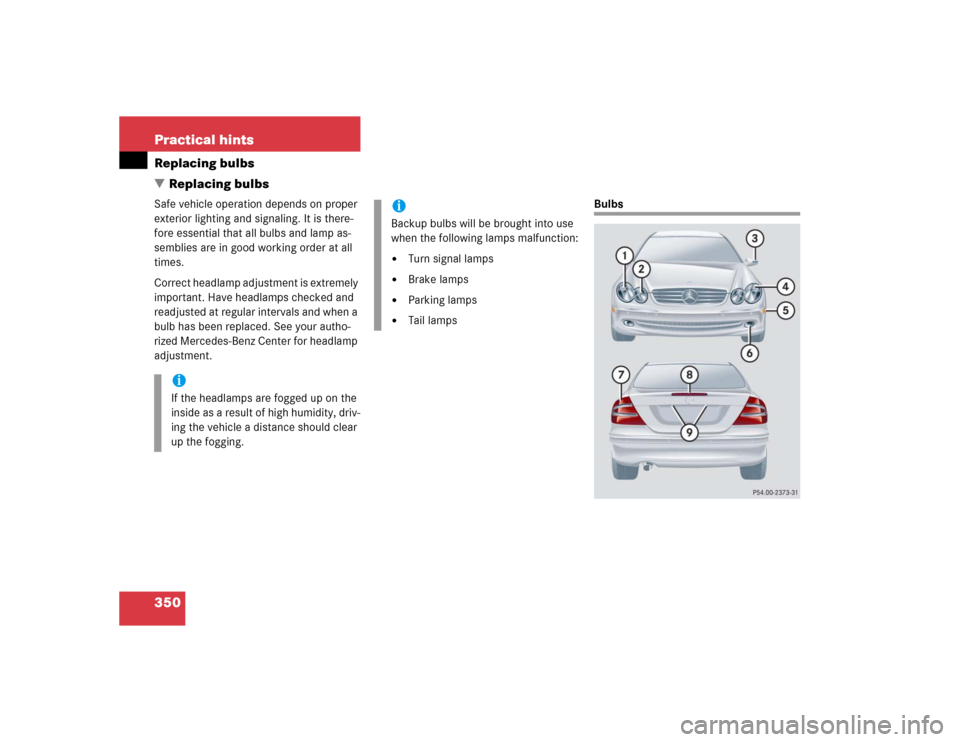
Bulbs
iIf the headlamps are fogged up on the
inside as a result of high humidity, driv-
ing the vehicle a distance should clear
up the fogging.
iBackup bulbs will be brought into use
when the following lamps malfunction:�
Turn signal lamps
�
Brake lamps
�
Parking lamps
�
Tail lamps
Page 352 of 440
352 Practical hintsReplacing bulbs�
Only use 12 volt bulbs of the same type
and with the specified watt rating.
�
Switch lights off before changing a bulb
to prevent short circuits.
�
Always use a clean lint-free cloth when
handling bulbs.
�
Your hands should be dry and free of oil
and grease.
�
If the newly installed bulb does not
come on, visit an authorized
Mercedes-Benz Center.
�
Have the LEDs and bulbs for the follow-
ing lamps replaced by an authorized
Mercedes-Benz Center.�
Additional turn signal lamps in the
exterior rear view mirrors
�
High mounted brake lamp
�
Bi-Xenon* lamps
�
Front fog lamps
Replacing bulbs for front lamps
Front lamps halogen-type
1Housing cover for low beam lamp
2Housing cover for high beam lamp3Bulb socket for turn signal lamp
4Low beam bulb
5High beam bulb
6Parking and standing lamp
Page 356 of 440
356 Practical hintsReplacing bulbsReplacing bulbs for rear lamps
Tail lamp assemblies
1Brake lamp
2Turn signal lamp
3Backup lamp
4Standing and side marker lamp
5Rear fog lamp (driver’s side)/tail�
Switch off the lights.
�
Open trunk.
�
Swing the trim panel covering the cor-
responding rear lights to the side.
�
Squeeze tabs together and remove the
bulb holder with the bulb.
�
Twist bulb counterclockwise and pull
out of bulb holder.
�
Insert new bulb into the holder and turn
it clockwise.
�
Reinstall bulb holder. The tabs must au-
dibly click.
�
Close trim panel.
�
Place the housing cover back on so
that its tabs click in place. License plate lamp
1Screws
�
Switch off the lights.
�
Loosen both screws1 and remove
lamp.
�
Replace the tubular lamp and reinstall
lamp.
�
Retighten the screws.
Page 417 of 440

417 Index
Fuel reserve 311
Instrument cluster 306–312
PASS. AIRBAG OFF 63, 313
Seat belts 311
Service indicator 296
SRS 59, 312
Turn signals 23
Language
Multifunction display 143
Setting 143
LATCH child seat anchors 73
Folding back 73
Layout of poly-V-belt drive 379
Leather upholstery
Cleaning 304
Lever
For cruise control 225
License plate lamps
Messages in display 330
Replacing bulbs 351, 356
Light alloy wheels
Cleaning 303
Technical data 382Light sensor 330
Lighter see Cigarette lighter
Lighting 119
Automatic headlamp mode 120
Combination switch 123
Daytime running lamp mode 121
Door entry lamps 125
Exterior lamp switch 119
Front fog lamps 122
High beam flasher 123
High beams 123
Instrument cluster illumination 126
Interior 124
Locator lighting 121
Low beam 119
Manual headlamp mode 120
Night security illumination 121
Parking lamps 119
Rear fog lamp 122
Settings (control system) 145Limiting the gear range 159
Limp Home Mode 165
Line of fall 399
Loading 237
Cargo tie-down rings 243
Instructions 242
Roof rack 237
Ski sack* 237
Split rear bench seat 240
Locator lighting 121
Setting 146
Lock buttons 399
Door handle (KEYLESS-GO*) 55
Locking 51, 86
Fuel filler flap 278
Global with KEYLESS-GO* 92
Global, SmartKey 87
The vehicle with KEYLESS-GO* 93
Trunk lid, separately 104
Vehicle in an emergency 344