Page 346 of 440
 side facing up.
�
Return batt")
346 Practical hintsUnlocking/locking in an emergency3Battery
4Contact spring�
Using a lint-free cloth, insert new bat-
teries under the contact spring with the
plus (+) side facing up.
�
Return battery compartment into hous-
ing until it locks into place.SmartKey with KEYLESS-GO*
1Battery
2Tilt battery up
3Mechanical key
Replacement batteries: Lithium, type
CR 2025 or equivalent.
�
Remove mechanical key (
�page 343).
�
Insert the mechanical key in side open-
ing and push grey slide.
The battery compartment is unlatched.
�
Pull the battery compartment out of the
SmartKey housing in direction of ar-
row.
�
Using mechanical key3 apply pres-
sure to position2.
Battery1 tilts up slightly.
�
Pull out batteries1 in direction of ar-
row.
�
Using a lint-free cloth, insert new bat-
teries with the plus (+) side facing up.
�
Return battery compartment into hous-
ing until it locks into place.
iWhen changing batteries, always re-
place both batteries.
The required replacement batteries are
available at any Mercedes-Benz
Center.
��
Page 348 of 440
348 Practical hintsOpening/closing in an emergency
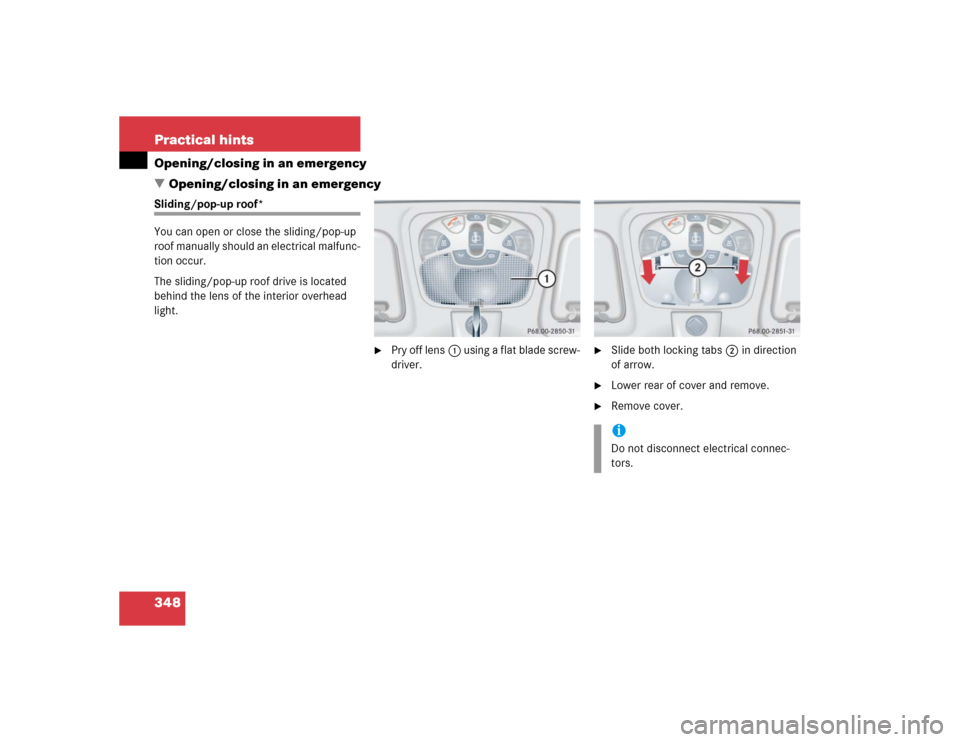
�Opening/closing in an emergencySliding/pop-up roof*
You can open or close the sliding/pop-up
roof manually should an electrical malfunc-
tion occur.
The sliding/pop-up roof drive is located
behind the lens of the interior overhead
light.
�
Pry off lens1 using a flat blade screw-
driver.
�
Slide both locking tabs2 in direction
of arrow.
�
Lower rear of cover and remove.
�
Remove cover.iDo not disconnect electrical connec-
tors.
Page 350 of 440
350 Practical hintsReplacing bulbs
�Replacing bulbsSafe vehicle operation depends on proper
exterior lighting and signaling. It is there-
fore essential that all bulbs and lamp as-
semblies are in good working order at all
times.
Correct headlamp adjustment is extremely
important. Have headlamps checked and
readjusted at regular intervals and when a
bulb has been replaced. See your autho-
rized Mercedes-Benz Center for headlamp
adjustment.
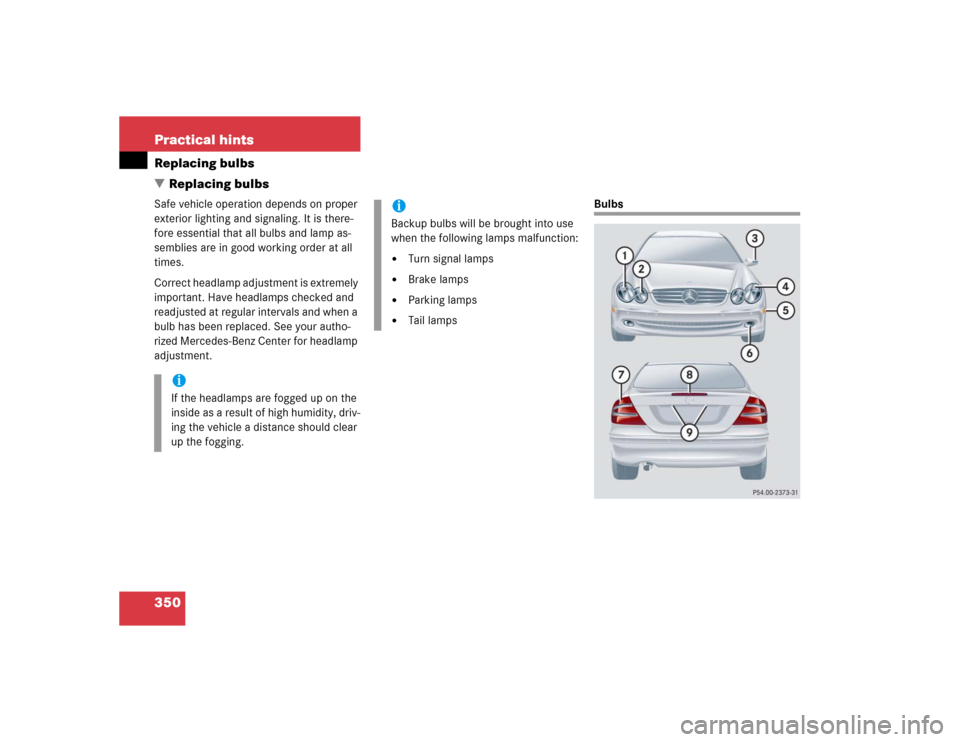
Bulbs
iIf the headlamps are fogged up on the
inside as a result of high humidity, driv-
ing the vehicle a distance should clear
up the fogging.
iBackup bulbs will be brought into use
when the following lamps malfunction:�
Turn signal lamps
�
Brake lamps
�
Parking lamps
�
Tail lamps
Page 352 of 440
352 Practical hintsReplacing bulbs�
Only use 12 volt bulbs of the same type
and with the specified watt rating.
�
Switch lights off before changing a bulb
to prevent short circuits.
�
Always use a clean lint-free cloth when
handling bulbs.
�
Your hands should be dry and free of oil
and grease.
�
If the newly installed bulb does not
come on, visit an authorized
Mercedes-Benz Center.
�
Have the LEDs and bulbs for the follow-
ing lamps replaced by an authorized
Mercedes-Benz Center.�
Additional turn signal lamps in the
exterior rear view mirrors
�
High mounted brake lamp
�
Bi-Xenon* lamps
�
Front fog lamps
Replacing bulbs for front lamps
Front lamps halogen-type
1Housing cover for low beam lamp
2Housing cover for high beam lamp3Bulb socket for turn signal lamp
4Low beam bulb
5High beam bulb
6Parking and standing lamp
Page 353 of 440
.
�
Turn housing cover1 or 2 counter-
clockwise and remove.
�
Turn bulb holder 4 or")
353 Practical hints
Replacing bulbs
Low beam and high beam bulb�
Switch off the lights.
�
Open the hood (
�page 281).
�
Turn housing cover1 or 2 counter-
clockwise and remove.
�
Turn bulb holder 4 or 5 with the bulb
counterclockwise and remove.
�
Press the bulb backwards and turn
counterclockwise out of the bulb hold-
er.
�
Press the new bulb into the holder and
twist it clockwise.
�
Place the bulb holder back into the
lamp and turn it clockwise.
�
Place the corresponding housing cov-
ers back on and turn them clockwise.Front turn signal lamp bulb
�
Switch off the lights.
�
Open the hood (
�page 281).
�
Twist bulb socket3 counterclockwise
and pull out.
�
Push bulb into socket, turn counter-
clockwise and remove.
�
Insert new bulb in socket, push in and
twist clockwise.
�
Reinsert bulb socket in lamp and twist
clockwise.Parking and standing lamp bulb
�
Switch off the lights.
�
Open the hood (
�page 281).
�
Turn housing cover2 counterclock-
wise and remove.
�
Pull out the bulb socket with the bulb.
�
Pull the bulb out of the bulb socket.
�
Insert a new bulb in the socket.
�
Reinstall the bulb socket.
�
Align housing cover and click into
place.
Page 354 of 440
354 Practical hintsReplacing bulbsFront lamps Bi-Xenon*-type
1Bulb socket for turn signal lamp
2Housing cover for high beam flasher
lamp
3Housing cover for Bi-Xenon* lamp4High beam flasher bulb
5Parking and standing lampHigh beam bulb for high beam flasher
�
Switch off the lights.
�
Open the hood (
�page 281).
�
Turn housing cover2 counterclock-
wise and remove.
�
Turn bulb holder 4 with the bulb coun-
terclockwise and remove.
�
Press the bulb backwards and turn
counterclockwise out of the bulb hold-
er.
�
Press the new bulb into the holder and
twist it clockwise.
�
Place the bulb holder back into the
lamp and turn it clockwise.
�
Place the housing cover 2 back on
and turn them clockwise.
Warning!
G
Do not remove the cover
3
for the Bi-Xe-
non* headlamp. Because of high voltage in
xenon lamps, it is dangerous to replace the
bulb or repair the lamp and its components.
We recommend that you have such work
done by a qualified technician.
Page 355 of 440
.
�
Twist bulb socket1 counterclockwise
and pull out.
�
Push bulb into socket, turn")
355 Practical hints
Replacing bulbs
Front turn signal lamp bulb�
Switch off the lights.
�
Open the hood (
�page 281).
�
Twist bulb socket1 counterclockwise
and pull out.
�
Push bulb into socket, turn counter-
clockwise and remove.
�
Insert new bulb in socket, push in and
twist clockwise.
�
Reinsert bulb socket in lamp and twist
clockwise.Parking and standing lamp bulb
�
Switch off the lights.
�
Open the hood (
�page 281).
�
Turn housing cover2 counterclock-
wise and remove.
�
Pull out the bulb socket with the bulb.
�
Pull the bulb out of the bulb socket.
�
Insert a new bulb in the socket.
�
Reinstall the bulb socket.
�
Align housing cover and click into
place.
Side marker lamp bulb�
Switch off the lights.
�
Carefully slide lamp towards rear.
�
Remove front end first.
�
Twist bulb socket counterclockwise
and pull out.
�
Pull bulb out of the bulb socket.
�
Insert new bulb in socket.
�
Reinstall bulb socket, push in and twist
clockwise.
�
To reinstall lamp, set rear end in
bumper and let front end snap into
place.
Page 356 of 440
356 Practical hintsReplacing bulbsReplacing bulbs for rear lamps
Tail lamp assemblies
1Brake lamp
2Turn signal lamp
3Backup lamp
4Standing and side marker lamp
5Rear fog lamp (driver’s side)/tail�
Switch off the lights.
�
Open trunk.
�
Swing the trim panel covering the cor-
responding rear lights to the side.
�
Squeeze tabs together and remove the
bulb holder with the bulb.
�
Twist bulb counterclockwise and pull
out of bulb holder.
�
Insert new bulb into the holder and turn
it clockwise.
�
Reinstall bulb holder. The tabs must au-
dibly click.
�
Close trim panel.
�
Place the housing cover back on so
that its tabs click in place. License plate lamp
1Screws
�
Switch off the lights.
�
Loosen both screws1 and remove
lamp.
�
Replace the tubular lamp and reinstall
lamp.
�
Retighten the screws.