Page 124 of 440

124 Controls in detailLightingSwitching off the hazard warning
flasher�
Press hazard warning flasher switch
again.
Interior lighting
The controls are located in the overhead
control panel.
1Rear interior lights
2Right front reading lamp
3Rocker switch for automatic control
system
4Left front reading lampActivating automatic control
�
Press rocker switch3 to center
position.
Interior lamps are switched on in dark-
ness, even when you:�
unlock the vehicle
�
open a door
�
remove the SmartKey from the
starter switch
The interior lamps are switched off after a
preset time (
�page 148).
iWith the hazard warning flasher acti-
vated and the combination switch set
for either left or right turn, only the re-
spective left or right turn signal will op-
erate when the SmartKey in the starter
switch is in position1 or2.iIf the hazard warning flasher was acti-
vated automatically, press switch1
twice.
iIf the door remains open, the interior
lamps switch off automatically after ap-
proximately five minutes when the
SmartKey is removed or in starter
switch position0.
Page 126 of 440
.
The instrumen")
126 Controls in detailInstrument cluster
�Instrument clusterA full view illustration of the instrument
cluster can be found in the “At a glance”
section of this manual (
�page 22).
The instrument cluster is activated when
you
�
open a door
�
turn on the ignition
�
press the reset button,
see (
�page 126)
�
switch on the exterior lamps
You can change the instrument cluster set-
tings in the Instrument cluster submenu of
the control system (
�page 142).
Instrument cluster illumination
1Reset button
Use the reset button to adjust the illumina-
tion brightness for the instrument cluster.To brighten illumination
�
Turn reset button1 in the instrument
cluster clockwise.
The instrument cluster illumination will
brighten.
To dim illumination
�
Turn reset button1 in the instrument
cluster counterclockwise.
The instrument cluster illumination will
dim.
iThe instrument cluster illumination is
dimmed or brightened automatically to
suit ambient light conditions.
The instrument cluster illumination will
also be adjusted automatically when
you switch on the vehicle’s exterior
lamps.
Page 127 of 440

127 Controls in detail
Instrument cluster
Coolant temperature indicator
During severe operating conditions, e.g.
stop-and-go traffic, the coolant tempera-
ture may rise close to 120°C.
The engine should not be operated with
the coolant temperature above 120°C. Do-
ing so may cause serious engine damage
which is not covered by the
Mercedes-Benz Limited Warranty.
Trip odometer
Make sure you are viewing the trip odome-
ter display (
�page 129).
�
If it is not displayed, press buttonè
orÿ on the multifunction steering
wheel repeatedly until the trip odome-
ter appears.
�
Press and hold reset button1 on the
instrument cluster (
�page 126) until
the trip odometer is reset.
Warning!
G
�
Driving when your engine is badly over-
heated can cause some fluids which
may have leaked into the engine com-
partment to catch fire. You could be se-
riously burned.
�
Steam from an overheated engine can
cause serious burns and can occur just
by opening the hood. Stay away from
the engine if you see or hear steam com-
ing from it.
Turn off the engine, get out of the vehicle
and do not stand near the vehicle until the
engine has cooled down.
iExcessive coolant temperature triggers
a warning in the multifunction display
(�page 323) and the red coolant warn-
ing lamp in the instrument cluster
comes on (
�page 309).
Page 133 of 440
133 Controls in detail
Control system
Menus, submenus and functions
Menu1
Menu2
Menu3
Menu4
Menu5
Menu6
Menu7
Menu8
Commands/submenusStandard dis-
play
AUDIO
NAVI*
Distronic*
Malfunction
memory
Settings
Trip computer
Telephone
Digital speed-
ometer
Select radio
station
Activate
route guid-
ance
Call up set-
tings
Call up malfunc-
tion messages
Reset to factory
settings
Fuel consumption
statistics after
start
Load phone
book
Call up FSS
Select
satellite ra-
dio station
Instrument clus-
ter submenu
Fuel consumption
statistics since
the last reset
Search for
name in
phone book
Check engine oil
level
Operate CD
player*
Time submenu
Call up range
Operate cas-
sette player
Lighting sub-
menuVehicle sub-
menuConvenience
submenu
Page 135 of 440
. Vehi-
cles with COMAND*: Refer to separate
operating instructions.
�
Press buttonè orÿ repeatedly
until")
135 Controls in detail
Control system
Select radio station�
Turn on the radio (
�page 186). Vehi-
cles with COMAND*: Refer to separate
operating instructions.
�
Press buttonè orÿ repeatedly
until you see the currently tuned sta-
tion in the display.
1Waveband
2Setting for station selection using
memory
3Station frequency
�
Press buttonk orj repeatedly
until the desired station is found.The type of search depends on the setting
for the station tuning (
�page 148):
�
The next stored station is selected (
SP)
�
Station searchSelect satellite radio station*
The Sirius -Satellite - Radio is treated as a
radio application.
�
Select SAT radio with the correspond-
ing softkey in the radio menu.
1SAT mode and preset number
2Setting for station selection using
memory
3Channel name or number
�
Press buttonk orj repeatedly
until the desired channel is found.
iYou can only store new stations using
the designated feature on the radio
(�page 191). Vehicles with
COMAND*: Refer to separate operat-
ing instructions.
You can also operate the radio in the
usual manner.
Page 137 of 440

137 Controls in detail
Control system
NAV menu
The
Nav
menu contains the functions need-
ed to operate your navigation system.
�
Press buttonè orÿ repeatedly
until you see the message
Nav
in the
display.
�
If the navigation system is switched off,
the message
Nav off
is shown in the
display.
�
If the navigation system is on, the mes-
sage
Nav active
is shown in the dis-
play.
Please refer to the COMAND* manual for
instructions on how to activate the route
guidance system*.
Distronic* menu
Use the Distronic menu to display the cur-
rent settings for your Distronic system.
What information is shown in the display
depends on whether the Distronic system
is active or inactive.
Please refer to the “Driving systems” sec-
tion of this manual (
�page 221) for in-
structions on how to activate Distronic.
�
Press buttonè orÿ repeatedly
until you see one of the following two
pictures in the display.Distronic deactivated
When Distronic is deactivated you will see
the standard display in the display.
1Vehicle ahead, if detected
2Actual distance to vehicle ahead
3Preset distance threshold to vehicle
ahead
4Your vehicle
5Symbol for activated distance warning
function
iTo select the reverse side of the tape,
press button below track number on
the audio system display, or enter re-
quest on the COMAND* system locat-
ed in the center dashboard.
Page 139 of 440

139 Controls in detail
Control system
Should any malfunctions occur while driv-
ing, the number of malfunctions will reap-
pear in the display when the SmartKey in
the starter switch is turned to position0 or
removed from the starter switch.
Settings menu
In the
Settings
menu there are two func-
tions:
�
The function
Reset to factory set-
tings?
, with which you can reset all the
settings to the original factory settings.
�
A collection of submenus with which
you can make individual settings for
your vehicle.
�
Press buttonè orÿ repeatedly
until the
Settings
menu is seen in the
display.Resetting all settings
You can reset all the functions of all sub-
menus to the factory settings.
�
Press the reset button in the instru-
ment cluster for approximately three
seconds.
In the display you will see the request
to press the reset button again to con-
firm.
�
Press the reset button again.
The functions of all the submenus will
reset to factory settings.
iThe message memory will be cleared
when you turn the SmartKey in the
starter switch to position1 or2. You
will then only see high-priority malfunc-
tions (
�page 314).
iThe settings you have changed will not
be reset unless you confirm the action
by pressing the reset button a second
time. After approximately five seconds,
you will see the
Settings...
menu
again.
Page 140 of 440
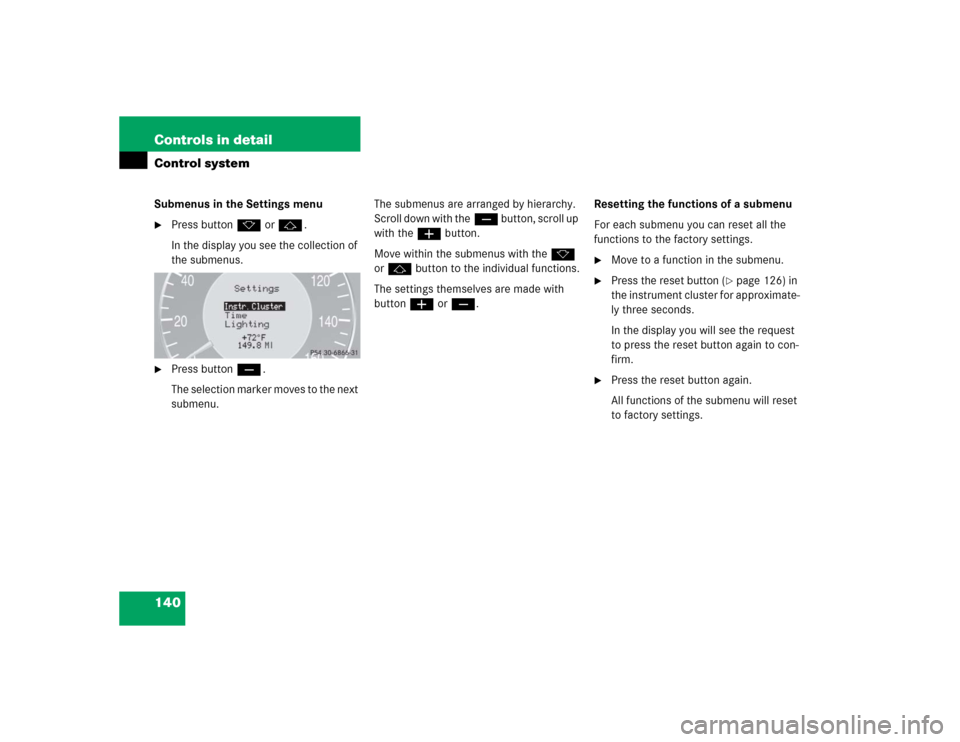
140 Controls in detailControl systemSubmenus in the Settings menu�
Press buttonk orj.
In the display you see the collection of
the submenus.
�
Press buttonç.
The selection marker moves to the next
submenu.The submenus are arranged by hierarchy.
Scroll down with theç button, scroll up
with theæ button.
Move within the submenus with thek
orj button to the individual functions.
The settings themselves are made with
buttonæ orç.Resetting the functions of a submenu
For each submenu you can reset all the
functions to the factory settings.
�
Move to a function in the submenu.
�
Press the reset button (
�page 126) in
the instrument cluster for approximate-
ly three seconds.
In the display you will see the request
to press the reset button again to con-
firm.
�
Press the reset button again.
All functions of the submenu will reset
to factory settings.