Page 48 of 440
48 Getting startedDrivingTurn signals and high beam
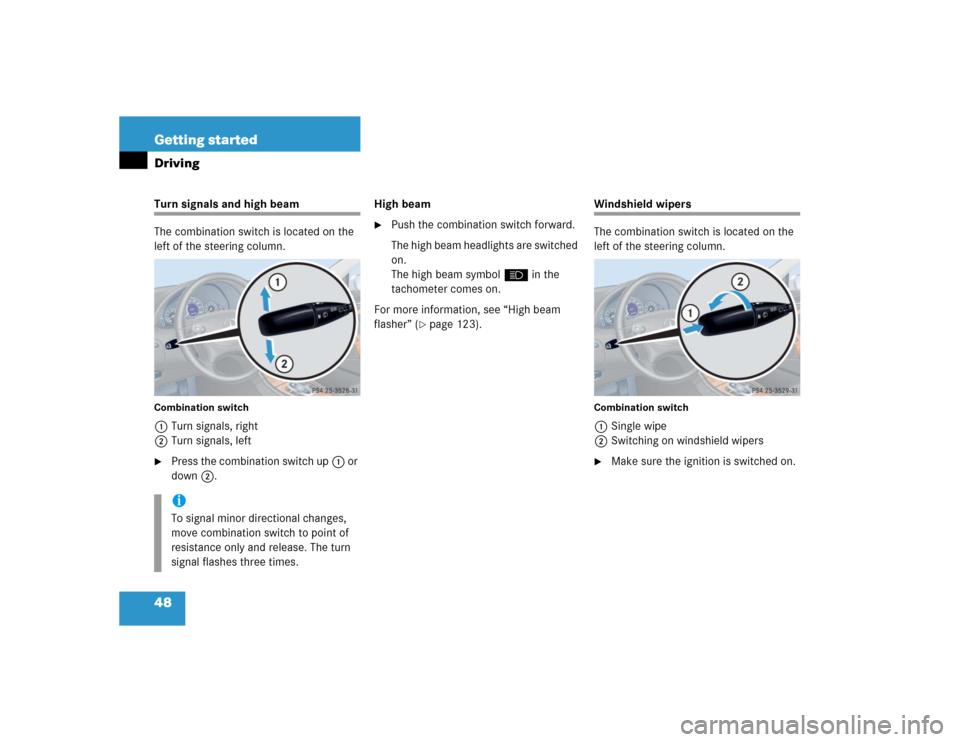
The combination switch is located on the
left of the steering column.Combination switch1Turn signals, right
2Turn signals, left�
Press the combination switch up1 or
down2.High beam
�
Push the combination switch forward.
The high beam headlights are switched
on.
The high beam symbolA in the
tachometer comes on.
For more information, see “High beam
flasher” (
�page 123).
Windshield wipers
The combination switch is located on the
left of the steering column.Combination switch1Single wipe
2Switching on windshield wipers�
Make sure the ignition is switched on.
iTo signal minor directional changes,
move combination switch to point of
resistance only and release. The turn
signal flashes three times.
Page 53 of 440
53 Getting started
Parking and locking
Switching off headlamps�
Turn the exterior lamp switch toM
(�page 47).
For more information, see “Lighting”
(
�page 119).
Turning off the engine �
Place the gear selector lever in
positionP.Turning off the engine with the
SmartKey
�
Turn the SmartKey in the starter switch
(�page 31) to position0 and remove
it.
The immobilizer is activated.
�
Press the seat belt release button
(�page 42).
Allow the retractor to completely re-
wind the seat belt by guiding the latch
plate.
iAlways set the parking brake in addi-
tion to shifting to positionP.
On steep slopes, turn the front wheels
towards the curb.
iThe SmartKey can only be removed
from the starter switch with the gear
selector lever in positionP.!With the SmartKey removed and the
driver’s door open, a warning sounds if
the vehicle’s exterior lamps are not
switched off.
��
Page 54 of 440
.
All turn signal lamps flash three times.
The locking knobs in the doors move")
54 Getting startedParking and locking
�
After exiting the vehicle, press the lock
button‹ on the SmartKey
(�page 30).
All turn signal lamps flash three times.
The locking knobs in the doors move
down.
For more information, see “Locking and
unlocking” (
�page 86).Turning off the engine with
KEYLESS-GO*
�
Place the gear selector lever inP.
�
Press the KEYLESS-GO start/stop but-
ton to shut off the engine.
With the driver's door closed, the start-
er switch is now in position1. With the
driver’s door opened, the starter switch
is set to position0, same as SmartKey
removed from starter switch
(�page 31).
�
Press the seat belt release button
(�page 42).
Allow the retractor to completely re-
wind the seat belt by guiding the latch
plate.
iOpening a door causes the windows on
that side of the car to open slightly.
They will return to the up position when
the door is closed.Warning!
G
To prevent possible personal injury, always
keep hands and fingers away from the door
openings when closing the doors. Be espe-
cially careful when small children are
around.
Before closing doors, make sure there is no
possibility of someone getting caught in a
door during closing.
Warning!
G
When leaving the vehicle, always remove the
SmartKey from the starter switch and lock
your vehicle. Do not leave children unat-
tended in the vehicle, or with access to an
unlocked vehicle. Unsupervised use of vehi-
cle may cause an accident and/or serious
personal injury.
��
Page 55 of 440

55 Getting started
Parking and locking
1Lock button on the door handle�
After exiting the vehicle, press lock
button1 on the door handle or on the
trunk lid.
All turn signal lamps flash three times.
The locking knobs in the doors move
down. For more information, see “Locking and
unlocking” (
�page 86).
!If you hear a warning signal you have
either�
forgotten to switch off the vehi-
cles’s exterior lamps before open-
ing the driver’s door, or
�
tried to turn off the engine while the
gear selector lever is not inP.
Turn off the lights or place the gear se-
lector lever inP.
Warning!
G
To prevent possible personal injury, always
keep hands and fingers away from the door
openings when closing the doors. Be espe-
cially careful when small children are
around.
Before closing doors, make sure there is no
possibility of someone getting caught in a
door during closing.
iOpening a door causes the windows on
that side of the car to open slightly.
They will return to the up position when
the door is closed.
Warning!
G
When leaving the vehicle, always remove the
SmartKey from the starter switch, take the
SmartKey with KEYLESS-GO* with you, and
lock your vehicle. Do not leave children un-
attended in the vehicle, or with access to an
unlocked vehicle. Unsupervised use of vehi-
cle equipment may cause an accident
and/or serious personal injury.
Page 71 of 440

71 Safety and Security
Occupant safety
Self-test BabySmart
TM1
without special
child seat installed
After turning the SmartKey in the starter
switch to position1 or2 or pressing the
KEYLESS-GO* start/stop button once or
twice, the PASS. AIRBAG OFF indicator
lamp1 located in the center console
comes on for approximately six seconds
and then goes out.
If the indicator lamp should not come on or
is continuously lit, the system is not func-
tioning. You must see an authorized
Mercedes-Benz Center before seating any
child on the passenger seat.
More information can be found in the
“Practical hints” section (�page 313).
1BabySmart
TM is a trademark of Siemens
Automotive Corp.
Warning!
G
The BabySmart
TM airbag deactivation sys-
tem will ONLY work with a special child seat
designed to operate with it. It will not work
with child seats which are not BabySmart
TM
compatible.
Never place anything between seat cushion
and child seat (e.g. pillow), since it reduces
the effectiveness of the deactivation sys-
tem. The bottom of the child seat must
make full contact with the passenger seat
cushion. An incorrectly mounted child seat
could cause injuries to the child in case of an
accident, instead of protecting the child.
Follow the manufacturer’s instructions for
installation of special child seats.
Warning!
G
When using a BabySmart
TM compatible
child seat on the front passenger seat, the
passenger front airbag will not deploy only if
the PASS. AIRBAG OFF indicator lamp re-
mains illuminated.
Please be sure to check the indicator every
time you use the special system child seat.
Should the light go out while the restraint is
installed, please check installation. If the
light remains out, do not use the
BabySmart
TM restraint to transport children
on the front passenger seat until the system
has been repaired.
Page 76 of 440

�
BAS (B
rake A")
76 Safety and SecurityDriving safety systems
�Driving safety systemsIn this section you will find information on
the following driving safety systems:�
ABS (A
ntilock B
rake S
ystem)
�
BAS (B
rake A
ssist S
ystem)
�
ESP (E
lectronic S
tability P
rogram)
ABS
The Antilock Brake System (ABS) regulates
the brake pressure so that the wheels do
not lock during braking. This allows you to
maintain the ability to steer your vehicle.
The ABS is functional above a speed of ap-
proximately 5 mph (8 km/h) independent
of road surface conditions.
On slippery road surfaces, the ABS will re-
spond even with light brake pressure.
iIn winter operation, the maximum ef-
fectiveness of the ABS, the BAS, and
the ESP is only achieved with winter
tires (M + S tires) or snow chains as re-
quired.
Warning!
G
The following factors increase the risk of ac-
cidents:�
Excessive speed, especially in turns
�
Wet and slippery road surfaces
�
Following another vehicle too closely
The ABS, BAS, and ESP cannot reduce this
risk.
Always adjust your driving style to the pre-
vailing road and weather conditions.
Warning!
G
Do not pump the brake pedal. Use firm,
steady brake pedal pressure instead. Pump-
ing the brake pedal defeats the purpose of
the ABS and significantly reduces braking
effectiveness.
Page 77 of 440
 comes on when you
turn the SmartKey in the starter switch to
position2 or press the KEYLESS-")
77 Safety and Security
Driving safety systems
The - indicator lamp in the instrument
cluster (
�page 22) comes on when you
turn the SmartKey in the starter switch to
position2 or press the KEYLESS-GO*
start/stop button twice. It goes out when
the engine is running.
Braking
At the instant one of the wheels is about to
lock up, a slight pulsation can be felt in the
brake pedal, indicating that the ABS is in
the regulating mode.
�
Keep firm and steady pressure on the
brake pedal while experiencing the pul-
sation.
Continuous, steady brake pedal pressure
yields the advantages provided by the ABS,
namely braking power and the ability to
steer the vehicle.
The pulsating brake pedal can be an indica-
tion of hazardous road conditions and
functions as a reminder to take extra care
while driving.Emergency brake maneuver
�
Keep continuous full pressure on the
brake pedal.
For more information, see “Practical hints”
(
�page 305).
BAS
The Brake Assist System (BAS) operates in
emergency situations. If you apply the
brakes very quickly, the BAS automatically
provides full brake boost, thereby poten-
tially reducing the braking distance. Apply
continuous full braking pressure until the
emergency braking situation is over. The
ABS will prevent the wheels from locking.
When you release the brake pedal, the
brakes function again as normal. The BAS
is then deactivated.
For more information, see “Practical hints”
(�page 305).
Warning!
G
The ABS cannot prevent the natural laws of
physics from acting on the vehicle, nor can
it increase braking or steering efficiency be-
yond that afforded by the condition of the
vehicle brakes and tires or the traction. The
ABS cannot prevent accidents, including
those resulting from excessive speed in
turns, following another vehicle too closely,
or hydroplaning. Only a safe, attentive, and
skillful driver can prevent accidents. The ca-
pabilities of an ABS equipped vehicle must
never be exploited in a reckless or danger-
ous manner which could jeopardize the us-
er’s safety or the safety of others.
Page 85 of 440
85 Controls in detail
Locking and unlocking
Seats
Memory function
Lighting
Instrument cluster
Control system
Automatic transmission
Good visibility
Automatic climate control
Audio system
Power windows
Sliding/pop-up roof*
Driving systems
Loading
Useful features