Page 362 of 453
359
Practical advice
Changing bulbs
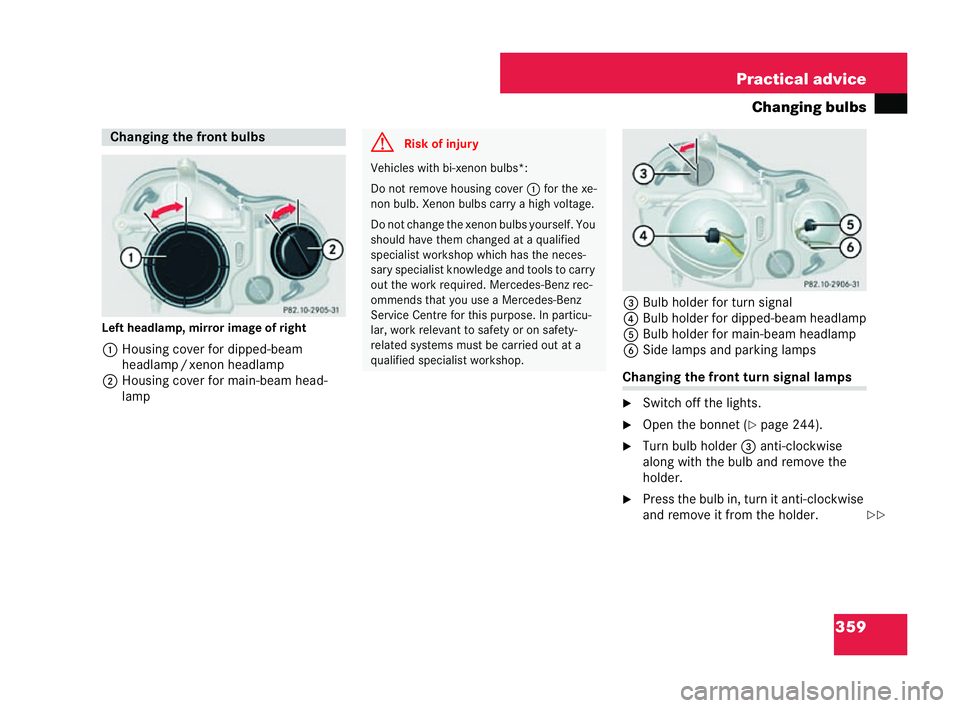
Left headlamp, mirro rim age ofright
1 Housing cover for dipped-beam
headlamp /xenon headl amp
2 Housing cover for main-beam hea d-
lamp 3
Bulb holder for turn signal
4 Bulbholder for dipped-beam headlamp
5 Bulbholder for main-beam headlamp
6 Side lamps and parking lamps Changing the front turn signal lamps
�6
Switch off the lights.
�6 Open the bonnet ( �=pa ge 244).
�6 Turn bulb holder 3anti-clockwise
along with the bulb and remove the
holder.
�6 Press the bulb in, turn it ant i-clockwise
and remove it from the holder. Ch
angi ngthe fron t bulb s P 82.10-2905-31 G
Risk of injury Vehicles with bi-xenon bulbs*:
Do not remove housing cover
1for the xe-
non bulb. Xenonbulbscarry ahigh vo lta ge.
Do not cha nge the xenon bulbs yourself. You
should have them changed at a qualified
specialist workshop which has the neces-
sary specialist knowledge and tools to carry
out the work required. Mercede s-Benz rec-
omm ends that you use a Merc edes-Benz
Service Centre for this purpose. In particu-
la r, work relevant to safety or on safety-
related systems must be carried out at a
qu alified specialist workshop. P 82.10-2906-31
�=�=209en_d2.boo Seite
359 Dienstag, 25. Mai 2004 7:26 19
Page 363 of 453
360 Practical advice
Changing bulbs
�6
Press the new bulb into the hol der and
screw it in clo ckwise.
�6 Place the bulb holder in the lamp and
turn itclockwise.
Ch anging the dipped-beam or main- beam hea
dlamps
�6 Switch off the lights.
�6 Open the bonnet ( �=pa ge 244).
�6 Turn appropr iate ho using cover 1or
2 anti- cloc kw ise and remove it.
�6 Turn bulb holder 4or5 anti-clock-
wi se along with the bul band remove
the hol der.
�6 Pull the bulb out of the bulb holder by
the base plate (not the glass bulb). �6
Insert the new bulb so that the base
plate:
�!fits in the recess on the bulb holder
and
�! lies level on the bulb holder
�6 Place the bulb hol der in the lamp and
turn it clockwise.
�6 Refit the appropriate housing cover
and turn it clockwise. Cha
nging the sid eand parking lamps
�6 Switch off the lights.
�6 Open the bonnet (�= page 244).
�6 Turn housing cover 2anti-clockwise
and rem ove it.
�6 Remove bulb holder 6along with the
bulb. �6
Turn the bulb gently anti-clockwise and
remove it from the holder.
�6 Insert the new bulb into the holder and
turn it clockwise.
�6 Replac ethe housing cover and let the
tabs lock into place.
�6 Refit the appropriate housing cover
and turn it clockwise.
�6 Replac ethe bulb holder. 209en_d2.boo Seite
360 Dienstag, 25. Mai 2004 7:26 19
Page 364 of 453
361
Practical advice
Changing bulbs Tail
lamp cl uster
Left bul bholder, mirror image of right
1 Brake lam ps
2 Turn signals
3 Reversing lamps
4 Side lamps
5 Rear fogl amp/ tail lamps �6
Switch off the lig hts.
�6 Open the boot lid ( �=page 84).
�6 Roll the trim located in the area of the
appropriate tail lamp cluster to the
side.
�6 Squeeze the reta ining clips and remove
the bul bholder along with the bulb.
�6 Turn the bulb anti-clockwise and
remove it from the hol der.
�6 Insert the new bulb into the holder and
turn it clockwise.
�6 Replace the bulb holder. Make sure
that you hear the bul bhol der engage in
the retaining clips.
�6 Roll the tri mback again. 1
Screws
�6 Switch off the lights.
�6 Undo the two screws and remove the
lamp unit.
�6 Change the bulb and refit the la mpunit.
�6 Screw the two screws back in. Ch
anging the rear bulbs P 82.10-2907-31 neu Licence plate
lighti ng P 82.10-2913-31209en
_d2.boo Seite 361 Dienstag, 25. Mai 2004 7:26 19
Page 371 of 453
368 Practical advice
Flat tyre
Your vehicle is equipped with:
�!
a spare wheel*
or �! a Minispare emergency spare wheel* Preparing the veh
icle
Prepare the vehicle as described
(�= page 363).
�6 Turn the spa re-wheel bracket anti-
clockwise.
The bracket loosens.
�6 Remove the wheel from the boot.
�6 Engage the steering wheel lock. Raisin
gthe vehicle
�6 Prevent the vehicle from rolling away
using chocks or similar:
On a level road:
�6place the cho cks in front of and be-
hind the wheel diagonally opposite
the wheel to be changed.
On uphill gradients:
�6 place chocks behind both wheels
on the other axle.
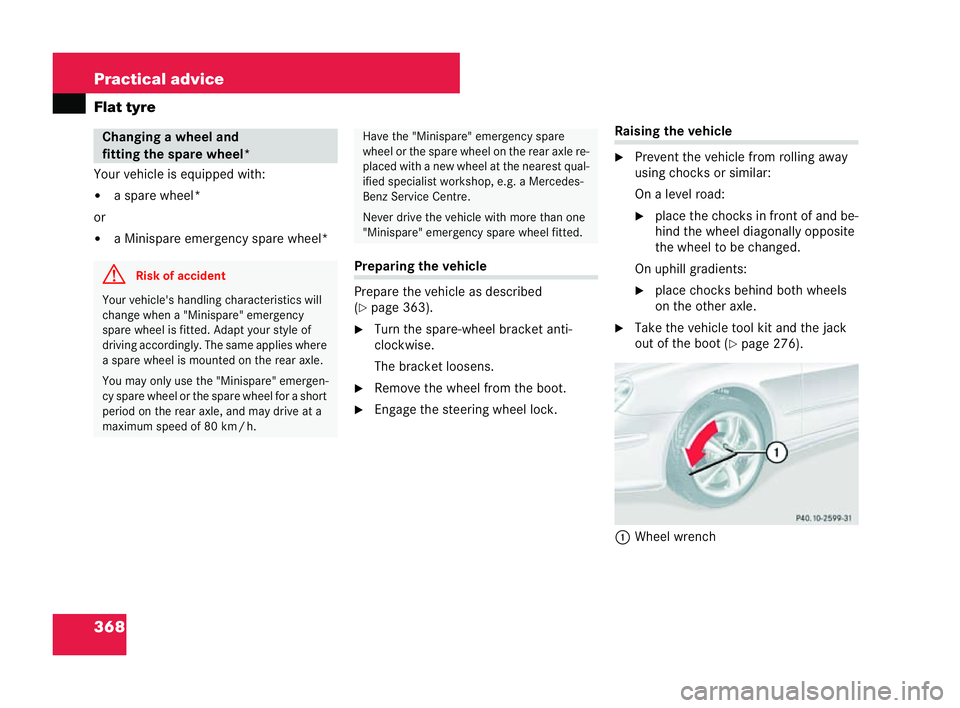
�6 Take the vehicle tool kit and the jack
out of the boot ( �=page 276).
1 Wheel wrench Ch
anging a wheel and
fitting the spare wheel* G
Risk of accident Your vehicle's handling characteristics will
change when a "Minispare" emergency
spare wheel is fitted. Adapt your style of
driving accordingly. The same applies where
a spare wheel is
mounted on the rear axle.
You may only use the "Minispare" emergen-
cy spare wheel or the spare wheel for a short
period on the rear axle, and may drive at a
maximum speed of 80 km /h. Have the
"Minispare" emergency spare
wheel or the spare wheel on the rear axle re-
placed with a new wheel at the nearest qual-
ified specialist workshop, e.g. a Mercedes-
Benz Service Centre.
Never drive the vehicle with more than one
"Minispare" emergency spare wheel fitted. P 40.10-2599-31209en_d2.boo Seite
368 Dienstag, 25. Mai 2004 7:26 19
Page 376 of 453
373
Practical advice
Flat tyre
�6 Press electr icair pump switch 2toI.
The electric air pump isswitched on.
The tyre ispumped up.
! Do not run the electric air pump for longer
than six minutes without a break, oth erwise it
may overheat.
The air pump can be used again once it has
cooled down.
�6 Pum pup the tyre to 2.5 bar (this takes
about fi veminutes).
�6 Press the switch on the electric air
pump to 0.
The electric air pump isswitched off.
If a tyre pressure of 2.5 bar is exceeded:
�6 Open the pressure release screw on
pressure gauge 4until the tyre pres-
sure is adjusted.
�6 Return the air pump to the stowage
well and close it. Lowering the vehicle
�6
Lower the vehicle. To do this, turn the
crank anti-clockwise until the vehicle is
once again firmly on the ground.
�6 Put the jack to one side.
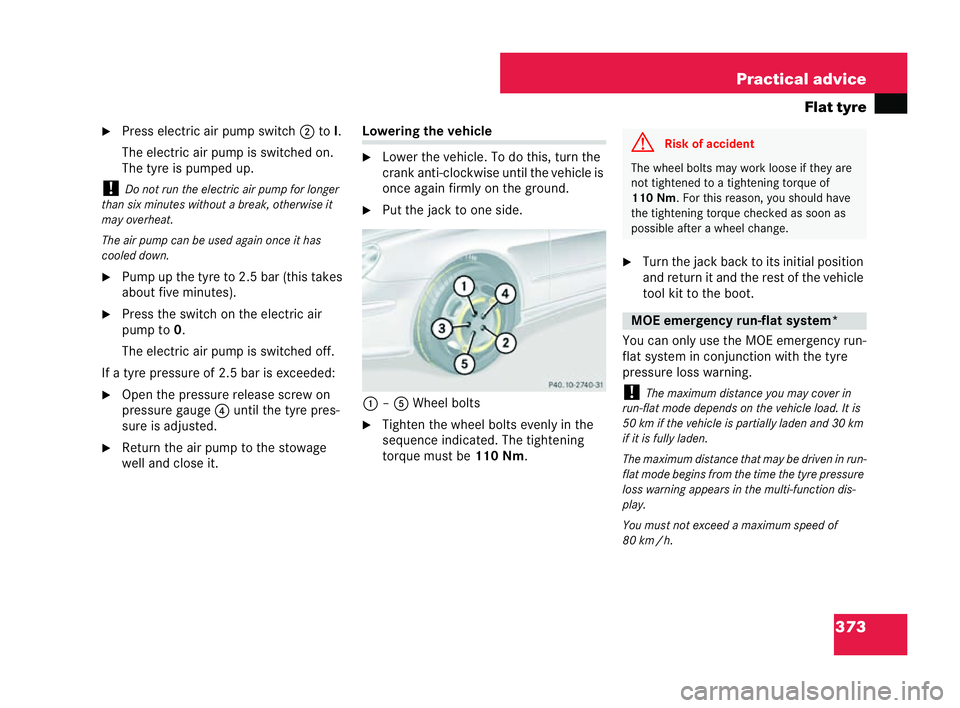
1 –5 Wheel bo lts
�6 Tighten the wheel bolts evenly inthe
sequence indicated. The tightening
torque must be 110 Nm. �6
Turn the jack back to its initial position
and return it and the rest of the vehicle
toolkit to the boot.
You can only use the MOE emergency run-
flat system in conjunction with the tyre
pressure loss warning.
! The maximum distance you may cover in
run-flat mode depends on the vehicle load. It is
50 km if the vehicle is partially laden and 30 km
if it is fully laden.
The maximum distance that may be drive nin run-
flat mode begins from the time the tyre pressure
loss warning appears in the multi-function dis-
play.
Yo u must not exceed a maximum speed of
80 km /h. P 40.10-2740-31 G
Risk of accident The wheel bolts may work loose if they are
not tightene dto a tightening torque of
11 0Nm . For this reason, you should have
the tightening torque checked as soonas
possible after a wheel change. MOE
emergencyrun-fl atsyst em* 209en_d2.boo Seite
373 Dienstag, 25. Mai 2004 7:26 19
Page 381 of 453

378 Practical advice
Battery
!
Only use battery chargers with a maximum
ch arging voltage of 14.8 V. �6
Charge the battery.
Observe the notes inthe operating
instructions foryour battery charge r.
�6 Refit the charge d battery.
To do so, follow the steps described
under "Removing the battery" in the
re ve rse order.
! Always conne ctthe battery in the order de-
scribed below. Never swap the terminal clamps.
You could otherwise damage the vehicle's elec-
tronics.
�6 Switch off all electrical consumers.
�6 Connect the positive terminal and
secure the cover.
�6 Connect the negative terminal. �6
Connect the breather hose.
Make sure that the battery is fitted with
a stopper opposite the breather hose.
i If the power supply tothe battery has been
interrupted (e. g.it has been reconnected), you
must carry out the following tasks:
�! Set the clock (�= page 121)
�! Rese tthe side win dows ( �=page 180) Cha
rging and fitting the battery G
Risk of inju ry Never charge th
ebattery when it is fitted in
the vehicle. Youco uld otherwise dam age
the vehicle's electronics .Only charge the
battery ina well ventilated area. During the
ch arg ingp roce ss, gas esmay escapeand
generate minor explosi ons which could in-
jure you and oth ers or cause paint damage
or acid corrosion to the vehic le. G
Risk of acid burns During the charging process, there is a risk
of acid burns due to the gases escaping
from th ebattery. Do not lean over the bat-
tery while the engine is being jump-started. Connecting the
battery 209en_d2.boo Seite
378 Dienstag, 25. Mai 2004 7:26 19
Page 386 of 453
383
Practical advice
Towing Securing the towing eye
�6
Remove the towing eye and the wheel
wrench from the vehicle tool kit
(�= page 276).
�6 Screw in the towing eye clockw ise to
the stop.
�6 Insert the wheel wrench handle into the
towing eye and tighten. Removing the towing eye
�6
Remove the wheel wrench from the ve-
hicle to olkit.
�6 Insert the wheel wrench handle into the
towing eye and turn the wheel wrench
anti-clockwise.
�6 Unscrew the to wing eye.
�6 Insert the top of cover 1byits tab in
the front bumper and press the bottom
of the cover inuntil it engages.
or St
andard vehicles:
�6 Insert the bottom of cover 2by its tab
in the rear bumper and press the top of
the cover in until it engages.
or
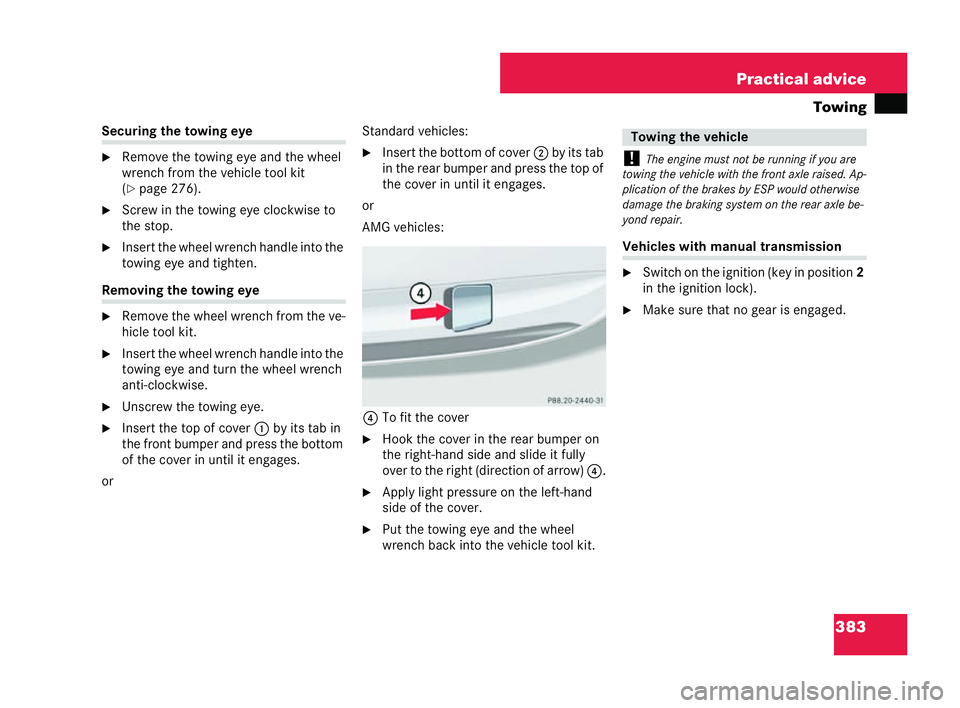
AMG veh icles:
4 To fit the cover
�6 Hook the cover in the rear bumper on
the right-hand side and slide it fully
over to the right (direction of arrow) 4.
�6 Apply light pressure on the left-hand
side of the cover.
�6 Put the towing eye and the wheel
wrench back into the vehicle tool kit. !
Theengine must not be running ifyo ua re
towing the vehicle with the front axle raised. Ap-
pli ca tion of the brakes by ESP would otherwise
da ma ge the braking sy stem on the rear axle be-
yond repair. Vehicles with manua
l transmission
�6 Switch on the ignition (key inposition 2
in the ignition lock).
�6 Make sure that no gear is engaged. P 88.20-2440-31 Towing the vehicle209en_d2.boo Seite
383 Dienstag, 25. Mai 2004 7:26 19
Page 390 of 453
387
Practical advice
Fuses
�6 Rem ove any moisture from the fuse
box using a dry cloth.
�6 Loosen clamps 6and swing fuse box
cover 5upwards. Clos
ing
�6 Place the cover on fuse box 5. Make
sure that the rubber seal fits correctly
and the cover fits correctly on the box.
�6 Press cover 5and secure it with
clam ps6.
�6 Guide the cover into the retainer.
�6 Turn the rotary catches one quarter
turn clockwise. The fuse box is located in the boot behind
the left-hand side panel. Open
ing
Illustratio ntake n from a Coupé
1 Trim
2 Coupé: cover
3 Coupé: fuse extractor �6
Remove trim 1.
�6 Remove cover 2. Closi
ng
�6 Rep lace co ver2.
�6 Press on trim 1. Fuse box in
theb oot P 54.15-2327-31 neu209en_d2.boo Seite
387 Dienstag, 25. Mai 2004 7:26 19