Page 79 of 418

78 Safety and SecurityDriving safety systemsThe - indicator lamp in the instrument
cluster comes on when you turn the
SmartKey in the starter switch to
position2 or press the KEYLESS-GO*
start/stop button twice. It goes out when
the engine is running.
Braking
At the instant one of the wheels is about to
lock up, a slight pulsation can be felt in the
brake pedal, indicating that the ABS is in
the regulating mode. �
Keep firm and steady pressure on the
brake pedal while experiencing the pul-
sation.
Continuous steady brake pedal pressure
yields the advantages provided by the ABS,
namely braking power and the ability to
steer the vehicle.
The pulsating brake pedal can be an indica-
tion of hazardous road conditions and
functions as a reminder to take extra care
while driving.Emergency brake maneuver
�
Keep continuous full pressure on the
brake pedal.
For more information, see “Practical hints”
section (
�page 292).
BAS
The Brake Assist System (BAS) operates in
emergency situations. If you apply the
brakes very quickly, the BAS automatically
provides full brake boost, thereby poten-
tially reducing the braking distance. Apply
continuous full braking pressure until the
emergency braking situation is over. The
ABS will prevent the wheels from locking.
When you release the brake pedal, the
brakes function again as normal. The BAS
is then deactivated.
Warning!
G
The ABS cannot prevent the natural laws of
physics from acting on the vehicle, nor can
it increase braking or steering efficiency be-
yond that afforded by the condition of the
vehicle brakes and tires or the traction af-
forded. The ABS cannot prevent accidents,
including those resulting from excessive
speed in turns, following another vehicle too
closely, or hydroplaning. Only a safe, atten-
tive, and skillful driver can prevent acci-
dents. The capabilities of an ABS equipped
vehicle must never be exploited in a reck-
less or dangerous manner which could jeop-
ardize the user’s safety or the safety of
others.
Page 108 of 418
.
Easy-entry / exit feature
With the easy-entry / exit feature activat-
ed, the steer")
107 Controls in detailSeats
�Seats
For more information on seat adjustment,
see “Seat adjustment” (
�page 35).
Easy-entry / exit feature
With the easy-entry / exit feature activat-
ed, the steering wheel tilts upwards and
the driver’s seat moves to the rear.
This allows easier entry into and exit from
the vehicle when the driver’s door is
opened. However, the engine must be
turned off.
When the SmartKey is inserted in the start-
er switch or you have pressed the
KEYLESS-GO* start / stop button once and
the driver’s door is closed, the steering
wheel and the driver’s seat return to their
last set positions.You can activate the following functions:
�
Steering column:
Only the steering column is adjusted.
�
Steering column and seat:
The steering column and the seat are
adjusted.
The easy-entry / exit feature can be
switched on or off in the convenience sub-
menu of the control system (
�page 154).
Warning!
G
You must make sure that no one can be-
come trapped or injured by the moving
steering wheel and driver’s seat when the
easy-entry / exit feature is activated, the
driver’s door is being opened, and the en-
gine is turned off or the SmartKey is re-
moved from the starter switch.
Do not leave children unattended in the ve-
hicle, or with access to an unlocked vehicle.
Children could open the driver’s door and
unintentionally activate the easy-entry/exit
feature, which could result in an accident
and/or serious personal injury.
iTo cancel seat/steering wheel move-
ment, do one of the following:�
Press the seat adjustment switch
(�page 35)
�
Move the steering column stalk
(�page 39)
�
Press the memory button
(�page 116)
Page 117 of 418

116 Controls in detailMemory function
�Memory function
You can store up to three different settings
per SmartKey or SmartKey with
KEYLESS-GO*.
The following settings are saved for each
stored position:�
Driver’s seat and seat backrest posi-
tion
�
Settings for multicontour seat*
�
Steering wheel position
�
Exterior rear view mirror position
�
Automatic climate control
These key-dependent memory settings
can be deactivated if desired
(
�page 154).The memory button and stored position
switch are located on the door.
1Stored position button
2Memory button
�
Make sure the ignition is switched on
or the relevant door is open and the
SmartKey is inserted in the starter
switch.
!Prior to operating the vehicle, the driv-
er should check and adjust the seat
height, seat position fore and aft, and
seat backrest angle if necessary, to en-
sure adequate control, reach and com-
fort. The head restraint should also be
adjusted for proper height. See also the
section on airbags (
�page 61) for
proper seat positioning.
In addition, adjust the steering wheel to
ensure adequate control, reach, opera-
tion and comfort. Both the inside and
outside rear view mirrors should be ad-
justed for adequate rear vision.
Fasten seat belts. Infants and small
children should be seated in a properly
secured restraint system that complies
with U.S. Federal Motor Vehicle Safety
Standards 213 and 225 and Canadian
Motor Vehicle Safety Standards 213
and 210.2.
Warning!
G
Do not activate the memory function while
driving. Activating the memory function
while driving could cause the driver to lose
control of the vehicle.
Page 118 of 418
.
�
Press memory button2.
�
Release memo")
117 Controls in detail
Memory function
Storing positions into memory�
Adjust the seats, steering wheel and
exterior mirrors to the desired position
(�page 34).
�
Press memory button2.
�
Release memory button2 and push
one of the position buttons1 within
three seconds.
All the settings are stored with the se-
lected position.
Recalling positions from memory�
Press and hold one of the position
buttons1 until the seat, steering
wheel and exterior mirrors have fully
moved to the stored positions.Storing exterior rear view mirror park-
ing position
For easier parking, you can adjust the pas-
senger-side exterior rear view mirror so
that you can see the right rear wheel as
soon as you engage reverse gearR.
For information on activating the parking
position, see “Setting parking position for
exterior rear view mirror” (
�page 156).
iReleasing the button immediately
stops movement to the stored posi-
tions.Warning!
G
Do not operate the power seats using the
memory button if the seat backrest is in an
extremely reclined position. Doing so could
cause damage to front or rear seats.
First move seat backrest to an upright posi-
tion.
iYou can store a parking position for the
passenger-side exterior rear view mir-
ror for each SmartKey or SmartKey
with KEYLESS-GO*.
Page 120 of 418
119 Controls in detail
Lighting
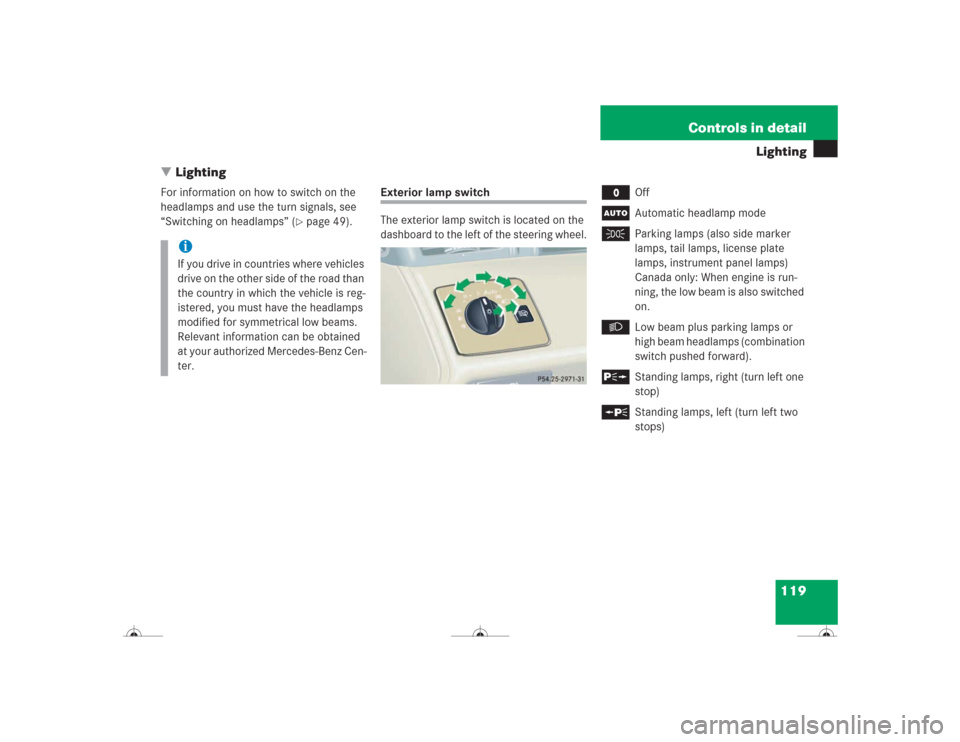
�Lighting
For information on how to switch on the
headlamps and use the turn signals, see
“Switching on headlamps” (
�page 49).
Exterior lamp switch
The exterior lamp switch is located on the
dashboard to the left of the steering wheel.
M
Off
U
Automatic headlamp mode
C
Parking lamps (also side marker
lamps, tail lamps, license plate
lamps, instrument panel lamps)
Canada only: When engine is run-
ning, the low beam is also switched
on.
B
Low beam plus parking lamps or
high beam headlamps (combination
switch pushed forward).
ˆ
Standing lamps, right (turn left one
stop)
‚
Standing lamps, left (turn left two
stops)
iIf you drive in countries where vehicles
drive on the other side of the road than
the country in which the vehicle is reg-
istered, you must have the headlamps
modified for symmetrical low beams.
Relevant information can be obtained
at your authorized Mercedes-Benz Cen-
ter.
Page 128 of 418
,
i.e. c")
127 Controls in detail
Instrument cluster
Coolant temperature gauge
During severe operating conditions,
e.g. stop-and-go traffic, the coolant tem-
perature may rise close to 248° F (120°C),
i.e. close to the red zone of the coolant
temperature gauge.
The engine should not be operated with
the coolant temperature above 248° F
(120°C), i.e. in the red zone of the coolant
temperature gauge. Doing so may cause
serious engine damage which is not cov-
ered by the Mercedes-Benz Limited War-
ranty.
Trip odometer�
Make sure you are viewing the trip
odometer display.
�
If it is not displayed, press the è or
ÿ button on the multifunction
steering wheel repeatedly until the trip
odometer appears (
�page 129).
�
Press and hold reset button on the in-
strument cluster (
�page 22) until the
trip odometer is reset.
Warning!
G
�
Driving when your engine is badly over-
heated can cause some fluids which
may have leaked into the engine com-
partment to catch fire. You could be se-
riously burned.
�
Steam from an overheated engine can
cause serious burns and can occur just
by opening the hood. Stay away from
the engine if you see or hear steam com-
ing from it.
Turn off the engine, get out of the vehicle
and do not stand near the vehicle until the
engine has cooled down.
iExcessive coolant temperature triggers
a warning in the multifunction display
(�page 306).
Page 130 of 418

129 Controls in detail
Control system
�Control system
The control system is activated as soon as
the SmartKey in the starter switch is
turned to position1 or as soon as the
KEYLESS-GO start/stop button is in
position1. The control system enables you
to:�
call up information about your vehicle
�
change vehicle settings
For example, you can use the control sys-
tem to find out when your vehicle is next
due for service, to set the language for
messages in the instrument cluster dis-
play, and much more.
The control system relays information to
the multifunction display.
Multifunction display
1Trip odometer
2Main odometer
iThe displays for the audio systems (ra-
dio, CD player) will appear in English,
regardless of the language selected.
Warning!
G
A driver’s attention to the road and traffic
conditions must always be his / her primary
focus when driving.
For your safety and the safety of others, se-
lecting features through the multifunction
steering wheel should only be done by the
driver when traffic and road conditions per-
mit it to be done safely.
Bear in mind that at a speed of just 30 mph
(approximately 50 km/h), your vehicle is
covering a distance of 44 feet (approximate-
ly 14 m) every second.
Page 131 of 418
130 Controls in detailControl systemMultifunction steering wheel
The displays in the multifunction display
and the settings in the control system are
controlled by the buttons on the multifunc-
tion steering wheel.
1
Multifunction display in the speed-
ometerOperating the control system
2
Selecting the submenu or setting
the volumeæ
up / to increase
ç
down / to decrease
3
Telephone*s
to take a call
t
to end a call
4
Menu systemsè
for next menu
ÿ
for previous menu
5
Moving within a menuj
for next display
k
for previous display