Page 212 of 418
211 Controls in detail
Driving systems
Vehicle level control
Your vehicle automatically adjusts its ride
height to�
reduce fuel consumption
�
increase vehicle safety
The vehicle chassis ride height is raised or
lowered according to the selected level
setting and to the vehicle speed:
�
With increasing speed, ride height is re-
duced by up to approximately 0.95 in
(24 mm).
�
With decreasing speed, the ride height
is again raised to the selected vehicle
level.Select the level 1 and 2 settings only when
required by current driving conditions.
Otherwise
�
Fuel consumption may increase
�
Handling may be impairediThese height adjustments are so small
that you may not notice any change.Warning!
G
To help avoid personal injury, keep hands
and feet away from wheel housing area, and
stay away from under the vehicle when low-
ering the vehicle chassis.
Page 213 of 418

212 Controls in detailDriving systemsThe following vehicle level settings can be
selected when the vehicle is stationary:
The switch with the indicator lamps is lo-
cated in the upper part of the center con-
sole.
1Indicator lamps
2Vehicle level control switch
�
Briefly press switch2 to change from
one level setting to the next. When ve-
hicle is at raised level 2, pressing the
switch will return the vehicle to normal
level.
The message:ACTIVE BODY CONTROL
VEHICLE RISING!appears in the multifunction display.
The display switches off when the vehi-
cle is raised.
Vehicle level when
stationary
Use for
Ride height increase
over normal
Automatic lowering
Indicator lamps
Normal level
Normal operation
None
Max. approx. 0.4 in (11 mm)
Both lamps off
Raised level 1
Driving with snow
chains (
�page 281)
Max. 0.55 in (14 mm)
1
Max. approx. 0.55 in (14 mm)
One lamp on
Raised level 2
Very rough road surface
conditions
Max. 0.95 in (24 mm)
1
Max. approx. 0.95 in (24 mm)
Both lamps on
1Dependent on load
Page 216 of 418

215 Controls in detail
Driving systems
Range of the sensors
To function properly, the sensors must be
free of dirt, ice, snow and slush. Clean the
sensors regularly, being careful not to
scratch or damage the sensors.Front sensors
Rear sensorsMinimum distance
If the system detects an obstacle in this
range, all the warning lamps come on and
you hear a warning signal. If the obstacle is
closer than the minimum distance, the ac-
tual distance might no longer be indicated
by the system.
Center
approx. 40 in (100 cm)
Corners
approx. 24 in (60 cm)
Center
approx. 48 in (120 cm)
Corners
approx. 32 in (80 cm)
!During parking maneuvers, pay special
attention to objects located above or
below the height of the sensors (e.g.
planters or trailer hitches). The Park-
tronic system will not detect such ob-
jects at close range and damage to
your vehicle or the object may result.
Ultrasonic signals from outside sourc-
es (e.g. truck air brakes or jackham-
mers) may impair the operation of the
Parktronic system.
Center
approx. 8 in (20 cm)
Corners
approx. 6 in (15 cm)
Page 225 of 418
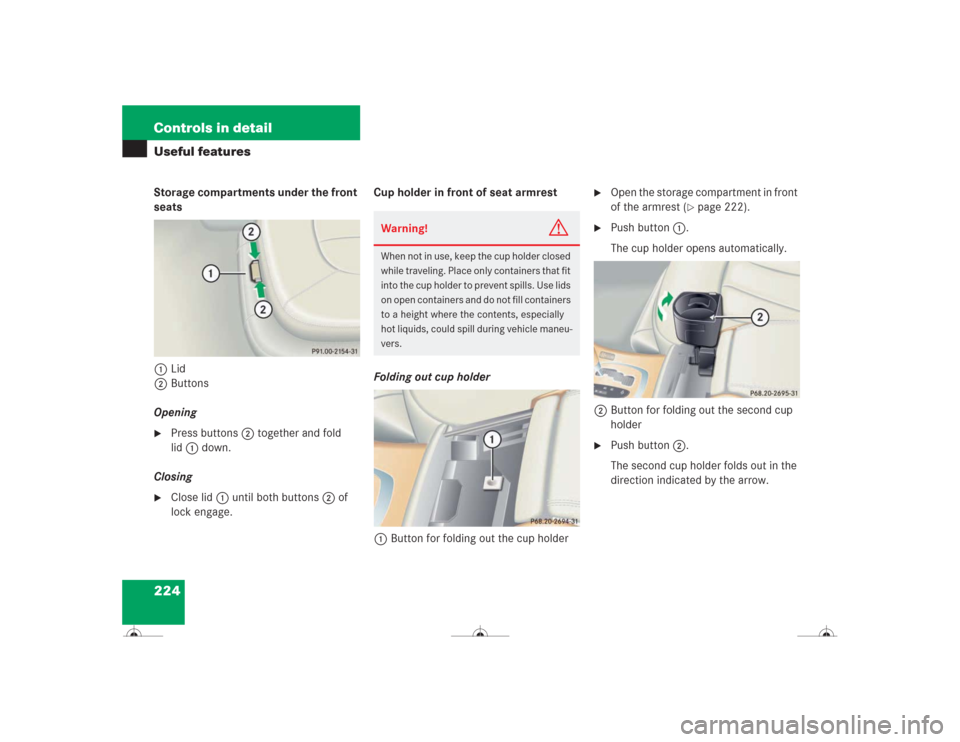
224 Controls in detailUseful featuresStorage compartments under the front
seats
1Lid
2Buttons
Opening�
Press buttons2 together and fold
lid1 down.
Closing
�
Close lid1 until both buttons2 of
lock engage.Cup holder in front of seat armrest
Folding out cup holder
1Button for folding out the cup holder
�
Open the storage compartment in front
of the armrest (
�page 222).
�
Push button1.
The cup holder opens automatically.
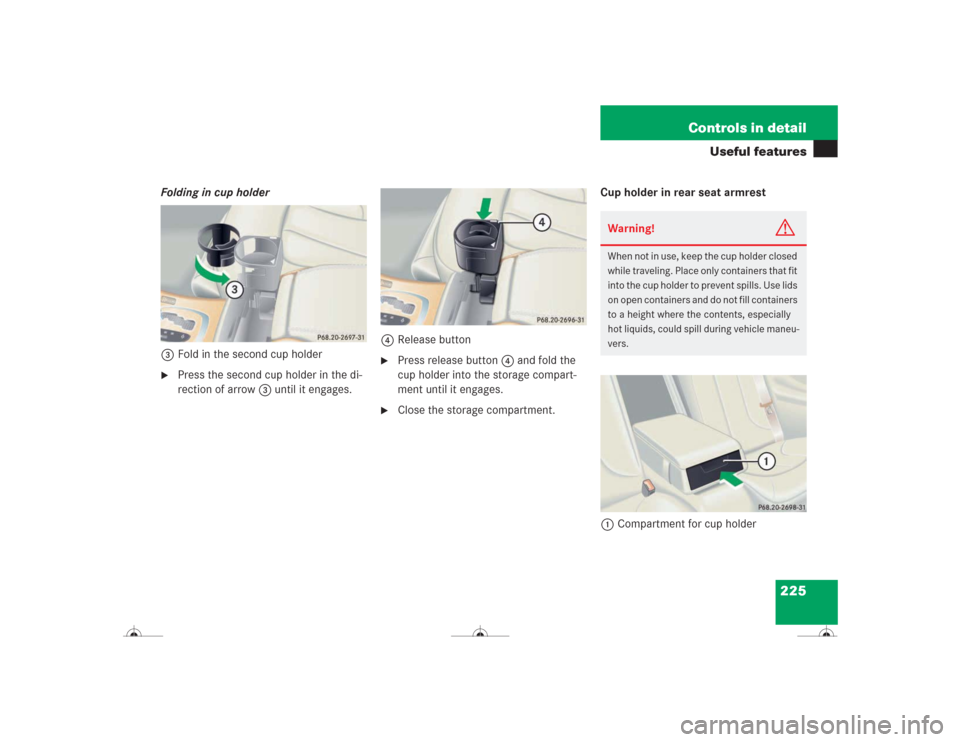
2Button for folding out the second cup
holder
�
Push button2.
The second cup holder folds out in the
direction indicated by the arrow.
Warning!
G
When not in use, keep the cup holder closed
while traveling. Place only containers that fit
into the cup holder to prevent spills. Use lids
on open containers and do not fill containers
to a height where the contents, especially
hot liquids, could spill during vehicle maneu-
vers.
Page 226 of 418
225 Controls in detail
Useful features
Folding in cup holder
3Fold in the second cup holder�
Press the second cup holder in the di-
rection of arrow3 until it engages.4Release button
�
Press release button4 and fold the
cup holder into the storage compart-
ment until it engages.
�
Close the storage compartment.Cup holder in rear seat armrest
1Compartment for cup holder
Warning!
G
When not in use, keep the cup holder closed
while traveling. Place only containers that fit
into the cup holder to prevent spills. Use lids
on open containers and do not fill containers
to a height where the contents, especially
hot liquids, could spill during vehicle maneu-
vers.
Page 261 of 418

260OperationEngine compartment
�Engine compartmentHood
Opening
The hood lock release lever is located in
the driver’s footwell to the left of the park-
ing brake pedal.
1Release lever
�
Pull release lever 1 in direction of ar-
row.
The hood is unlocked and handle 2
will extend out of the radiator grille.
2Handle for opening the hood
�
Pull handle 2 to its stop out of radiator
grille.
�
Pull up on the hood (do not pull up on
the handle) and then release it.
The hood will be automatically held
open at shoulder height.
Warning!
G
Do not pull the release lever while the vehi-
cle is in motion. Otherwise the hood could
be forced open by passing air flow.
!To avoid damage to the windshield wip-
ers or hood, never open the hood if the
wiper arms are folded forward away
from the windshield.
Warning!
G
To help prevent personal injury, stay clear of
moving parts when the hood is open and the
engine is running. Make sure the hood is
properly closed before driving. When closing
the hood, use extreme caution not to catch
hands or fingers.
The radiator fan may continue to run for ap-
proximately 30 seconds or even restart af-
ter the engine has been turned off. Stay
clear of fan blades.
Page 262 of 418
.
The hood will lock audibly.
�
Check to make sure the hood is fully
closed.
If you can raise")
261 Operation
Engine compartment
Closing�
Let the hood drop from a height of ap-
proximately 1 ft (30 cm).
The hood will lock audibly.
�
Check to make sure the hood is fully
closed.
If you can raise the hood at a point
above the headlamps, then it is not
properly closed. Open it again and let it
drop with somewhat greater force.
Engine oil
The amount of oil your engine needs will
depend on a number of factors, including
driving style. Higher oil consumption can
occur when�
the vehicle is new
�
the vehicle is driven frequently at
higher engine speeds
Engine oil consumption checks should only
be made after the vehicle break-in period.
Warning!
G
If you see flames or smoke coming from the
engine compartment, or if the coolant tem-
perature gauge indicates that the engine is
overheated, do not open the hood. Move
away from vehicle and do not open the hood
until the engine has cooled down. If neces-
sary, call the fire department.Warning!
G
The engine is equipped with a transistorized
ignition system. Because of the high voltage
it is dangerous to touch any components (ig-
nition coils, spark plug sockets, diagnostic
socket) of the ignition system�
with the engine running
�
while starting the engine
�
if ignition is “on” and the engine is
turned manually
Warning!
G
Be careful that you do not close the hood on
anyone.
iDo not use any special lubricant addi-
tives, as these may damage the drive
assemblies. Using special additives not
approved by Mercedes-Benz will re-
strict your warranty entitlement.
More information on this subject is
available at any Mercedes-Benz
Center.
Page 282 of 418

The engine is equipped with a block heat-
er.
The electrical cable may be installed at an
authorized Mercedes-Benz Center.Snow chains
Snow chai")
281 Operation
Winter driving
Block heater (Canada only)
The engine is equipped with a block heat-
er.
The electrical cable may be installed at an
authorized Mercedes-Benz Center.Snow chains
Snow chains should only be driven on
snow-covered roads at speeds not to
exceed 30 mph (50 km/h). Remove chains
as soon as possible when driving on roads
without snow.Please observe the following guidelines
when using snow chains:
�
Use of snow chains is not permissible
with all wheel/tire combinations.
�
Snow chains should only be used on
the rear wheels. Follow the manufac-
turer's mounting instructions.
�
Only use snow chains that are ap-
proved by Mercedes-Benz. Your autho-
rized Mercedes-Benz Center will be
glad to advise you on this subject.
�
Use of snow chains may be prohibited
depending on location. Always check
local and state laws before installing
snow chains.
iWhen using snow chains, the vehicle
should only be driven at vehicle
height 1 (
�page 211).
iWhen driving with snow chains, you
may wish to deactivate the ESP
(�page 80) before setting the vehicle
in motion. This will improve the
vehicle‘s traction.
!Do not use snow chains with tire sizes
245 / 45 R18 on 8½J x 18 rim and
265 / 40 R18 in general (
�page 365).
Do not use snow chains on tires
mounted on AMG rims.