Page 303 of 418

302 Practical hintsWhat to do if …?Display
Display message
Possible cause
Possible solution
DISTRONIC
EXTERNAL INTERFER-
ENCE
REACTIVATE!
Distronic* is switched off and is temporarily
unavailable.
�
Try activating Distronic* again later.
CURRENTLY UNAVAIL-
ABLE
SEE OPER. MANUAL
Distronic* is switched off because the Dis-
tronic* cover in the radiator grille is dirty.
�
Clean the Distronic* cover in the radiator
grille (
�page 287).
�
Restart the vehicle.
DRIVE TO WORKSHOP!
Distronic* is malfunctioning or the display
is malfunctioning.
�
Visit an authorized Mercedes-Benz Center as
soon as possible.
P
SHIFT
TO P
You have tried to turn off the engine with
the KEYLESS-GO* start/stop button with
the gear selector lever not inP.
�
Place the gear selector lever in positionP.
ESP
MALFUNCTION!
VISIT WORKSHOP!
The ESP has detected a malfunction and
switched off.
The ABS may still be operational.
�
Continue driving with added caution.
�
Have the system checked at an authorized
Mercedes-Benz Center as soon as possible.
Failure to follow these instructions increases the
risk of an accident.
DISPLAY MALFUNCTION
VISIT WORKSHOP!
The ESP or the ESP display is malfunction-
ing.
�
Continue driving with added caution.
�
Have the system checked at an authorized
Mercedes-Benz Center as soon as possible.
Failure to follow these instructions increases the
risk of an accident.
Page 314 of 418

313 Practical hints
What to do if …?
Display symbol
Display messages
Possible cause
Possible solution
F
KEY
CHECK BATTERY
The battery in the KEYLESS-GO* key is
discharged.
�
Change the battery (
�page 332).
KEY
NOT RECOGNIZED!
SmartKey with KEYLESS-GO* is not rec-
ognized while the engine is running be-
cause�
the SmartKey with KEYLESS-GO* is
not in the vehicle
�
there is strong radio-frequency inter-
ference
�
Stop the vehicle as soon as it is safe to do
so.
�
Search for the SmartKey with
KEYLESS-GO*.
Otherwise the vehicle cannot be centrally
locked nor can the engine be started again
after it has been stopped.
SmartKey with KEYLESS-GO* is momen-
tarily not recognized.
�
Change the position of the SmartKey with
KEYLESS-GO* in the vehicle.
�
Operate the vehicle with the SmartKey in
the starter switch if necessary.
KEY
DETECTED IN VEHICLE
SmartKey with KEYLESS-GO*left in the
vehicle was recognized while locking the
vehicle from the outside.
�
Take the SmartKey with KEYLESS-GO*
out of the vehicle.
KEY
DRIVE TO WORKSHOP!
The KEYLESS-GO* system is malfunction-
ing.
�
Visit an authorized Mercedes-Benz Cen-
ter as soon as possible.
Page 332 of 418
331 Practical hints
Unlocking/locking in an emergency
�Unlocking/locking in an emergency
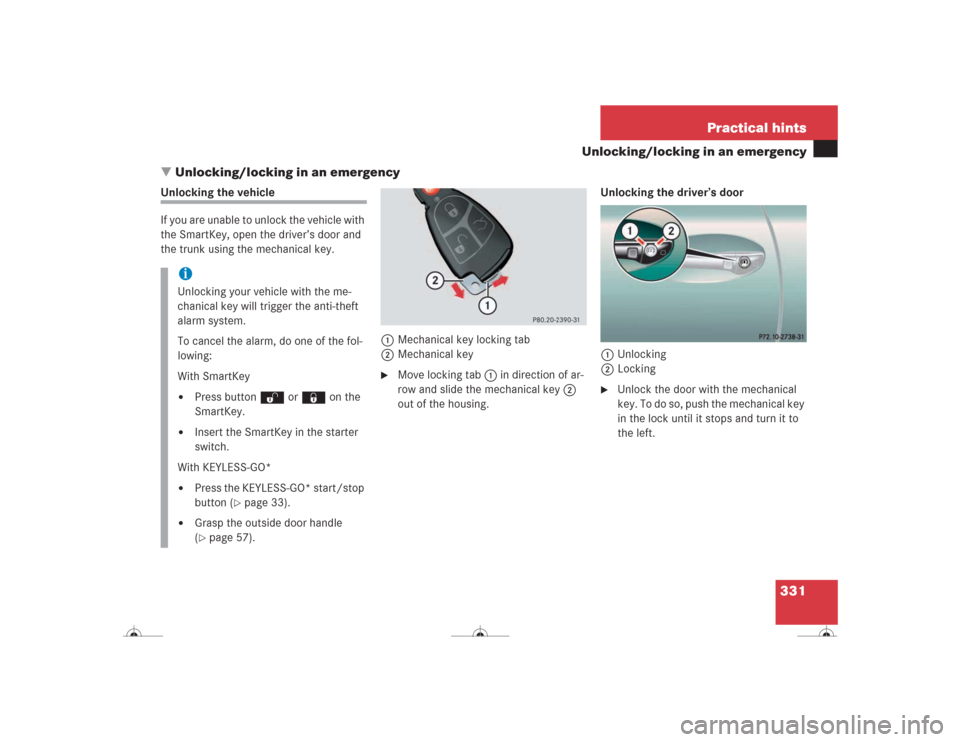
Unlocking the vehicle
If you are unable to unlock the vehicle with
the SmartKey, open the driver’s door and
the trunk using the mechanical key.
1Mechanical key locking tab
2Mechanical key
�
Move locking tab1 in direction of ar-
row and slide the mechanical key2
out of the housing.Unlocking the driver’s door
1Unlocking
2Locking
�
Unlock the door with the mechanical
key. To do so, push the mechanical key
in the lock until it stops and turn it to
the left.
iUnlocking your vehicle with the me-
chanical key will trigger the anti-theft
alarm system.
To cancel the alarm, do one of the fol-
lowing:
With SmartKey�
Press button Œ or ‹ on the
SmartKey.
�
Insert the SmartKey in the starter
switch.
With KEYLESS-GO*
�
Press the KEYLESS-GO* start/stop
button (
�page 33).
�
Grasp the outside door handle
(�page 57).
Page 333 of 418
 is required to open the trunk lid.
If you are unable to unlock the trunk with
th")
332 Practical hintsUnlocking/locking in an emergencyUnlocking the trunk
A minimum height clearance of 6.3 ft
(1.90 m) is required to open the trunk lid.
If you are unable to unlock the trunk with
the SmartKey or KEYLESS-GO*, open the
trunk with the mechanical key.
The trunk lid lock is located above the rear
license plate recess.
1Unlocking and opening
2Trunk lid lock�
Insert the mechanical key into the
trunk lid lock2.
�
Turn the mechanical key counterclock-
wise to position1 and press trunk lid
lock2 in direction of arrow.
The trunk unlocks and opens.
Locking the vehicle
If you are unable to lock the vehicle with
the SmartKey or the SmartKey with
KEYLESS-GO*, lock it with the mechanical
key as follows:�
Close the passenger door and the trunk
lid.
�
Press the central locking switch in the
center console (
�page 106).
�
Check to see whether the locking knob
on the passenger door is still visible. If
necessary push it down manually.
�
Slide mechanical key2 out of the
SmartKey (
�page 331).
�
Lock the driver’s door with the me-
chanical key (
�page 331).
�
Lock the trunk lid necessary with the
mechanical key (if applicable)
(�page 104).
Replacing batteries in the SmartKey/
SmartKey with KEYLESS-GO*
If the batteries in the SmartKey or the
SmartKey with KEYLESS-GO* are dis-
charged, the vehicle can no longer be
locked or unlocked. It is recommended to
have the batteries replaced at an autho-
rized Mercedes-Benz Center.
!The trunk lid swings open upwards au-
tomatically. Always make sure that
there is sufficient overhead clearance.
Warning!
G
Keep the batteries out of reach of children.
If a battery is swallowed, seek medical help
immediately.
Page 335 of 418

334 Practical hintsUnlocking/locking in an emergencySmartKey with KEYLESS-GO*
1Battery
2Tilt battery up
3Mechanical keyReplacement battery: Lithium, type
CR 2025 or equivalent.
�
Remove mechanical key (
�page 331).
�
Insert the mechanical key in side open-
ing and push gray slide.
The battery compartment is unlatched.
�
Pull the battery compartment out of the
SmartKey housing.
�
Using mechanical key3, apply pres-
sure to position2.
Battery1 tilts up slightly.
�
Pull out battery1 in direction of ar-
row.
�
Using a lint-free cloth, insert new bat-
tery with the plus (+) side facing up.
�
Return battery compartment into hous-
ing until it locks into place.
Fuel filler flap
In case the central locking system does
not release the fuel filler flap, you can it
manually.
1Release knob�
Open the trunk.
�
Remove the battery cover and the trim
inside the trunk on the right-hand side.
�
Pull release knob 1 in the direction of
arrow.
The fuel filler flap can be opened.
iThe required replacement battery is
available at any authorized
Mercedes-Benz Center.
Page 344 of 418

343 Practical hints
Flat tire
�Flat tire
Preparing the vehicle�
Park the vehicle as far as possible from
moving traffic on a hard surface.
�
Turn on the hazard warning flashers.
�
Turn the steering wheel so that the
front wheels are in a straight ahead
position.
�
Set the parking brake.
�
Move the gear selector lever toP.
Vehicles with SmartKey:
�
Turn off the engine (
�page 55).
�
Remove the SmartKey from the starter
switch.Vehicles with SmartKey with
KEYLESS-GO*:
�
Turn off the engine by pressing the
KEYLESS-GO* button on the gear se-
lector lever once (
�page 56).
�
Open the driver’s door (this puts the
starter switch in position0, same as
with the SmartKey removed from the
starter switch). The driver’s door then
can be closed again.
�
Have any passenger exit the vehicle at
a safe distance from the roadway.
Mounting the spare wheel
iOpen door only when conditions are
safe to do so.
Warning!
G
Never operate the vehicle with more than
one spare wheel mounted.
The spare wheel rim is for temporary use
only. Use for over a total of 12 000 miles
(20 000 km) (aggregate of all uses) may
cause wheel rim failure leading to an acci-
dent and possible injuries.
The spare wheel should only be used tempo-
rarily and replaced with a regular road wheel
as quickly as possible.
CL 55 AMG and Sport Package* only:
The spare wheel is for temporary use only.
When driving with spare wheel mounted, en-
sure proper tire pressure and do not exceed
vehicle speed of 50 mph (80 km/h).
The dimensions of the spare wheel are dif-
ferent from those of the road wheels. As a
result, the vehicle handling characteristics
change when driving with a mounted spare
wheel. Adapt your driving style accordingly.
Page 349 of 418

348 Practical hintsBattery
�Battery
The battery is located in the trunk under
the right hand wheel well cover panel.
1Battery cover
2Locking knob�
Rotate and loosen locking button2
approx. one-half turn.
�
Remove battery cover1.
Warning!
G
Failure to follow these instructions can re-
sult in severe injury or death.
Never lean over batteries while connecting,
you might get injured.
Battery fluid contains sulfuric acid. Do not
allow this fluid to come in contact with eyes,
skin or clothing. In case it does, immediately
flush affected area with water and seek
medical help if necessary.
A battery will also produce hydrogen gas,
which is flammable and explosive. Keep
flames or sparks away from battery, avoid
improper connection of jumper cables,
smoking, etc.Warning!
G
Do not place metal objects on the battery as
this could result in a short circuit.
Use leak-proof battery only to avoid the risk
of acid burns in the event of an accident.
!Never loosen or detach battery termi-
nal clamps while the engine is running
or the SmartKey is in the starter switch.
Otherwise the alternator and other
electronic components could be se-
verely damaged.
Have the battery checked regularly by
an authorized Mercedes-Benz Center.
Refer to Service Booklet for mainte-
nance intervals or contact your autho-
rized Mercedes-Benz Center for further
information.Warning!
G
With a disconnected battery�
you will no longer be able to turn the
SmartKey in the starter switch and
pressing the KEYLESS-GO* start/stop
button on the gear selector lever will
have no effect
�
the gear selector lever will remain
locked in positionP
Page 356 of 418

355 Practical hints
Towing the vehicle
Installing towing eye bolt
1Cover on right side of front bumper
2Cover on right side of rear bumperRemoving cover
�
Press mark on cover in direction of ar-
row.
�
Lift cover off to reveal threaded hole for
towing eye bolt.
Installing towing eye bolt
�
Take towing eye bolt and wheel wrench
out of trunk (
�page 329).
�
Screw towing eye bolt clockwise into
its stop and tighten with wheel wrench.
Removing towing eye bolt
�
Loosen towing eye bolt counterclock-
wise with wheel wrench.
�
Unscrew towing eye bolt.
�
Store towing eye bolt and wheel
wrench in trunk.
Installing cover
�
Fit cover and snap into place.
!When towing the vehicle with all wheels
on the ground, please note the follow-
ing:
With the automatic central locking acti-
vated and the SmartKey in starter
switch position2, or KEYLESS-GO*
start/stop button in position2, the ve-
hicle doors lock if the left front wheel
as well as the right rear wheel are turn-
ing at vehicle speeds of approx. 9 mph
(15 km / h) or more.
Switch off the tow-away alarm
(�page 84).
To prevent the vehicle door locks from
locking, deactivate the automatic cen-
tral locking (
�page 153).
Towing of the vehicle should only be
done using the properly installed tow-
ing eye bolt. Never attach tow cable,
tow rope or tow rod to the vehicle chas-
sis, frame or suspension parts.