Page 162 of 418
161 Controls in detail
Automatic transmission
Steering wheel gearshift control (Speedshift) CL 55 AMG
You can change the gears manually on the
steering wheel or by using the gear
selector lever (
�page 158).
Allow engine to warm up under low load
use. Do not place full load on the engine
until the operating temperature has been
reached. Shift into reverse gear only when
the vehicle is stopped.
!Coasting the vehicle, or driving for any
other reason with gear selector lever
inN can result in transmission damage
that is not covered by the
Mercedes-Benz Limited Warranty.Warning!
G
Getting out of your vehicle with the gear
selector lever not fully engaged in positionP
is dangerous. Also, positionP alone is not
intended to or capable of preventing your
vehicle from moving, possibly hitting people
or objects.
Always set the parking brake in addition to
shifting to positionP (
�page 47).
When parked on an incline, turn the front
wheels towards the road curb.
Do not park this vehicle in areas where com-
bustible materials such as grass, hay or
leaves can come into contact with the hot
exhaust system, as these materials could be
ignited and cause a vehicle fire.Warning!
G
When leaving the vehicle, always remove the
SmartKey from the starter switch, take the
SmartKey with KEYLESS-GO* with you and
lock your vehicle. Do not leave children un-
attended in the vehicle, or with access to an
unlocked vehicle. Children could move the
gear selector lever from positionP, which
could result in an accident and / or serious
personal injury.
!Avoid spinning of a drive wheel for an
extended period when driving off on
slippery road surfaces. This may cause
serious damage to the drivetrain which
is not covered by the Mercedes-Benz
Limited Warranty.
Page 173 of 418
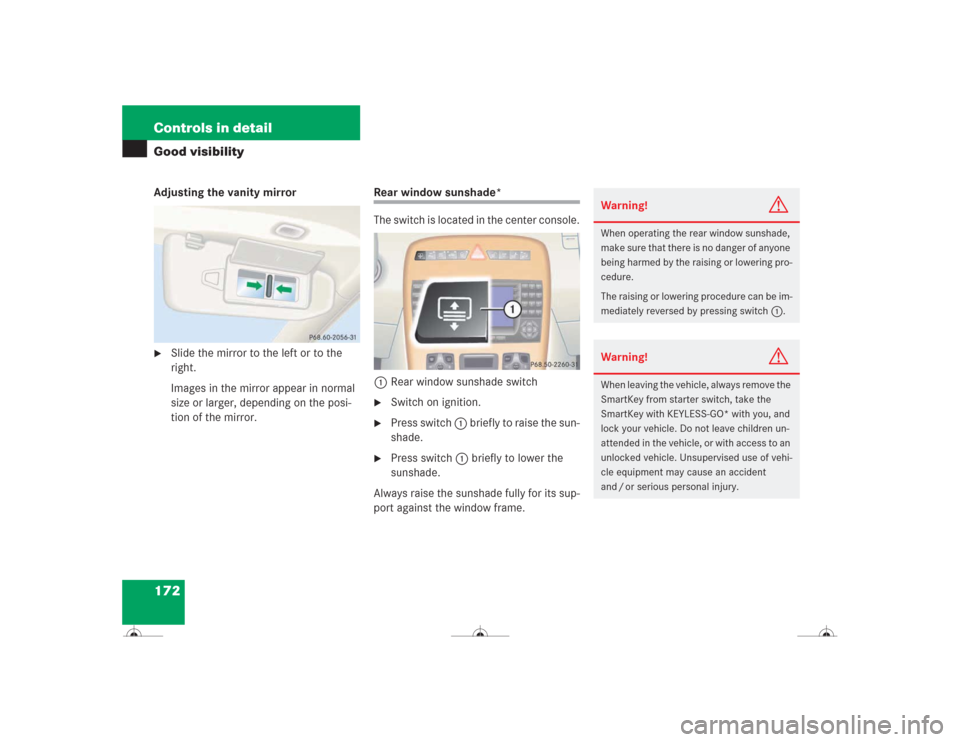
172 Controls in detailGood visibilityAdjusting the vanity mirror�
Slide the mirror to the left or to the
right.
Images in the mirror appear in normal
size or larger, depending on the posi-
tion of the mirror.
Rear window sunshade*
The switch is located in the center console.
1Rear window sunshade switch�
Switch on ignition.
�
Press switch 1 briefly to raise the sun-
shade.
�
Press switch 1 briefly to lower the
sunshade.
Always raise the sunshade fully for its sup-
port against the window frame.
Warning!
G
When operating the rear window sunshade,
make sure that there is no danger of anyone
being harmed by the raising or lowering pro-
cedure.
The raising or lowering procedure can be im-
mediately reversed by pressing switch1.Warning!
G
When leaving the vehicle, always remove the
SmartKey from starter switch, take the
SmartKey with KEYLESS-GO* with you, and
lock your vehicle. Do not leave children un-
attended in the vehicle, or with access to an
unlocked vehicle. Unsupervised use of vehi-
cle equipment may cause an accident
and / or serious personal injury.
Page 177 of 418
176 Controls in detailAutomatic climate controlNearly all dust particles, pollutants and
odors are filtered out before outside air en-
ters the passenger compartment through
the air distribution system.
The air conditioning will not engage (no
cooling) if the ± mode is selected
(�page 183).
Setting the temperature
Use temperature controls aand8
(�page 175) to separately adjust the air
temperature on each side of the passenger
compartment. You should raise or lower
the temperature setting in small incre-
ments, preferably starting at 72°F (22°C).
Increasing / decreasing
�
Press button a or 8 repeatedly up or
down until the display shows the de-
sired temperature.
The automatic climate control system
will accordingly adjust the interior air
temperature.
Warning!
G
Follow the recommended settings for heat-
ing and cooling given on the following pag-
es. Otherwise the windows could fog up,
impairing visibility and endangering you and
others.
iThe current climate control settings
(ON / OFF, temperature, air volume, ac-
tivated charcoal filter, etc.) are stored
for each SmartKey before it is removed
from the starter switch or when the ve-
hicle is locked using the SmartKey with
KEYLESS-GO* (
�page 116).
If the vehicle interior is hot, ventilate
the interior before driving off.
Keep the air intake grille in front of the
windshield free of snow, leaves, sticks,
and any other debris.
Do not obstruct air volume by placing
objects on the air volume-through ex-
haust slots below the rear window.
iWhen operating the climate control
system in automatic mode, you will
only rarely need to adjust the tempera-
ture, air volume and air distribution.
Page 187 of 418
186 Controls in detailPower windows
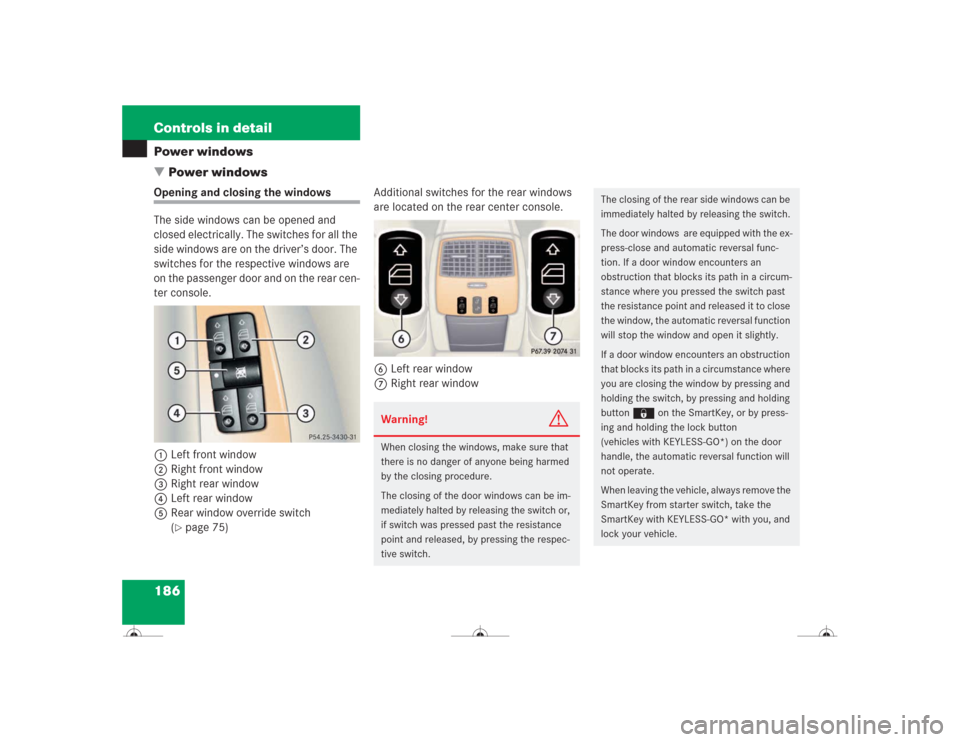
�Power windowsOpening and closing the windows
The side windows can be opened and
closed electrically. The switches for all the
side windows are on the driver’s door. The
switches for the respective windows are
on the passenger door and on the rear cen-
ter console.
1Left front window
2Right front window
3Right rear window
4Left rear window
5Rear window override switch
(
�page 75)Additional switches for the rear windows
are located on the rear center console.
6Left rear window
7Right rear window
Warning!
G
When closing the windows, make sure that
there is no danger of anyone being harmed
by the closing procedure.
The closing of the door windows can be im-
mediately halted by releasing the switch or,
if switch was pressed past the resistance
point and released, by pressing the respec-
tive switch.
The closing of the rear side windows can be
immediately halted by releasing the switch.
The door windows are equipped with the ex-
press-close and automatic reversal func-
tion. If a door window encounters an
obstruction that blocks its path in a circum-
stance where you pressed the switch past
the resistance point and released it to close
the window, the automatic reversal function
will stop the window and open it slightly.
If a door window encounters an obstruction
that blocks its path in a circumstance where
you are closing the window by pressing and
holding the switch, by pressing and holding
button ‹ on the SmartKey, or by press-
ing and holding the lock button
(vehicles with KEYLESS-GO*) on the door
handle, the automatic reversal function will
not operate.
When leaving the vehicle, always remove the
SmartKey from starter switch, take the
SmartKey with KEYLESS-GO* with you, and
lock your vehicle.
Page 190 of 418
189 Controls in detail
Power windows
Opening (Summer opening feature)
If the weather is warm, you can ventilate
the vehicle before driving off by simulta-
neously:�
opening the sliding/pop-up roof
�
opening the side windows
�
turning on the seat ventilation* for the
driver’s seat
To do so, follow the instructions below:
�
Press and hold button Πafter un-
locking the vehicle.
The windows and sliding / pop-up roof
begin to open after approximately one
second.
�
Release the Πbutton to stop proce-
dure.Closing (Convenience feature)
�
Press and hold button ‹ after lock-
ing the vehicle.
The windows and sliding / pop-up roof
begin to close after approximately one
second.
�
Release the ‹ button to stop proce-
dure.
Make sure that all side windows and the
sliding / pop-up roof are properly closed
before leaving the vehicle.Closing the windows with the
SmartKey with KEYLESS-GO*
(Convenience feature)
The sliding/pop-up roof (
�page 191) will
also be closed when the power windows
are operated with KEYLESS-GO.
�
Press and hold lock button at door
(�page 57) until the side windows and
the sliding / pop-up roof are closed.
Warning!
G
When closing the windows and the
sliding /pop-up roof, make sure that there is
no danger of anyone being harmed by the
closing procedure.
The windows will not automatically reopen if
blocked during convenience closing.
��
Page 192 of 418
191 Controls in detail
Sliding / pop-up roof
�Sliding / pop-up roof
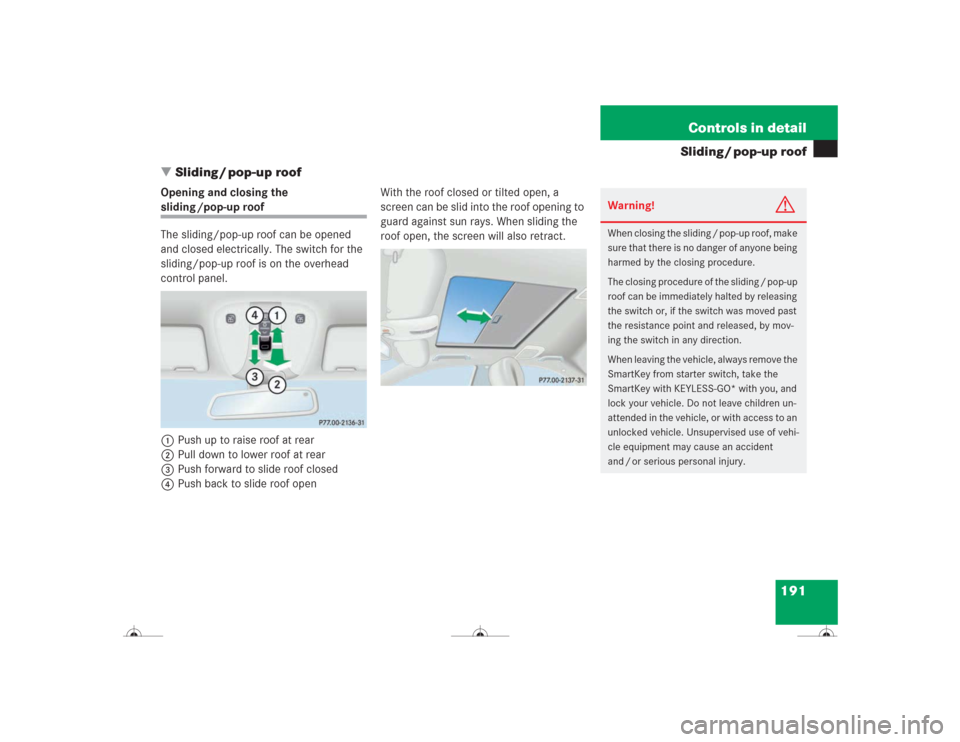
Opening and closing the sliding /pop-up roof
The sliding/pop-up roof can be opened
and closed electrically. The switch for the
sliding/pop-up roof is on the overhead
control panel.
1Push up to raise roof at rear
2Pull down to lower roof at rear
3Push forward to slide roof closed
4Push back to slide roof openWith the roof closed or tilted open, a
screen can be slid into the roof opening to
guard against sun rays. When sliding the
roof open, the screen will also retract.
Warning!
G
When closing the sliding / pop-up roof, make
sure that there is no danger of anyone being
harmed by the closing procedure.
The closing procedure of the sliding / pop-up
roof can be immediately halted by releasing
the switch or, if the switch was moved past
the resistance point and released, by mov-
ing the switch in any direction.
When leaving the vehicle, always remove the
SmartKey from starter switch, take the
SmartKey with KEYLESS-GO* with you, and
lock your vehicle. Do not leave children un-
attended in the vehicle, or with access to an
unlocked vehicle. Unsupervised use of vehi-
cle equipment may cause an accident
and / or serious personal injury.
Page 195 of 418
194 Controls in detailSliding / pop-up roofClosing the sliding/pop-up roof with
KEYLESS-GO* (Convenience feature)
The power window (
�page 186) will also
be closed when the sliding/pop-up roof is
operated with KEYLESS-GO.
�
Press and hold lock button at door
(�page 57) until the sliding / pop-up
roof and the side windows are closed.
Synchronizing the sliding / pop-up roof
The power sliding / pop-up roof must be re-
synchronized each time after:�
the battery has been disconnected
�
the sliding / pop-up roof has been
closed manually
�
the sliding / pop-up roof does not open
smoothly
�
a malfunction
Synchronizing
�
Switch on ignition.
�
Press and hold the switch in
direction1 until the sliding/pop-up
roof is fully raised at the rear.
Hold the switch for approximately one
second.
The sliding/pop-up roof is synchro-
nized.
Warning!
G
When closing the windows and the
sliding /pop-up roof, make sure that there is
no danger of anyone being harmed by the
closing procedure.
The sliding/pop-up roof will not automati-
cally reopen if blocked during convenience
closing.
If potential danger exists, proceed as fol-
lows:�
Release the lock button.
�
Pull on the door handle and hold firmly.
The side windows and the
sliding / pop-up roof will open for as long
as the door handle is held but the door
not opened.
Page 229 of 418
228 Controls in detailUseful featuresCigarette lighter
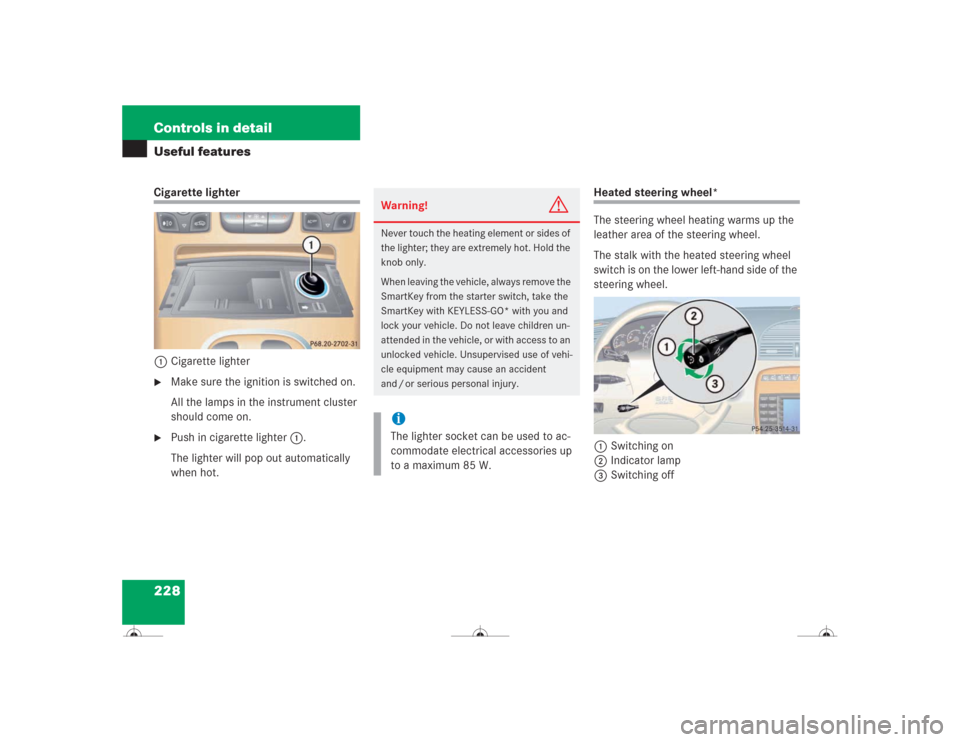
1Cigarette lighter�
Make sure the ignition is switched on.
All the lamps in the instrument cluster
should come on.
�
Push in cigarette lighter1.
The lighter will pop out automatically
when hot.
Heated steering wheel*
The steering wheel heating warms up the
leather area of the steering wheel.
The stalk with the heated steering wheel
switch is on the lower left-hand side of the
steering wheel.
1Switching on
2Indicator lamp
3Switching off
Warning!
G
Never touch the heating element or sides of
the lighter; they are extremely hot. Hold the
knob only.
When leaving the vehicle, always remove the
SmartKey from the starter switch, take the
SmartKey with KEYLESS-GO* with you and
lock your vehicle. Do not leave children un-
attended in the vehicle, or with access to an
unlocked vehicle. Unsupervised use of vehi-
cle equipment may cause an accident
and / or serious personal injury.iThe lighter socket can be used to ac-
commodate electrical accessories up
to a maximum 85 W.