Page 25 of 418
24 At a glanceMultifunction steering wheel
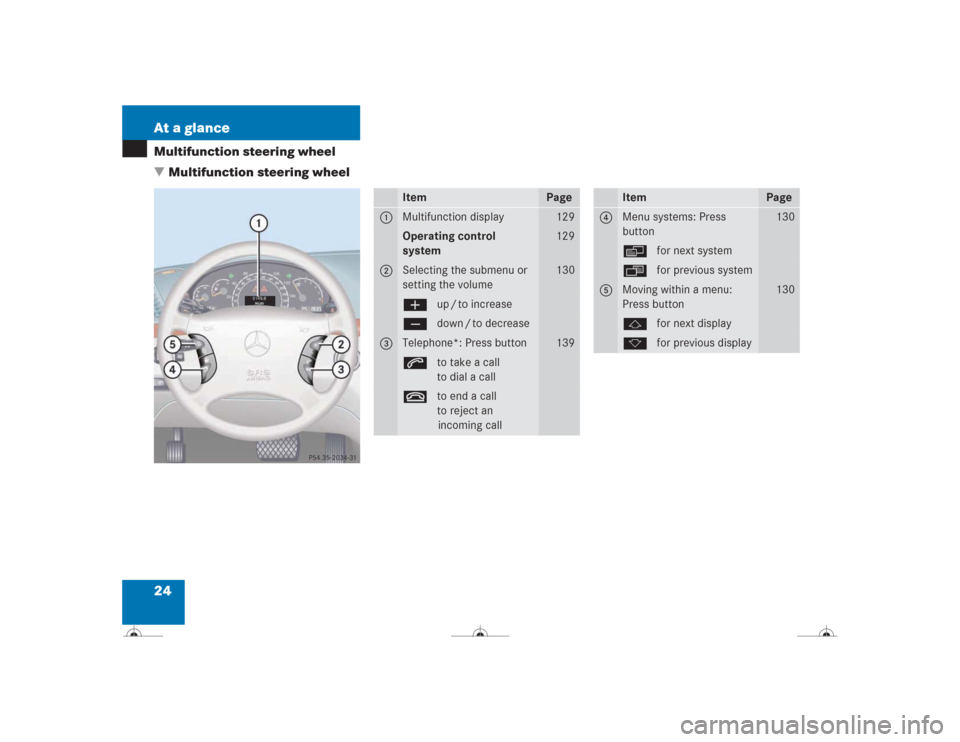
�Multifunction steering wheel
Item
Page
1
Multifunction display
129
Operating control
system
129
2
Selecting the submenu or
setting the volume
130
æup / to increaseçdown / to decrease
3
Telephone*: Press button
139
sto take a call
to dial a calltto end a call
to reject an
incoming call
Item
Page
4
Menu systems: Press
button
130
èfor next systemÿfor previous system
5
Moving within a menu:
Press button
130
jfor next displaykfor previous display
Page 27 of 418
26 At a glanceCenter consoleLower part
Item
Page
1
KEYLESS-GO* start / stop
button
33
2
Gear selector lever for
automatic transmission
46
3
PASSENGER AIRBAG OFF
indicator lamp
71
4
Thumbwheel for setting
distance in Distronic*
206
5
Distance warning func-
tion* on / off switch
206
6
Program mode selector for
automatic transmission
163
7
Ashtray
227
Lighter
228
Page 29 of 418
28 At a glanceDoor control panel
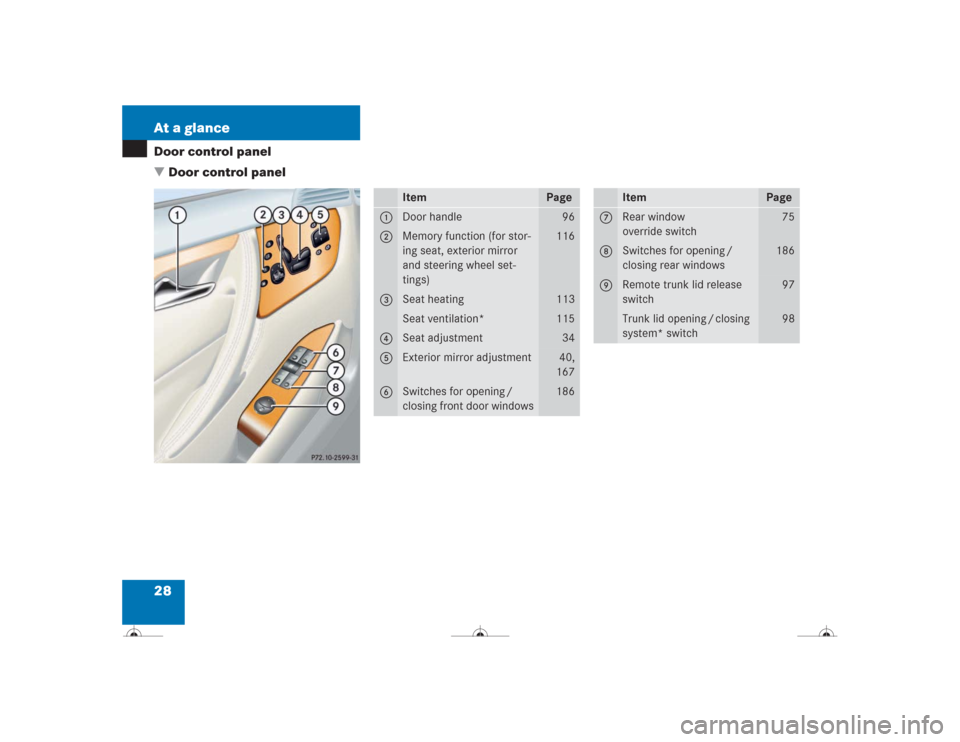
�Door control panel
Item
Page
1
Door handle
96
2
Memory function (for stor-
ing seat, exterior mirror
and steering wheel set-
tings)
116
3
Seat heating
113
Seat ventilation*
115
4
Seat adjustment
34
5
Exterior mirror adjustment
40,
167
6
Switches for opening /
closing front door windows
186
Item
Page
7
Rear window
override switch
75
8
Switches for opening /
closing rear windows
186
9
Remote trunk lid release
switch
97
Trunk lid opening / closing
system* switch
98
Page 35 of 418

34 Getting startedAdjusting
�AdjustingSeatsWarning!
G
All seat, head restraint, steering wheel, and
rear view mirror adjustments, as well as fas-
tening of seat belts, must be done before
the vehicle is put into motion.Warning!
G
Do not adjust the driver’s seat while driving.
Adjusting the seat while driving could cause
the driver to lose control of the vehicle.
Never ride in a moving vehicle with the seat
back in an extremely reclined position as
this can be dangerous. You could slide un-
der the seat belt in a collision. If you slide
under it, the belt would apply force at the ab-
domen or neck. That could cause serious or
fatal injuries. The seat back and seat belts
provide the best restraint when the
wearer is in a nearly upright position and
belts are properly positioned on the body.
Your seat must be adjusted so that you can
correctly fasten your seat belt (
�page 42).
Never place hands under the seat or near
any moving parts while a seat is being ad-
justed.
Warning!
G
When leaving the vehicle, always remove the
SmartKey from the starter switch, take the
SmartKey with KEYLESS-GO* with you, and
lock your vehicle.
Even with the SmartKey removed from the
starter switch or the SmartKey with
KEYLESS-GO* removed from the vehicle,
the power seats can be operated when the
respective door is open. Therefore, do not
leave children unattended in the vehicle, or
with access to an unlocked vehicle. Unsu-
pervised use of vehicle equipment may
cause an accident and/or serious personal
injury.
Warning!
G
Children 12 years old and under must never
ride in the front seat, except in a
Mercedes-Benz authorized BabySmart
TM
compatible child seat, which operates with
the BabySmart
TM system installed in the ve-
hicle to deactivate the passenger front air-
bag when it is properly installed. Otherwise
they will be struck by the airbag when it in-
flates in a crash. If this happens, serious or
fatal injury will result.
According to accident statistics, children
are safer when properly restrained in the
rear seating positions than in the front seat-
ing positions. Infants and small children
must ride in the back seats and be seated in
an appropriate infant or child restraint sys-
tem, which is properly secured with the ve-
hicle's seat belt and top tether strap, or
secured via lower anchors and top tether
strap, fully in accordance with the child seat
manufacturer’s instructions.
Page 36 of 418

35 Getting started
Adjusting
Seat adjustment
The seat adjustment switches are located
in each door.
1Head restraint height
2Seat height
3Seat cushion tilt
4Seat cushion depth
5Seat fore and aft adjustment
6Seat backrest tilt
�
Switch on ignition.
or
�
Open the respective door.
Seat fore and aft adjustment
�
Press the switch forward or backward
in the direction of arrow5.
Adjust seat to a comfortable seating
position that still allows you to reach
the accelerator / brake pedal safely.
The position should be as far to the rear
as possible, consistent with ability to
properly operate controls.Seat cushion tilt
�
Press the switch up or down in the di-
rection of arrow3 until your upper
legs are lightly supported.
Seat cushion depth
�
Press the switch forward or backward
in the direction of arrow4 until your
legs are supported comfortably.
Seat backrest tilt
�
Press the switch forward or backward
in the direction of arrow6 until your
arms are slightly angled when holding
the steering wheel.
Seat height
�
Press the switch up or down in the di-
rection of arrow2.
A child’s risk of serious or fatal injuries is
significantly increased if the child restraints
are not properly secured in the vehicle and
the child is not properly secured in the child
restraint.
iWhen moving the seat, be sure that
there are no items in the footwell or be-
hind the seats. Otherwise you could
damage the seats.
The memory function (
�page 116) lets
you store the setting for the seat posi-
tion together with the settings for the
steering wheel and the exterior rear
view mirrors.
Page 39 of 418

38 Getting startedAdjustingthe respective backrest is not engaged in its
lock. Carefully slow down, and drive with
caution to an area which is in a safe distance
from the roadway. Always provide sufficient
room behind the backrest and fold the back-
rest all the way back until it locks in place.
Keep the area around head restraints clear
of articles (e.g. clothing) to not obstruct the
folding operation of the head restraints.
The warning message is no longer displayed
as soon as the backrest is locked in place. If
both backrests are locked in place and the
warning message is still displayed, have the
system checked at an authorized
Mercedes-Benz Center immediately.
When leaving the vehicle, always remove the
SmartKey from the starter switch, take the
SmartKey with KEYLESS-GO* with you, and
lock your vehicle.
The power seats can also be operated with
the driver’s or passenger door open. Do not
leave children unattended in the vehicle or
with access to an unlocked vehicle. Unsu-
pervised use of vehicle equipment may
cause an accident and/or serious personal
injury.
Never place hands under seat or near any
moving parts during a seat adjustment pro-
cedure.
!The automatic seat slide is provided
with a safety feature.
The automatic process is interrupted, if
the backrest of the sliding seat is
pushed against an occupant or object.
The seat will slide forward and stop.
Investigate and correct the cause of in-
terruption.
Now use memory button (
�page 116)
or seat adjustment switch (�page 35)
to bring seat into desired position.
When folding the backrest forward
from a reclined position, and then fold-
ing it back, the backrest stops in a
more upright position for the safety of
any rear-seat passenger. Adjust the
backrest until your arms are slightly an-
gled when holding the steering
wheel (
�page 35).
��
Page 40 of 418
.
1Adjusting steering column, in or out
2Ad")
39 Getting started
Adjusting
Steering wheel Steering wheel adjustment
The stalk for steering wheel adjustment is
located on the steering column (lower left).
1Adjusting steering column, in or out
2Adjusting steering column, up or down
�
Switch on ignition.
or
�
Open the driver’s door.Adjusting steering column in or out
�
Move stalk forward or back in the direc-
tion of arrow 1 until a comfortable
steering wheel position is reached with
your arms slightly bent at the elbow.
Adjusting steering column up or down
�
Move stalk up or down in the direction
of arrow 2.
Make sure your legs can move freely
and all the displays (incl. malfunction
and indicator lamps) on the instrument
cluster are clearly visible.
For more information, see “Heated steer-
ing wheel*” (
�page 228).
Warning!
G
Do not adjust the steering wheel while driv-
ing. Adjusting the steering wheel while driv-
ing could cause the driver to lose control of
the vehicle.
When leaving the vehicle, always remove the
SmartKey from the starter switch, take the
SmartKey with KEYLESS-GO* with you and
lock your vehicle.
Even with the SmartKey removed from the
starter switch or the SmartKey with
KEYLESS-GO* removed from the vehicle,
the steering wheel adjustment feature can
be operated when the driver’s door is open.
Therefore, do not leave children unattended
in the vehicle, or with access to an unlocked
vehicle. Unsupervised use of vehicle equip-
ment may cause an accident and/or serious
personal injury.
iThe memory function (
�page 116) lets
you store settings for the steering
wheel together with the settings for the
exterior rear view mirrors and the seat
position.
Page 42 of 418
41 Getting started
Adjusting
The buttons are located on the driver’s
door.
1Driver’s side exterior rear view mirror
button
2Passenger-side exterior rear view mir-
ror button
3Adjustment button
�
Switch on ignition.
�
Press button1 for the left mirror or
button2 for the right mirror.
�
Push adjustment button3 up, down,
left or right according to the desired
setting.
For more information, see “Folding the ex-
terior rear view mirrors in and out automat-
ically” (
�page 169).
!For information on how to reposition
the exterior mirror housing when it was
forcibly pushed forward (hit from the
rear) or forcibly pushed rearward (hit
from the front), see “Folding the exteri-
or rear view mirrors in and out manual-
ly” (
�page 169).
iThe memory function (
�page 116) lets
you store the setting for the exterior
rear view mirrors together with the set-
ting for the steering wheel and the seat
position.
At low ambient temperatures, the mir-
rors will be heated automatically.