Page 295 of 400

295 Practical hints
What to do if …
Display symbol
Display message
Possible cause
Possible solution
.
LIGHTS
TURN OFF LIGHTS!
This display appears if the driver’s door is
opened and no SmartKey in the starter
switch.
�
Insert SmartKey in the starter switch.
�
Switch off the headlights.
LOW BEAM, L
CHECK LIGHT!
The left low beam lamp is malfunctioning.
�
Visit an authorized Mercedes-Benz
Center as soon as possible.
LOW BEAM, R
CHECK LIGHT!
The right low beam lamp is
malfunctioning.
�
Visit an authorized Mercedes-Benz
Center as soon as possible.
REVERSE LIGHT, L
CHECK LIGHT!
The left backup lamp is malfunctioning.
�
Replace the bulb as soon as possible.
REVERSE LIGHT, R
CHECK LIGHT!
The right backup lamp is malfunctioning.
�
Replace the bulb as soon as possible.
MARKER LIGHT, FL
CHECK LIGHTS!
BACK-UP LIGHT ON!
The left parking lamps are
malfunctioning. A backup bulb is being
used.
�
Visit an authorized Mercedes-Benz
Center as soon as possible.
MARKER LIGHT, FR
CHECK LIGHTS!
BACK-UP LIGHT ON!
The right parking lamps are
malfunctioning. A backup bulb is being
used.
�
Visit an authorized Mercedes-Benz
Center as soon as possible.
TAIL LIGHT, L
CHECK LIGHTS!
BACK-UP LIGHT ON!
The left tail lamp is malfunctioning.
A backup bulb is being used.
�
Visit an authorized Mercedes-Benz
Center as soon as possible.
Page 299 of 400

299 Practical hints
What to do if …
Display symbol
Display message
Possible cause
Possible solution
K
CLOSE
SUNROOF!
You have opened the driver’s door with
the SmartKey removed from the starter
switch and the sliding/pop-up roof open.
�
Close the sliding/pop-up roof
(�page 203).
J
CLOSE
SUNROOF!
You have opened the driver’s door with
the SmartKey removed from the starter
switch and the sliding/pop-up roof open.
�
Close the sliding/pop-up roof
(�page 203).
L
TELE AID
DRIVE TO WORKSHOP!
One or more main functions of the Tele
Aid system* are malfunctioning.
�
Have the Tele Aid system* checked by
an authorized Mercedes-Benz Center.
ì
FUNCTION
NOT AVAILABLE!
This display appears if buttonì
orí on the multifunction steering
wheel is pressed and the vehicle is not
equipped with a telephone*.
Ê
TRUNK OPEN!
This message will appear whenever the
trunk lid is open.
�
Close the trunk lid.
W
WASHER FLUID
CHECK LEVEL!
The fluid level has dropped to
about
1/3of total reservoir capacity.
�
Add washer fluid (
�page 259).
Page 305 of 400
305 Practical hints
Unlocking/locking in an emergency
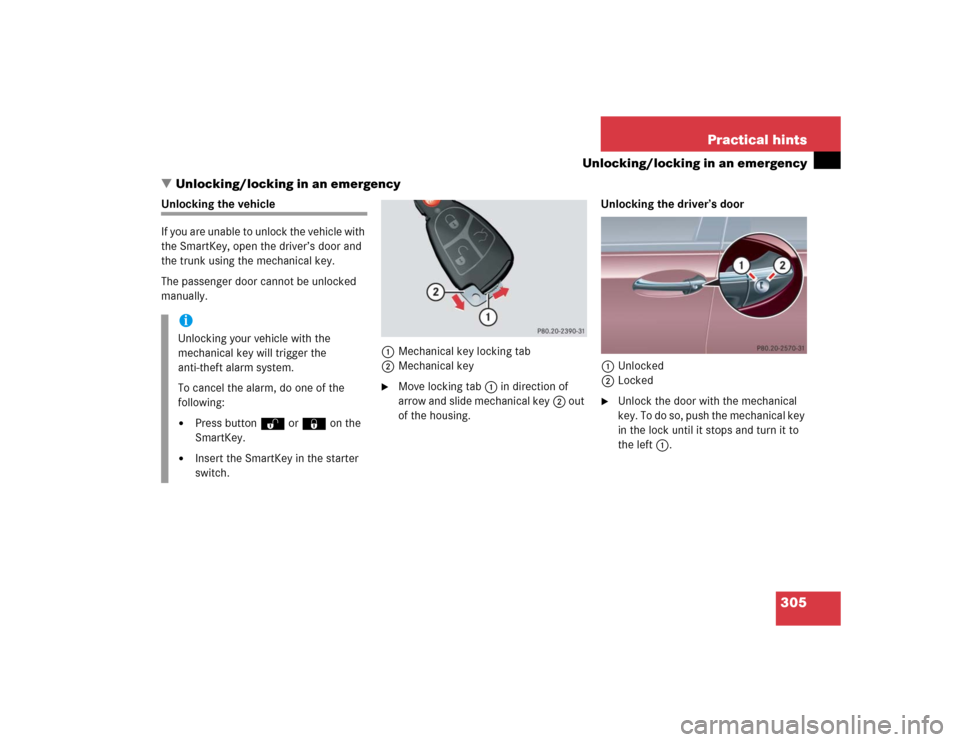
�Unlocking/locking in an emergency
Unlocking the vehicle
If you are unable to unlock the vehicle with
the SmartKey, open the driver’s door and
the trunk using the mechanical key.
The passenger door cannot be unlocked
manually.
1Mechanical key locking tab
2Mechanical key
�
Move locking tab1 in direction of
arrow and slide mechanical key2 out
of the housing.Unlocking the driver’s door
1Unlocked
2Locked
�
Unlock the door with the mechanical
key. To do so, push the mechanical key
in the lock until it stops and turn it to
the left1.
iUnlocking your vehicle with the
mechanical key will trigger the
anti-theft alarm system.
To cancel the alarm, do one of the
following:�
Press buttonŒ or‹ on the
SmartKey.
�
Insert the SmartKey in the starter
switch.
Page 316 of 400

316 Practical hintsReplacing wiper blades
�Replacing wiper bladesRemoving wiper blades�
Fold the wiper arm forward.
1Lock
2Unlock
�
Pull the tab in direction of arrow2 and
remove windshield wiper.
Installing wiper blades�
Slide the wiper blade into the cutout on
the wiper arm.
�
Slide the tab back in the direction of
arrow1 until it audibly engages.
�
Fold the wiper arm backward to rest on
the windshield. Make sure you hold on
to the wiper when folding the wiper arm
back.
Warning!
G
For safety reasons, remove SmartKey from
starter switch before replacing a wiper
blade. Otherwise the motor could suddenly
turn on and cause injury.
!Never open the hood when the wiper
arms are folded forward.
Hold on to the wiper when folding the
wiper arm back. If released, the force
of the impact from the tensioning
spring could crack the windshield.
Do not allow the wiper arms to contact
the windshield glass without a wiper
blade inserted.
Make certain that the wiper blades are
properly installed. Improperly installed
wiper blades may cause windshield
damage.
For your convenience, we recommend
that you have this work carried out by
an authorized Mercedes-Benz Center.
Page 323 of 400

323 Practical hints
Battery
�Battery
The battery is located in the engine
compartment on the right hand side.
Removal of filter box:�
Release the three clamps1.
�
Remove filter box.
Installation of filter box:
�
Insert filter box properly.
�
Secure it with the three clamps1.
Warning!
G
Failure to follow these instructions can
result in severe injury or death.
Never lean over batteries while connecting,
you might get injured.
Battery fluid contains sulfuric acid. Do not
allow this fluid to come in contact with eyes,
skin or clothing. In case it does, immediately
flush affected area with water and seek
medical help if necessary.
A battery will also produce hydrogen gas,
which is flammable and explosive. Keep
flames or sparks away from battery, avoid
improper connection of jumper cables,
smoking, etc.
!Never loosen or detach battery termi-
nal clamps while the engine is running
or the SmartKey is in the starter switch.
Otherwise the alternator and other
electronic components could be se-
verely damaged.
Have the battery checked regularly by
an authorized Mercedes-Benz Center.
Refer to Service Booklet for mainte-
nance intervals or contact your autho-
rized Mercedes-Benz Center for further
information.Warning!
G
Do not place metal objects on the battery as
this could result in a short circuit.
Use leak-proof battery only to avoid the risk
of acid burns in the event of an accident.
Page 324 of 400
.
�
Remove the filter box (
�page 323).")
324 Practical hintsBattery1Negative terminal
2Positive terminal cover
Disconnecting the battery�
Turn off all electrical consumers.
�
Open the hood (
�page 252).
�
Remove the filter box (
�page 323).
�
Disconnect battery negative lead1.
�
Remove cover2 from positive
terminal.
�
Disconnect the battery positive lead.
Removing the battery�
Remove the screw-nuts securing the
battery.
�
Remove the battery bracket.
�
Take out the battery.
Charging and reinstalling the battery�
Charge battery in accordance with the
instructions of the battery charger
manufacturer.
�
Reinstall the charged battery. Follow
the previously described steps in
reverse order.
Warning!
G
With a disconnected battery�
you will no longer be able to turn the
SmartKey in the starter switch
�
the gear selector lever will remain
locked in positionP
Warning!
G
Never charge a battery while still installed in
the vehicle. Gases may escape during charg-
ing and cause explosions that may result in
paint damage, corrosion or personal injury.
Page 328 of 400

328 Practical hintsTowing the vehicle
�Towing the vehicleMercedes-Benz recommends that the
vehicle be transported with all wheels off
the ground using flatbed or appropriate
wheel lift/dolly equipment. This method is
preferable to other types of towing.When circumstances do not permit the
recommended towing methods, the
vehicle may be towed with all wheels on
the ground or front wheels raised (except
vehicles with 4MATIC) only so far as
necessary to have the vehicle moved to a
safe location where the recommended
towing methods can be employed.
!Use flatbed or wheel lift/dolly equip-
ment with SmartKey in starter switch
turned to position0.
Do not tow with sling-type equipment.
Towing with sling-type equipment over
bumpy roads will damage radiator and
supports.
To prevent damage during transport,
do not tie down vehicle by its chassis or
suspension parts.
Switch off the tow-away alarm
(�page 79) and deactivate the auto-
matic central locking (
�page 133).
!Vehicles with automatic transmission
and/or 4MATIC:
Do not tow-start the vehicle.!Vehicles with 4MATIC:
Do not tow with one axle raised. Doing
so could damage the transfer case,
which is not covered by the
Mercedes-Benz Limited Warranty.
All wheels must be on or off the ground.
Observe instructions for towing the
vehicle with all wheels on the ground.
!If the vehicle is towed with the front
axle raised (not permissible for vehicles
with 4MATIC), the engine must be shut
off (SmartKey in starter switch
position0 or1). Otherwise the ESP will
immediately be engaged and will apply
the rear wheel brakes.
When towing the vehicle with all wheels
on the ground, the gear selector lever
must be in positionN (manual trans-
mission: gears disengaged) and the
SmartKey must be in starter switch
position2.
When towing the vehicle with all wheels
on the ground or the front axle raised,
the vehicle may be towed only for
distances up to 30 miles (50 km) and
at a speed not to exceed 30 mph
(50 km/h).
Page 329 of 400

329 Practical hints
Towing the vehicle
!
To be certain to avoid a possibility of
damage to the drive train, however, we
recommend the drive shaft be discon-
nected at the rear axle drive flange
(vehicles with 4MATIC: disconnected at
the front and rear axle drive flanges) for
any towing beyond a short tow to a
nearby garage.
Warning!
G
If circumstances require towing the vehicle
with all wheels on the ground, always tow
with a tow bar if:�
the engine will not run
�
there is a malfunction in the power
supply or in the vehicle’s electrical
system
as that will be necessary to adequately
control the towed vehicle.
Prior to towing the vehicle with all wheels on
the ground, make certain that the SmartKey
is in starter switch position2.
If the SmartKey is left in starter switch
position0 for an extended period of time, it
can no longer be turned in the switch. In this
case, the steering is locked. To unlock,
remove SmartKey from starter switch and
reinsert.
iTo signal turns while being towed with
the hazard warning flasher in use, turn
SmartKey in starter switch to
position2 and activate the combina-
tion switch for the left or right turn
signal in the usual manner – only the
selected turn signal will operate.
Upon canceling the turn signal, the
hazard warning flasher will operate
again.