Page 251 of 400
.
2Brake fluid (fuse box cover removed)
Rem")
251 Operation
At the gas station
Check regularly and before a long trip
1Coolant level
For more information on coolant, see
“Coolant level” (
�page 257).
2Brake fluid (fuse box cover removed)
Removing fuse box cover
(
�page 333).
3Windshield washer and headlamp
cleaning system*
For more information on filling up the
washer reservoir, see “Windshield
washer system and headlamp cleaning
system*” (
�page 259).Engine oil level
For more information on engine oil level,
see “Engine oil” (
�page 254).
Opening hood (
�page 252).
Vehicle lighting
Check function and cleanliness. For more
information on replacing light bulbs, see
“Replacing bulbs” (�page 310).
Exterior lamp switch (�page 100).
Tire inflation pressure
More information on tire inflation pressure
(
�page 261).
!If you find that the brake fluid in the
brake fluid reservoir has fallen to the
minimum mark or below, have the
brake system checked for brake pad
thickness and leaks immediately.
Notify an authorized Mercedes-Benz
Center immediately. Do not add brake
fluid as this will not solve the problem.
For more information, see “Practical
hints” (
�page 275).
Page 293 of 400

293 Practical hints
What to do if …
Display symbol
Display message
Possible cause
Possible solution
A
RESERVE FUEL
GO TO GAS STATION!
The fuel level has dropped below the
reserve mark.
�
Refuel at the next gas station
(�page 249).
CHECK GAS CAP!
SEE OPERATOR’S MANUAL
The fuel cap is not closed tightly.
�
Check the fuel cap (
�page 249).
Y
HOOD OPEN!
You are driving with the hood open.
�
Close the hood (
�page 252).
I
REMOVE KEY!
You have forgotten to remove the
SmartKey.
�
Remove the SmartKey from the starter
switch.
REPLACE KEY!
DRIVE TO WORKSHOP!
No additional code available for
SmartKey.
�
Change the SmartKey.
.
3RD BRAKE LIGHT
CHECK LIGHT!
The high mounted brake lamp is
malfunctioning.
�
Visit an authorized Mercedes-Benz
Center as soon as possible.
AUTOM. LIGHT ON
REMOVE KEY!
SmartKey in starter switch position1
or2.
�
Remove SmartKey from the starter
switch.
BRAKE LIGHT
DRIVE TO WORKSHOP!
Brake lamp illumination is delayed or
lamp is permanently on.
�
Visit an authorized Mercedes-Benz
Center as soon as possible.
BRAKE LIGHT, L
CHECK LIGHT!
The left brake lamp is malfunctioning.
�
Visit an authorized Mercedes-Benz
Center as soon as possible.
BRAKE LIGHT, R
CHECK LIGHT!
The right brake lamp is malfunctioning.
�
Visit an authorized Mercedes-Benz
Center as soon as possible.
DISPLAY MALFUNCTION
VISIT WORKSHOP!
The display for the lamps or the system is
malfunctioning.
�
Visit an authorized Mercedes-Benz
Center as soon as possible.
Page 304 of 400
304 Practical hintsWhere will I find ...?Minispare wheel bolts
1Wheel bolt for light alloy rims
2Wheel bolt for Minispare wheel or other
steel rims (located in vehicle tool kit)
!Wheel bolts2 must be used when
mounting the Minispare wheel or other
steel rims. The use of any wheel bolts
other than wheel bolts2 for the
Minispare wheel or other steel rims will
physically damage the vehicle’s
brakes.
Warning!
G
Make sure to use the original length wheel
bolts when remounting the original wheel
after it has been repaired.
Page 311 of 400

311 Practical hints
Replacing bulbs
Rear lamps Notes on bulb replacement
�
Only use 12 volt bulbs of the same type
and with the specified watt rating.
�
Switch lights off before changing a bulb
to prevent short circuits.
�
Always use a clean lint-free cloth when
handling bulbs.
�
Your hands should be dry and free of oil
and grease.
�
If the newly installed bulb does not
come on, visit an authorized
Mercedes-Benz Center.
�
Have the LEDs and bulbs for the
following lamps replaced by an
authorized Mercedes-Benz Center:�
Additional turn signals in the
exterior rear view mirrors
�
High mounted brake lamp
�
Xenon lamps
�
Front fog lamps
Lamp
Type
7
High mounted brake
lamp
LED
8
Brake lamp
P21W
9
Turn signal lamp
PY 21 W
a
Backup lamp
P21W
b
Tail, parking,
standing and side
marker lamp
P21/5W
c
License plate lamps
C5W
d
Rear fog lamp,
driver’s side
P21/4W
Warning!
G
Keep bulbs out of reach of children.
Bulbs and bulb sockets can be very hot.
Allow the lamp to cool down before
changing a bulb.
Halogen lamps contain pressurized gas.
A bulb can explode if you:�
touch or move it when hot
�
drop the bulb
�
scratch the bulb
Wear eye and hand protection.
Because of high voltage in Xenon lamps, it is
dangerous to replace the bulb or repair the
lamp and its components. We recommend
that you have such work done by a qualified
technician.
Page 316 of 400
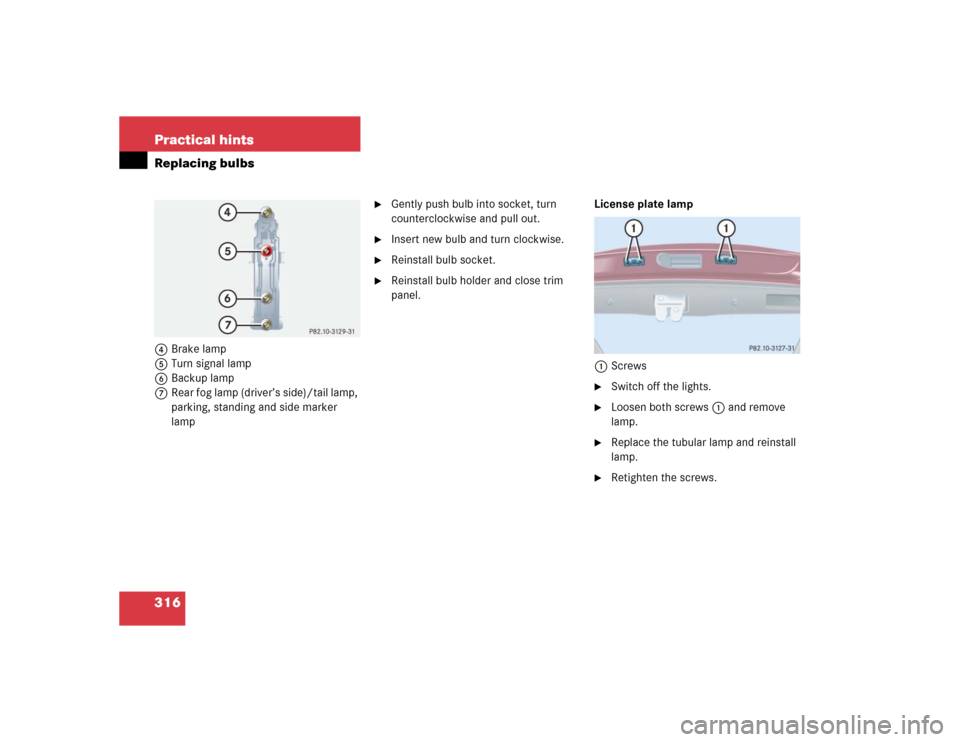
316 Practical hintsReplacing bulbs4Brake lamp
5Turn signal lamp
6Backup lamp
7Rear fog lamp (driver’s side)/tail lamp,
parking, standing and side marker
lamp
�
Gently push bulb into socket, turn
counterclockwise and pull out.
�
Insert new bulb and turn clockwise.
�
Reinstall bulb socket.
�
Reinstall bulb holder and close trim
panel.License plate lamp
1Screws
�
Switch off the lights.
�
Loosen both screws1 and remove
lamp.
�
Replace the tubular lamp and reinstall
lamp.
�
Retighten the screws.
Page 321 of 400
�
Clean contact surfaces of whee")
321 Practical hints
Flat tire
Mounting the new wheel
1Wheel bolt for light alloy rims
2Wheel bolt for Minispare wheel or other
steel rims (located in vehicle tool kit)�
Clean contact surfaces of wheel and
wheel hub.
�
Guide Minispare wheel onto alignment
bolt and push it on.
�
Insert wheel bolts and tighten them
slightly.
!Wheel bolts2 must be used when
mounting the Minispare wheel or other
steel rims. The use of any wheel bolts
other than wheel bolts2 for the
Minispare wheel or other steel rims will
physically damage the vehicle’s
brakes.
!To avoid paint damage, place wheel flat
against hub and hold it there while
installing first wheel bolt.Warning!
G
Always replace wheel bolts that are
damaged or rusted.
Never apply oil or grease to wheel bolts.
Damaged wheel hub threads should be
repaired immediately. Do not continue to
drive under these circumstances! Contact
an authorized Mercedes-Benz Center or call
Roadside Assistance.
Incorrect wheel bolts or improperly tight-
ened wheel bolts can cause the wheel to
come off. This could cause an accident.
Make sure to use the correct mounting
bolts.
Page 328 of 400

328 Practical hintsJump startingThe battery is located in the engine
compartment on the right hand side. The
terminals for jump starting are located in
front of the battery.�
Make sure the two vehicles do not
touch.
�
Turn off all electrical consumers.
�
Apply parking brake.
�
Shift gear selector lever to positionP.1Positive terminal of charged battery
2Positive under hood terminal in front of
discharged battery
3Negative terminal of charged battery
4Negative under hood terminal in front
of discharged battery
�
Connect positive terminal1 of the
charged battery with positive under
hood terminal2 in front of the
discharged battery with the jumper
cables. Clamp cable to charged
battery1 first.
�
Start engine of the vehicle with the
charged battery and run at idle speed.
�
Connect negative terminal3 of the
charged battery with negative under
hood terminal4 in front of the
discharged battery with the jumper
cables. Clamp cable to charged
battery3 first.
�
Start the engine of the disabled
vehicle.
You can now again turn on the electrical
consumers. Do not turn on the lights under
any circumstances.
�
Remove the jumper cables first from
negative terminals3 and4 and then
from positive terminals1 and2.
You can now turn on the lights.
�
Have the battery checked at the near-
est authorized Mercedes-Benz Center.
Warning!
G
Keep flames or sparks away from battery.
Do not smoke.
Observe all safety instructions and precau-
tions when handling automotive batteries
(�page 258).
!Do not tow-start the vehicle.
Page 357 of 400

Prevents the wheels from locking up
during braking so that the vehicle can
continue to be steered.
Alignment bolt
Metal pin with thread. The center")
357 Technical terms
ABS
(A
ntilock B
rake S
ystem)
Prevents the wheels from locking up
during braking so that the vehicle can
continue to be steered.
Alignment bolt
Metal pin with thread. The centering
pin is an aid used when changing a tire
to align the wheel with the wheel hub.
BabySmart
TM1
airbag deactivation
system
This system detects if a special system
compatible child restraint seat is
installed on the front passenger seat.
The system will automatically deacti-
vate the passenger front airbag when
such a seat is properly installed
(PASS. AIRBAG OFF indicator lamp
located in the center console comes
on). See your authorized
Mercedes-Benz Center for availability.BabySmart
TM compatible child seats
Special restraint system for children.
The sensor system for the passenger
seat prevents deployment of the
passenger front airbag if a
BabySmartTM compatible child seat is
installed.
BAS
(B
rake A
ssist S
ystem)
System for potentially reducing braking
distances in emergency braking
situations. The system is activated
when it senses an emergency based on
how fast the brake is applied.
Bi-Xenon headlamps*
Headlamps which use an electric arc as
the light source and produce a more
intense light than filament headlamps.
Bi-Xenon headlamps produce low
beam and high beam.CAC
(C
ustomer A
ssistance C
enter)
Mercedes-Benz customer service
center, which can help you with any
questions about your vehicle and
provide assistance in the event of a
breakdown.
CAN system
(C
ontroller A
rea N
etwork)
Data bus network serving to control
vehicle functions such as door locking
or windshield wiping depending on
vehicle settings and/or ambient
conditions.
Cockpit
All instruments, switches, buttons and
indicator/warning lamps in the
passenger compartment needed for
vehicle operation and monitoring.
1BabySmart
TM is a trademark of Siemens
Automotive Corp.

!Wheel bolts2 must be")