Page 67 of 400

67 Safety and Security
Occupant safety
Warning!
G
The BabySmart
TM1
airbag deactivation sys-
tem will ONLY work with a special child seat
designed to operate with it. It will not work
with child seats which are not BabySmart
TM
compatible.
Never place anything between seat cushion
and child seat (e.g. pillow), since it reduces
the effectiveness of the deactivation sys-
tem. The bottom of the child seat must
make full contact with the passenger seat
cushion. An incorrectly mounted child seat
could cause injuries to the child in case of an
accident, instead of protecting the child.
Follow the manufacturer’s instructions for
installation of special child seats.
1BabySmart
TM is a trademark of Siemens
Automotive Corp.
Warning!
G
When using a BabySmart
TM compatible
child seat on the front passenger seat, the
passenger front airbag will not deploy only if
the PASS. AIRBAG OFF indicator lamp
remains illuminated.
Please be sure to check the indicator every
time you use the special system child seat.
Should the light go out while the restraint is
installed, please check installation. If the
light remains out, do not use the
BabySmart
TM restraint to transport children
on the front passenger seat until the system
has been repaired.
Warning!
G
Do not place powered-on laptops, cell
phones and like electronic devices on the
front passenger seat. Signals from such de-
vices may interfere with the BabySmart
TM
system. Such signal interference may cause
the PASS. AIRBAG OFF indicator lamp not to
come on during self-test or be continuously
lit, indicating that the system is not function-
ing.
Page 68 of 400

68 Safety and SecurityOccupant safetyInstallation of infant and child restraint
systems
This vehicle is equipped with tether an-
chorages for a top tether strap at each of
the rear seating positions.
1Cover of top anchorage ring�
Make sure the rear backrest is locked
in its upright position (
�page 213).
�
Remove cover1 from anchorage
ring3.
�
Guide tether strap between head
restraint and top of seat back.
Head restraint must be installed (if
removable) and positioned such that
the top tether strap can pass freely
between the head restraint and top of
seat back.
Make sure the tether strap is not
twisted.2Hook
3Anchorage ring
�
Securely fasten hook2, which is part
of the tether strap, to anchorage
ring3.
�
Reinstall cover1 after removing the
tether strap.
Warning!
G
Always lock backrest in its upright position
when rear seat bench is occupied by pas-
sengers, or the extended cargo area is not in
use. Check for secure locking by pushing
and pulling on the backrest.
iFor safety, make sure the hook has
attached to the ring beyond the safety
catch, as illustrated.
Page 69 of 400

69 Safety and Security
Occupant safety
Child seat anchors – LATCH-type
This vehicle is equipped with two LATCH-
(Lower A
nchors and T
ethers for CH
ildren)
type anchors (at each of the outer rear
seats) for the installation of a LATCH-type
child seat with the matching mounting
fittings.
If a child seat is not installed, the
LATCH-type anchors can be folded back
between the seat cushion and the
backrest.
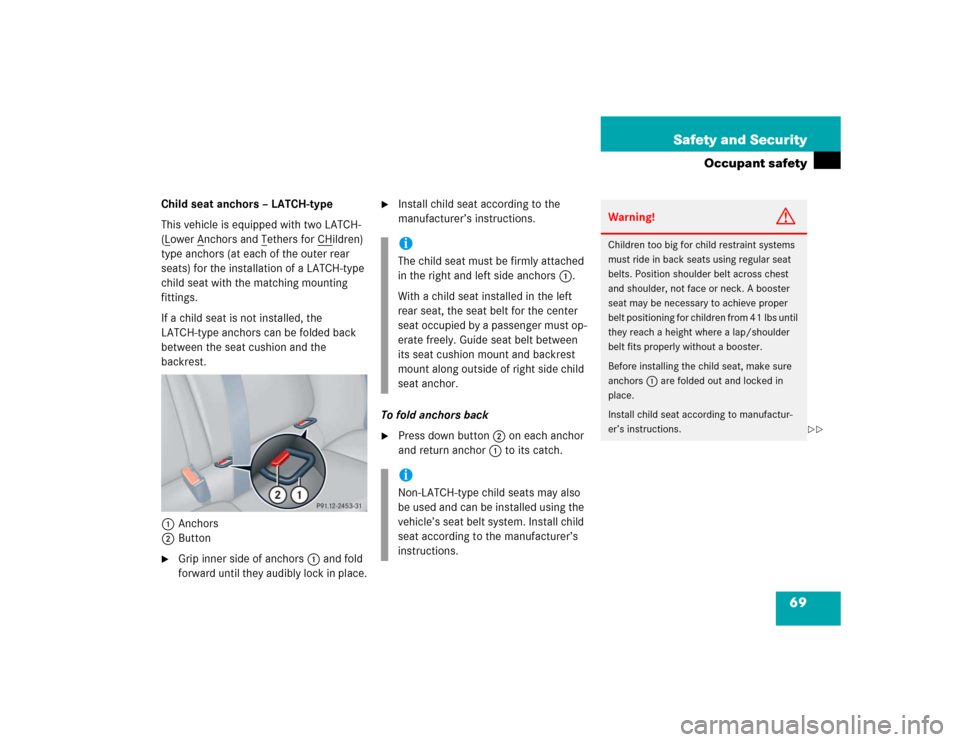
1Anchors
2Button
�
Grip inner side of anchors1 and fold
forward until they audibly lock in place.
�
Install child seat according to the
manufacturer’s instructions.
To fold anchors back
�
Press down button2 on each anchor
and return anchor1 to its catch.iThe child seat must be firmly attached
in the right and left side anchors1.
With a child seat installed in the left
rear seat, the seat belt for the center
seat occupied by a passenger must op-
erate freely. Guide seat belt between
its seat cushion mount and backrest
mount along outside of right side child
seat anchor.iNon-LATCH-type child seats may also
be used and can be installed using the
vehicle’s seat belt system. Install child
seat according to the manufacturer’s
instructions.
Warning!
G
Children too big for child restraint systems
must ride in back seats using regular seat
belts. Position shoulder belt across chest
and shoulder, not face or neck. A booster
seat may be necessary to achieve proper
belt positioning for children from 41 lbs until
they reach a height where a lap/shoulder
belt fits properly without a booster.
Before installing the child seat, make sure
anchors1 are folded out and locked in
place.
Install child seat according to manufactur-
er’s instructions.
��
Page 70 of 400

70 Safety and SecurityOccupant safety
Blocking of rear door window operation
The override switch is located on the door
control panel of the driver’s door.
1Override switch�
Slide override switch1 to the right.
The rear door windows can no longer
be operated using the switch located in
the rear doors.
For more information, see “Power win-
dows” (
�page 200).
T h e c h i l d s e a t m u s t b e f i r m l y a t t a c h e d i n t h e
right and left side anchors1.
An incorrectly mounted child seat may come
loose during an accident which could result
in serious injury or death to your child.
Damaged or impact-damaged child seats or
child seat anchors1 must be replaced.
Do not leave children unattended in the
vehicle, even if the children are secured in a
child restraint system.
iOperation of the rear door windows
with the switches located on the door
control panel of the driver’s door is still
possible.Warning!
G
Activate the override switch when children
are riding in the back seats of the vehicle.
The children may otherwise injure them-
selves, e.g. by becoming trapped in the win-
dow opening.
When leaving the vehicle, always remove the
SmartKey from the starter switch, and lock
the vehicle. Do not leave children unattend-
ed in the vehicle, or with access to an un-
locked vehicle. Unsupervised use of vehicle
equipment can cause an accident and/or
serious personal injury.
��
Page 81 of 400
81 Controls in detail
Locking and unlocking
Seats
Memory function*
Lighting
Instrument cluster
Control system
Manual transmission
Automatic transmission*
Good visibility
Climate control
Automatic climate control*
Audio system
Power windows
Sliding/pop-up roof*
Driving systems
Loading
Useful features
Page 92 of 400

92 Controls in detailSeats
�SeatsFor information on seat adjustment, see
“Seats” (
�page 32).
Easy-entry/exit feature*
With the easy-entry/exit feature activated,
the steering wheel tilts upwards and the
driver’s seat moves to the rear.
This allows easier entry into and exit from
the vehicle when the driver’s door is
opened. However, the engine must be
turned off.
When the SmartKey is inserted in the
starter switch and the driver’s door is
closed, the steering wheel and the driver’s
seat return to their last set positions.You can activate the following functions:
�
Steering column:
Only the steering column is adjusted.
�
Steering column and seat:
The steering column and the seat are
adjusted.
The easy-entry/exit feature can be
switched on or off in the convenience
submenu of the control system
(
�page 133).
Warning!
G
You must make sure no one can become
trapped or injured by the moving steering
wheel and the driver’s seat when the
easy-entry/exit feature* is activated, the
driver’s door is being opened and the engine
is turned off or the SmartKey is removed
from the starter switch.
Do not leave children unattended in the
vehicle, or with access to an unlocked
vehicle. Children could open the driver’s
door and unintentionally activate the
easy-entry/exit feature*, which could result
in an accident and/or serious personal
injury.
iTo cancel seat/steering wheel
movement, do one of the following:�
Press the seat adjustment switch*
(�page 28)
�
Move the steering column stalk*
(�page 37)
�
Press the memory button*
(�page 28)
Page 93 of 400

93 Controls in detail
Seats
Removing and installing front seat head restraints
For information on head restraint
adjustment, see “Seats” (
�page 32).
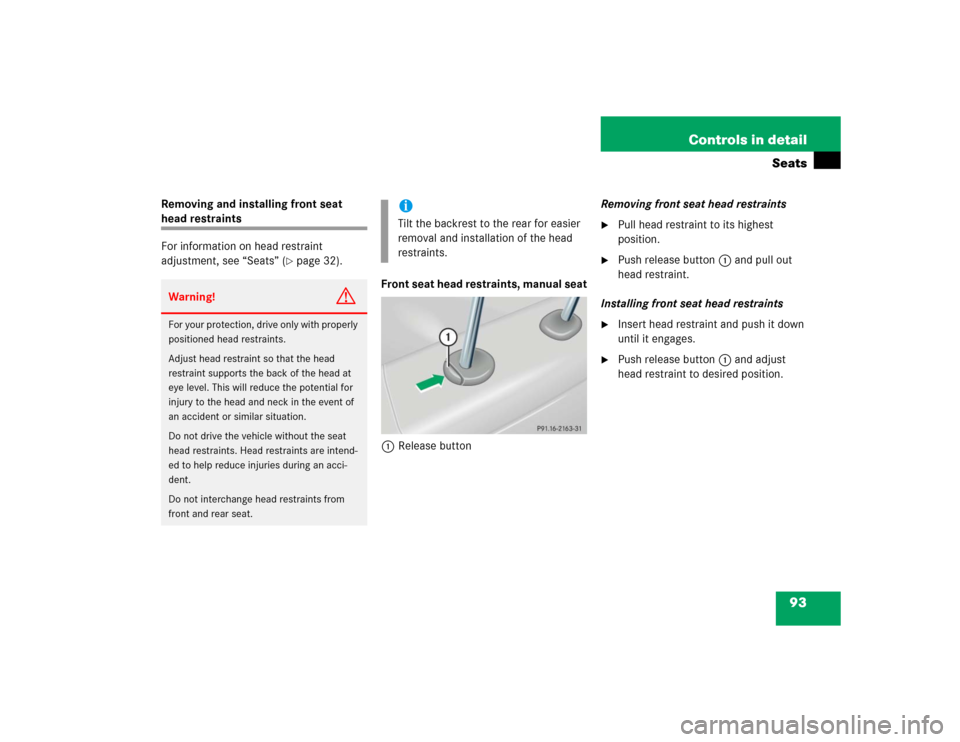
Front seat head restraints, manual seat
1Release buttonRemoving front seat head restraints
�
Pull head restraint to its highest
position.
�
Push release button1 and pull out
head restraint.
Installing front seat head restraints
�
Insert head restraint and push it down
until it engages.
�
Push release button1 and adjust
head restraint to desired position.
Warning!
G
For your protection, drive only with properly
positioned head restraints.
Adjust head restraint so that the head
restraint supports the back of the head at
eye level. This will reduce the potential for
injury to the head and neck in the event of
an accident or similar situation.
Do not drive the vehicle without the seat
head restraints. Head restraints are intend-
ed to help reduce injuries during an acci-
dent.
Do not interchange head restraints from
front and rear seat.
iTilt the backrest to the rear for easier
removal and installation of the head
restraints.
Page 94 of 400

94 Controls in detailSeatsFront seat head restraints, power seat*
Removing front seat head restraints�
Press switch1 upwards and hold until
head restraint is fully extended.
�
Pull out head restraint.
Installing front seat head restraints
�
Press switch1 upwards and hold for
about five seconds.
�
Push head restraint down until it
engages.
�
Adjust head restraint to desired
position (
�page 35).
Rear seat head restraints
Head restraint height (rear outer seats)
1Release button
Raising:�
Manually adjust the height of the head
restraint by pulling it upward.
If the head restraint is fully retracted,
push release button1 and pull the
head restraint out.Lowering:
�
To lower the head restraint, push
release button1 and push down on
the head restraint.Warning!
G
For your protection, drive only with properly
positioned head restraints.
Adjust head restraint so that the head
restraint supports the back of the head at
eye level. This will reduce the potential for
injury to the head and neck in the event of
an accident or similar situation.
Do not drive the vehicle without the seat
head restraints. Head restraints are
intended to help reduce injuries during an
accident.!The center rear seat head restraint
cannot be adjusted.