Page 98 of 376
98 Controls in detailLighting
�LightingFor information on how to switch on the
headlamps and use the turn signals, see
the “Getting started” section (
�page 48).
Exterior lamp switch
The exterior lamp switch is located on the
dashboard to the left of the steering wheel M
Off
U Automatic headlamp mode
C Parking lamps (also side marker
lamps, tail lamps, license plate
lamps, instrument panel lamps)
Canada only: When engine is run-
ning, the low beam is also switched
on.
B Low beam plus parking lamps or
high beam headlamps (combination
switch pushed forward).
ˆ Standing lamps, right (turn left one
stop)
‚ Standing lamps, left (turn left two
stops)
iIf you drive in countries where vehicles
drive on the other side of the road than
the country where the vehicle is regis-
tered, you must have the headlamps
modified for symmetrical low beams.
Relevant information can be obtained
at your authorized Mercedes-Benz Cen-
ter.
Page 99 of 376

99
Controls in detail
Lighting
Manual headlamp mode
The low beam headlamps and parking
lamps can be switched on and off with the
exterior lamp switch.
Automatic headlamp mode
The parking lamps, low beam headlamps
and license plate lamps switch on and off
automatically depending on the brightness
of the ambient light.�
Turn the exterior lamp switch to
U.
iIf you remove the SmartKey and open
the driver’s door while the parking
lamps or low beam headlamps are
switched on, �
a warning sounds
�
$ appears in the multifunction
display
�
the message
TURN OFF LIGHTS!
appears in the multifunction display
iWith the daytime running lamp mode
activated and the engine running, the
low beam headlamps cannot be
switched off manually.
Warning!
G
If the exterior lamp switch is set to U,�
the headlamps may switch off unexpect-
edly when the system senses bright am-
bient light, for example light from
oncoming traffic.
�
the headlamps will not be automatically
switched on under foggy conditions.
To minimize risk to you and to others, acti-
vate headlamps by turning exterior lamp
switch to
B
when driving or when traffic
and / or ambient lighting conditions require
you to do so.
In low ambient lighting conditions, only
switch from position
U
to
B
with the
vehicle at a standstill. Switching from U
to
B
will briefly switch off the head-
lamps. Doing so while driving in low ambient
lighting conditions may result in an acci-
dent.
The automatic headlamp feature is only an
aid to the driver. The driver is responsible for
the operation of the vehicle's lights at all
times.
Page 100 of 376

100 Controls in detailLighting
Daytime running lamp mode�
Turn exterior lamp switch to
positionM orU .
When the engine is running, the low beam
headlamps are automatically switched on.
In low ambient light conditions, the parking
lamps will also switch on.
Canada only
When you shift from a driving position to
position N or P, the low beam switches off
(with a three-minute delay).
For nighttime driving you should turn the
exterior lamp switch to position B to
permit activation of the high beam head-
lamps. USA only
The high beam headlamps can also be ac-
tivated when driving with the daytime run-
ning lamp mode activated and exterior
lamp switch in position
M.
To activate the daytime running lamp
mode, see “Setting daytime running lamp
mode (USA only)” (
�page 125).
Locator lighting and night security illu-
mination
Locator lighting and night security illumi-
nation are described in the control system
section under “Setting locator lighting”
(
�page 126) and “Exterior lamps delayed
shut off” (
�page 127).
iWith the daytime running lamp mode
activated, the low beam headlamps will
not be switched off automatically.iThe front fog lamps and rear fog lamp
cannot be switched on manually with
exterior lamp switch in position U.
To activate the fog lamps, turn exterior
lamp switch to position B and pull
the exterior lamp switch to first or sec-
ond stop.
iFor exterior lamp switch, see
(�page 98).
Page 101 of 376
101
Controls in detail
Lighting
Switching on fog lamps
Switching on front fog lamps
�
Make sure the low beam headlamps
are switched on.
�
Pull out exterior lamp switch to first
stop.
The green indicator lamp‡ in the
lamp switch comes on. Switching on rear fog lamps
�
Make sure the low beam headlamps
are switched on.
�
Pull out exterior lamp switch to second
stop.
The yellow indicator lamp
† in the
lamp switch comes on.
iFog lamps will operate with the parking
lamps and/or the low beam headlamps
on. Fog lamps should only be used in
conjunction with low beam headlamps.
Consult your State or Province Motor
Vehicle Regulations regarding allow-
able lamp operation.
Warning!
G
In low ambient lighting or foggy conditions,
only switch from position
U
to
B
with the vehicle at a standstill. Switching
from
U
to
B
will briefly switch off
the headlamps. Doing so while driving in low
ambient lighting conditions may result in an
accident.
Page 146 of 376
 and for setting the rear view
mirrors (
�page 39) is found in the “Get-
ting started” sectio")
146 Controls in detailGood visibility
�Good visibilityInformation on the windshield wipers
(�page 49) and for setting the rear view
mirrors (
�page 39) is found in the “Get-
ting started” section.
Rear view mirrors
Interior rear view mirror, antiglare posi-
tion
1 Lever
Tilt the mirror to the antiglare night posi-
tion using lever 1. Automatic antiglare rear view mirrors*
The reflection brightness of the exterior
rear view mirror on the driver’s side and
the interior rear view mirror will respond
automatically to glare when
�
the ignition is switched on
and
�
incoming light from headlamps falls on
the sensor in the interior rear view mir-
ror.
The rear view mirror will not react if
�
reverse gear is engaged
�
the interior lighting is turned on.
Warning!
G
The automatic antiglare function does not
react if incoming light is not aimed directly
at sensors in the interior rear view mirror.
The interior rear view mirror and the exterior
rear view mirror on the driver’s side do not
react, for example, when transporting cargo
which covers the rear window.
Glare can endanger you and others.Warning!
G
In the case of an accident liquid electrolyte
may escape from the mirror housing if the
mirror glass breaks.
Electrolyte has an irritating effect. Do not al-
low the liquid to come into contact with
eyes, skin, clothing, or respiratory system.
In case it does, immediately flush affected
area with water, and seek medical help if
necessary.
Page 148 of 376
148 Controls in detailGood visibilityHeadlamp cleaning system*
The switch is located on the left side of the
dashboard.1 Headlamp washer switch�
Switch on ignition.
�
Press switch 1.
The headlamps are cleaned with a
high-pressure water jet.
For information on filling up the washer
reservoir, see “Windshield washer system
and headlamp cleaning system”
(
�page 243).
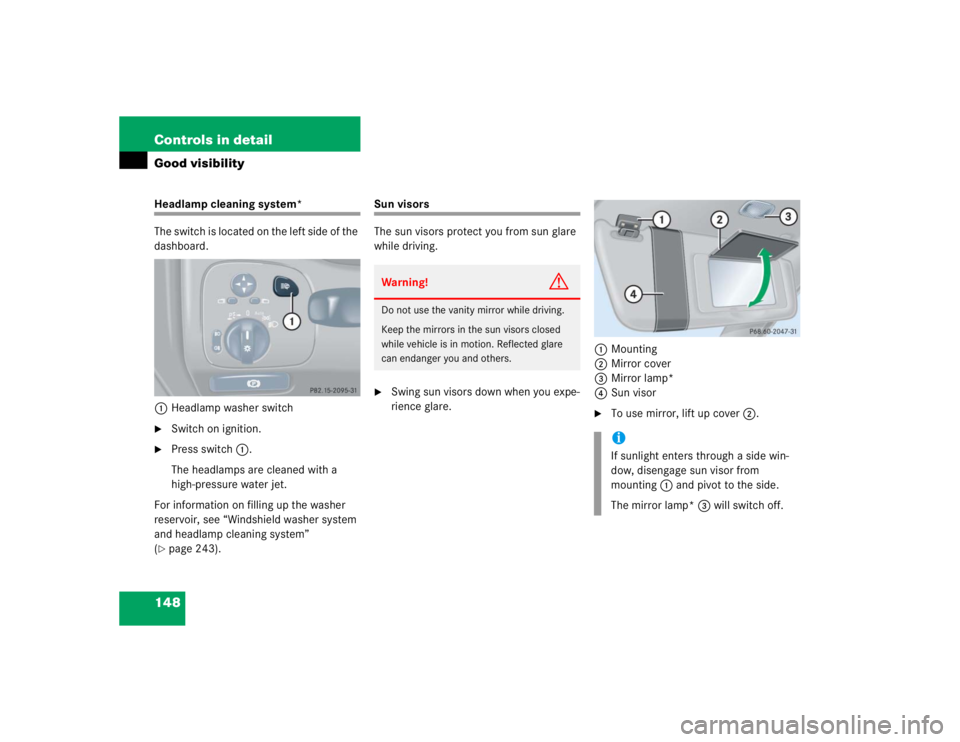
Sun visors
The sun visors protect you from sun glare
while driving.�
Swing sun visors down when you expe-
rience glare. 1
Mounting
2 Mirror cover
3 Mirror lamp*
4 Sun visor
�
To use mirror, lift up cover 2.
Warning!
G
Do not use the vanity mirror while driving.
Keep the mirrors in the sun visors closed
while vehicle is in motion. Reflected glare
can endanger you and others.
iIf sunlight enters through a side win-
dow, disengage sun visor from
mounting 1 and pivot to the side.
The mirror lamp* 3 will switch off.
Page 234 of 376
.
2 Brake fluid (fuse box cover removed)
Removing fuse")
234 OperationAt the gas station
Check regularly and before a long trip1 Coolant level
For more information, see “Coolant lev-
el” (
�page 241).
2 Brake fluid (fuse box cover removed)
Removing fuse box cover, see “Fuses”
(
�page 317).
3 Windshield washer and headlamp
cleaning system*
For more information on filling up the
washer reservoir, see “Windshield
washer system and headlamp cleaning
system” (
�page 243).
iUse only premium unleaded gasoline
with a minimum Posted Octane Rating
of 91 (average of 96 RON / 86 MON).
Information on gasoline quality can
normally be found on the fuel pump.
More information on gasoline can be
found in the Factory Approved Service
Products pamphlet.
Flexible Fuel Vehicles are identified by
a label reading Premium gasoline or
E85 only! on the fuel filler flap.
For more information,see “Flexible Fuel
Vehicles” (
�page 334).
iLeaving the engine running and the fuel
cap open can cause the ? lamp to
illuminate.
For more information , see“Practical
hints” section (
�page 260).
��
Page 237 of 376
.
The hood will lock audibly.
�
Check to make sure the hood is fully
closed.
If you can raise t")
237
Operation
Engine compartment
Closing�
Let the hood drop from a height of ap-
proximately 1ft (30cm).
The hood will lock audibly.
�
Check to make sure the hood is fully
closed.
If you can raise the hood at a point
above the headlamps, then it is not
properly closed. Open it again and let it
drop with somewhat greater force.
Engine oil
The amount of oil your engine needs will
depend on a number of factors, including
driving style. Higher oil consumption can
occur when�
the vehicle is new
�
the vehicle is driven frequently at
higher engine speeds
Engine oil consumption checks should only
be made after the vehicle break-in period.
Warning!
G
If you see flames or smoke coming from the
engine compartment, or if the coolant tem-
perature display indicates that the engine is
overheated, do not open the hood. Move
away from vehicle and do not open the hood
until the engine has cooled. If necessary,
call the fire department.Warning!
G
The engine is equipped with a transistorized
ignition system. Because of the high voltage
it is dangerous to touch any components
(ignition coils, spark plug sockets, diagnos-
tic socket) of the ignition system�
with the engine running
�
while starting the engine
�
if ignition is “on” and the engine is
turned manually
Warning!
G
Be careful that you do not close the hood on
anyone.
iDo not use any special lubricant addi-
tives, as these may damage the drive
assemblies. Using special additives not
approved by Mercedes-Benz will
restrict your warranty entitlement.
More information on this subject is
available at any Mercedes-Benz
Center.