Page 9 of 12
 SEATS
Always check the Owner’s Manual for more operating information and safety features
Seats
Seats
Quick Tips 2004 Mazda Mazda RX-8 page 16
page 17
1
456
23
Dual locking mode
lap/shoulder belt
r")
SEATS
Always check the Owner’s Manual for more operating information and safety features
Seats
Seats
Quick Tips 2004 Mazda Mazda RX-8 page 16
page 17
1
456
23
Dual locking mode
lap/shoulder belt
retractor (front passenger
and rear safety belts only)
Emergency locking mode: Belt
locksonly on hard braking/
cornering or impacts of about
5 mph or more
Automatic locking mode:
Must be used when installing
child-safety seat
To activate: Pull webbing until fully
extended from retractor until click
is heard; belt will only tighten
when released
To disengage: Unbuckle belt and
allow webbing to retract fully Manual controls
1. Fore-aft adjustment
Lift lever and hold, slide
seat, release lever
2. Raise/lower seat
Pull/push lever and release
3. Seatback angle
To adjust: Lift and hold lever, lean
forward or backward, release lever
Tip: Side-impact air bags*
deploy from outboard
side of driver and front
passenger seatbacks
WARNINGS: Do not adjust
seats while driving, you can
lose control of vehicle
Safety belts must always be
worn when vehicle is in motion
Air bags are supplemental
and do not replace safety
belt usage
Always wear your safety belt
and properly secure children
12 and under in the rear seat
Never place rear-facing
infant-safety seat in front
of any air bag, an infant is
in serious danger of being
injured or killed
If you choose to install a
forward-facing child-safety
seat in the front seating
position, move vehicle seat
as far back as possiblePower driver’s seat*
4. Raise/lower front of
seat cushion
Pull/push front of switch vertically
Fore/aft adjustment
Slide switch horizontally
Raise/lower rear of
seat cushion
Pull/push rear of switch vertically
5. Seatback angle
Press front/rear of switch
6. Lumbar adjustment*
Press front/rear of switch to
increase/decrease firmness
Seat warmer*,
see Console/Transmission
Child-safety seat
To install in rear outboard seats:
Use dual locking mode retractor
seat belts; see Owner’s Manual
for proper installation and child
seat tether and LATCH system
instructions
WARNING: Use age
appropriate child restraints,
see Owner’s Manual and
state or province laws
*Denotes optional equipment
Page 10 of 12
 CLIMATE CONTROLS
Always check the Owner’s Manual for more operating information and safety features
Climate
Controls
Trunk
Quick Tips 2004 Mazda Mazda RX-8 page 18
page 19
Trunk
To open: Use key, r")
CLIMATE CONTROLS
Always check the Owner’s Manual for more operating information and safety features
Climate
Controls
Trunk
Quick Tips 2004 Mazda Mazda RX-8 page 18
page 19
Trunk
To open: Use key, remote
trunk-lid release or remote
keyless entry fob
Remote trunk-lid release,
see Driver’s View
Remote trunk-lid
release lock-out
Switch in ON position,
remote trunk release
functions normal; OFF position
disables system; located in glove box
1. Instant Mobility System
emergency flat tire
repair kit (IMS)
†,
see Getting Started2. Jack/jack handle
3. Lug wrench
Tire economy and tips
Check pressure regularly when
tires are cold, maintain correct
front-end alignment and tire
balance; rotate tires at the mileage
shown in the Maintenance
Guide; see Owner’s Manual
for rotation chart
Tire pressure
P225/55R16 94V,
P225/45R18 91W
Front/rear: 32psi cold
Tips: Correct tire pressure ensures
safe handling and ride comfort
If you experience pull/drift while
driving, possible causes may
be road crown, tire pressure,
or wheel alignment
The suspension is sport-tuned
with firmer ride for optimum
handling and responseTire chains*
†Tire chains can damage
aluminum wheels; use on
steel wheels only
Tips: Use only SAE class “S”
chains, install only on rear
tires; install as tightly as
possible and retighten
after driving 1/4 -1/2 miles;
chains may affect handling
Never exceed 30 mph with
tire chains
132
1. Air flow selections
= air to dash
= air to dash and floor
= air to floor
= air to floor and
windshield
2. Fan control
Rotate knob between 0 (OFF)
and 4 (HIGH)
3. Temperature control
Cooler/warmer = rotate knob
counterclockwise/clockwise
4. A/C= air conditioner
Press to turn on/off
5. Air intake control
= recirculate inside air;
use for maximum cooling
= fresh air
WARNING: Do not use
position in cold
weather, windows may
fog and hamper vision
6. Rear window defogger
Press on/off; shuts off with
ignition; also operates heated
side mirrors*
Control positions for
maximum defrost
Fan to maximum, temperature to
maximum hot, selectedTips: To help prevent windshield
fogging in humid weather,
select before starting engine
To prevent moisture buildup,
never drive with system off
Objects placed under the
front seats may interfere
with air flow to the rear
7. Front windshield
defogger
A/C switches ON and air
intake switches to fresh air
A/C01
2
3
4MODE
4231
756
*Denotes optional equipment†See Owner’s Manual
Luggage
compartment
internal safety
release
Allows you to escape
should you become locked in trunk
Slide illuminated release lever in
direction of arrow; lever will glow
if it has been exposed to light
Located on interior trunk lid
OFF ONTRUNK OPENER
Page 11 of 12
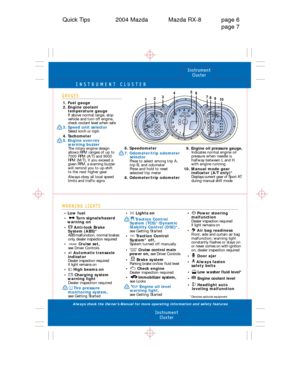
 AM/FM STEREO/CASSETTE/CD
Always check the Owner’s Manual for more operating information and safety features
Audio
Systems
Audio
Systems
Quick Tips 2004 Mazda Mazda RX-8 page 20
page 21
6. SEEK/TRA")
AM/FM STEREO/CASSETTE/CD
Always check the Owner’s Manual for more operating information and safety features
Audio
Systems
Audio
Systems
Quick Tips 2004 Mazda Mazda RX-8 page 20
page 21
6. SEEK/TRACK/APC
Radio: Press to
automatically seek higher/
lower frequency
CD: Press to select
next/previous track
Tape: Press to
automatically advance tape to
beginning of next selection/
replay selection; to stop this
operation, press button again
7. LOAD*
To load multiple discs: Press
and hold LOAD (7) until
beep is heard; insert CD
when “In” is displayed
To eject disc: Press Eject (14)
To eject specific disc: Press and
hold Eject (14) until beep is
heard; within five seconds
press the desired tray
number 1-6 (15)
/
/
/
1. Power/Volume
Press to turn on/off; rotate
to increase/decrease volume
Tip: Press (8) and (9)
together to turn radio on
2. Repeat
Press to replay current CD/
tape selection
3. Disc up
†
Press to skip forward to
beginning of next CD
4. Disc down
†
Press to skip back to beginning
of previous CD
5. Tune/Auto-Memory
Tune: Rotate counterclockwise/
clockwise for lower frequency/
higher frequency
Radio: Press and hold until a
beep is heard; system auto-
maticallyscans and temporarily
stores six strong stations in each
band; press again to cancel
11. CD
Press to play CD
12. Tape*/MD*
Press to play Mini-disc Player/
cassette tape
13. DISP*
Press: Changes display during
MD play
14. CD eject button
15. Memory preset buttons
To set: Tune to station, press
and hold until beep is heard
16. Mini Disc slot*
17. Eject button*
18. Cassette door*
19. Dolby® Noise Reduction*
Reduces tape noise and hiss;
press to activate/deactivate
20. Scan
Press to briefly sample next
listenable selections; functions
in all modes 8. FM1/2
Press to select between FM1/FM2
station preset buttons (15)
9. AM
Press to select AM frequency band
10. CD slot
Tip: Automatic Level
Control (ALC) automatically
adjusts audio volume/quality
depending on vehicle speed
22. Fast forward
Press to fast forward through
a track
23. Reverse
Press to reverse through a track
24. Program Random
†Press to enable/cancel
Clock
To set: With ignition in ACC or ON
position, press (B) and hold until
beep sounds; 12 hr/24 hr will be
displayed; press (A) to select; press
(B) again while selection is flashing:
Hr ADJUST displays; press (A) to
select hr; press (B) when done,
do the same to set minutes
21. Text/Audio Control
Audio control: Press to select
BASS/MID/TREBLE/FADE/
BALANCE/BEEP ON/ALC OFF/
ALC LEVEL 1, 2, 3/AUDIO PLT
ON**; rotate right/left to
adjust selected feature
*Denotes optional equipment
**Bose audio system only
†For use with cassette tape player,
MD player, or CD changer*
171918
6 5 4 3 2 1RPTPROG
RDM
DISC DISC SEEK
TRACK
APC
SETDISP AMB
LOADCLK AM CD
VOLTAPE/MD FM 1/2
SCAN
TEXT/AUDIO CONT TUNE/AUTO-MPUSH
POWER
1312891011
BA714
521
MINI DISC
1617
6
15
4222332241
20
Page 12 of 12
 UNDER HOOD
Always check the Owner’s Manual for more operating information and safety features
Under Hood
Quick Tips 2004 Mazda Mazda RX-8 page 22
page 23
1. Engine oil filler cap
SAE 5W-20
Remove")
UNDER HOOD
Always check the Owner’s Manual for more operating information and safety features
Under Hood
Quick Tips 2004 Mazda Mazda RX-8 page 22
page 23
1. Engine oil filler cap
SAE 5W-20
Remove engine cover (12) to
access engine oil dipstick and
oil filler cap
2. Automatic transmission
fluid dipstick*
Check with engine on at
operating temperature; fluid
level should be within cross-
hatched area/between top two
notches on dipstick
3 . Brake/Clutch* fluid reservoir
Fill to MAX mark with DOT 3
fluid; check with cap on
4. Battery
5. Fuse block
6. Air filter
7. Hood support rod
8. Hood latch
Push hood latch to the left,
open hood9. Engine coolant reservoir
Level should be between Fand
Llines when cold
WARNING: Never remove
coolant reserve tank cap
while engine is running or
hot; you could get burned
10. Engine oil dipstick
Check with engine off and at
operating temperature; fluid
level should be between Fand
Lmarks on dipstick
11. Windshield washer
reservoir
Fill with windshield
washer fluid
12. Engine cover
Break-in period
First 600 miles: Drive at varying
road and engine speeds; avoid
full throttle, rapid acceleration
or kick-down of transmission
Do not use special “break-in” oils
Anti-lock Braking System (ABS)*
ABS automatically reduces
hydraulic pressure to any wheel
on the verge of locking up
You may feel a slight pulsing of
the brake pedal and hear a
clicking noise; this tells you the
ABS is functioning properly;
increase pressure on pedal for
maximum braking
Tips: Maintain constant
pressure on the brake pedal
Do not pump the brakes
ABS self test*
A self-diagnostic test is performed
when starting; you may feel some
brake pedal pulsation and hear
some noise, this is normalUnique driving conditions
†
Every 5,000 miles change oil/filter,
inspect coolant level, lights, brake/
clutch fluid, tire pressure/wear,
locks/hinges and washer fluidNormal maintenance
notes
Rotate tires every 7,500 miles or
sooner if needed; replace cabin air
filter every 25,000 miles or 24 months
A.Change: Engine oil/replace filter
Lube: Locks and hinges
B.Inspect: Disc brakes
C.Inspect: Drive belts, fuel lines,
hoses, and connections, brake
lines and hoses, steering
operation and linkages, front
and rear suspension ball joints,
driveshaft dust boots, chassis
and body bolts, exhaust system
heat shields, cooling system,
and bolts and nuts on seat
D.Replace: Air filter, spark plugs
E.Clean: Air filter
F. Replace: Manual transmission
and rear differential oil,
engine coolant
1.3-liter 13B
*Denotes optional equipment†See Owner’s Manual
211210311
856974
7,500 miles
15,000 miles
22,500 miles
30,000 miles
37,500 miles
45,000 miles
52,500 miles
60,000 miles
67,500 miles
75,000 miles
82,500 miles
90,000 miles
A A A
A
A B C F A E A B A D
A B C E
A
A B E
A